
![]() Estimated Read Time: 6 minutes
Estimated Read Time: 6 minutes
Sections in this article:
Note: For an interactive introduction to workflows in Gatekeeper, take our Introduction to Workflows course. You must be logged into Gatekeeper to access this course.
Phases are stages in a workflow, representing specific steps, such as Procurement Approval or Compliance Reviews. You can add as many phases as required in your workflows, however, it is recommended to avoid adding excessive or unnecessary phases, as this may introduce unnecessary complexity to the process.
All workflows contain at least three types of phase:
- Start Phase: Initiates the process and collects the information needed to begin.
- In Progress Phases: Where the work happens, including reviews, approvals, and collaboration.
- Done Phase: Wraps up the process and finalises updates to records in the Vault.
By default, a Start Form and Workflow End will be added to all blank workflows. These can be renamed and edited.
Add a Phase
Note: Users require the Workflow Administrator additional permission to configure workflows. See Workflow Authorisation Overview to learn more.
To add a phase to a workflow:
- Open the workflow.
- Click Add in the New Phase column.

- Complete the core details for the phase:
- Enter a title.
- Add a label and description if required.
- If this is an end phase (e.g. a rejected phase), select the This phase is an end of process checkbox.
- Click Save & Next.
This will add the phase between the Start Form and Workflow End phases. Repeat this process for as many phases as needed.
Reorder Phases
To change the order of phases:
- Click the Reorder Phases icon.

- Drag and drop the phases into the desired position.
- Select the Minimise checkbox if you want the phase to be minimised by default. Users can then click to expand this if needed.
- Once finished, click Update.
Note: Reordering phases changes how they appear on the board visually, it does not affect card routing. The order cards move through phases is controlled by transition rules, not their position on the board.
Configure a Phase
To edit the settings for a phase, click on its title.

You can then configure the phase using the sections on the right of the screen. These settings determine how cards behave in this phase.

Core
This contains the basic details for the phase. You can:
- Edit the title
- Add a label and description
- Select whether the phase is an end phase
- Add checklist items
- Configure display settings
- Allow risks and events to be displayed and managed
- Delete the phase

Form Access
Configure the authorisation type and ownership settings for the phase, including auto-assign rules and backup owner settings. See Workflow Owners Overview for further details.

Notifications
Here, you can select who will receive notification emails for the phase.
- Email notifications: notify the selected recipients when the card arrives in this phase.
- Email reminders: remind the selected recipients every X days after the card arrives in the phase.

See Configure Workflow Notifications for further details.
Form
Here, you can add sections to your workflow form, and set each section as Read only, Hidden or Editable for this phase.
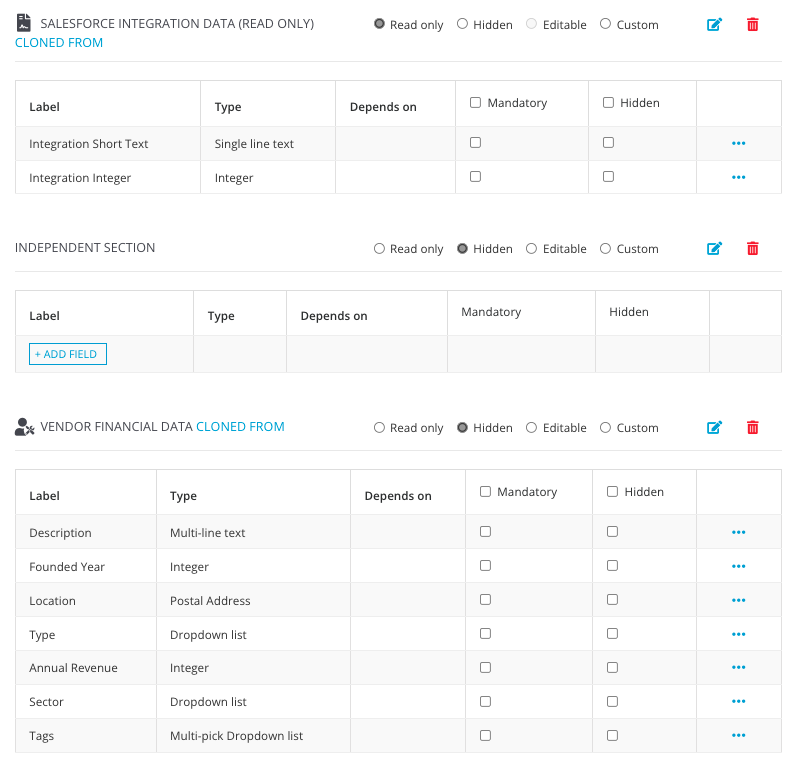
See Set up a Workflow Form for a step-by-step walkthrough.
Approval
Here you can select whether the phase is an approval phase or not.

To learn more, see Configure Workflow Phase Approvals.
Transitions
Set the rules that determine which phase the card is automatically routed to when exiting the current phase.
They can be straightforward, for example when the approval is given, move the card forward. Alternatively, they can be conditional, routing cards differently based on the data collected (for example, sending a high-risk vendor to an extra review phase that a low-risk vendor would skip entirely).

See Configure Workflow Transitions for a full overview.
Actions
Here, you can select the relevant workflow actions. This is generally a task that a user can perform on the workflow which affects something outside the workflow.

To learn more, see Configure Workflow Actions.
SLA
Here, you can configure an SLA timer to keep track of your cards and automate escalations. 
See Workflow SLA Timers for further details.
Delete a Phase
To delete a workflow phase:
- Click the name of the phase to edit it.
- From Core, click Delete.

A phase cannot be deleted if any of the following apply:
- It is the Start Form phase
- A live card is currently in the phase
- An active transition references the phase
Note: This action cannot be undone. Deleting this phase will permanently remove it from the workflow.
FAQs