LuminIQ - Create Contracts Using Lumin Extract
This article walks you through the steps of contract record creation using Lumin Extract.
![]() Estimated Read Time: 5 minutes
Estimated Read Time: 5 minutes
Sections in this article:
- What is Lumin Extract?
- Which Fields Can Be Extracted Using Lumin Extract?
- Configure Default Contract Values
- Create a Contract with Lumin Extract
- Lumin Extract Troubleshooting
Note: This must be enabled by an administrator before it is available to users. See Configure LuminIQ for step-by-step instructions.
To learn about creating a card from a contract document within workflows, see Create Workflow Cards with Lumin Intake.
What is Lumin Extract?
Lumin Extract creates new contract records by automatically extracting the key metadata from contract documents. From the Lumin Extract area, you can upload files and track the progress. Each file will move through three stages:
- Processing - It will take a few minutes to receive the document, capture the plain text, then analyse the content to extract key metadata values.
- Ready for review - Gatekeeper automatically creates a contract record using the extracted metadata, and applies default values if any fields are unavailable. The file will automatically be set as the master record. You can then review the uploaded document side-by-side with the extracted metadata, and confirm or update the extracted details.
- Completed - Gatekeeper will update the contract record with any changes you made during review, and the file will move into the Completed column.
Note:
- If the contract is from a vendor that doesn't exist in Gatekeeper, a new vendor record is created automatically.
- If the vendor already exists, the contract is automatically associated with it.
- If a vendor with a variation of the name already exists (for example, if Lumin extracts the value Ernst & Young while the existing vendor name is Ernst and Young), Gatekeeper links the contract to that vendor rather than creating a new record.
Which Fields Can Be Extracted Using Lumin Extract?
Lumin Extract can extract the following fields from the core data model:
- Contract Name
- Vendor Name
- Currency
- Annual Value
- Contract Type
- Category
- Entity
- Contract Dates
Additionally, custom fields that you have configured can be extracted. See LuminIQ - Custom Data Extraction for further details.
Configure Default Contract Values
Before using Lumin Extract, you must configure the default values. These are fallback values that are used to populate contract records when Lumin Extract cannot extract a value from the uploaded document. These act as a backup, and will only be applied if no value is found during extraction. To configure this:
- From the navigation menu, expand the Settings option, then click Configuration.
- Click LuminIQ.
- On the Data Extraction tile, click Configure.

- Set the default values for each field by selecting the relevant option from the dropdown list.

- To amend the options available for each field, click the cog icon to navigate to each configuration page.
- Once finished, click Save.
You can amend these values, but changes will only apply to files uploaded after the update. Files that have already been processed will not be affected.
Tip: You could add an extra option to your dropdown lists, for example, Unknown or Default. Setting this as the default value allows you to filter and review contracts where data was not extracted.
Create a Contract with Lumin Extract
Note: The file size must be less than 50MB.
To create a contract with Lumin Extract:
- From the navigation menu, click Lumin Extract.

- Drag and drop a file into the Upload File area, or click Browse to select files from your device. You can add multiple files at once if required.
- Click Extract Files to confirm.
- Once the file has been processed, review the extracted data on the left-hand side of the screen.
- If you navigated away from the screen while the file was processing, click on the card in the Ready to Review column to open it.
-png.png?width=670&height=230&name=Monosnap%20AI%20Extract%20_%20Gatekeeper%20-%20Google%20Chrome%202%20(3)-png.png)
- If you navigated away from the screen while the file was processing, click on the card in the Ready to Review column to open it.
- Update the metadata fields as required.

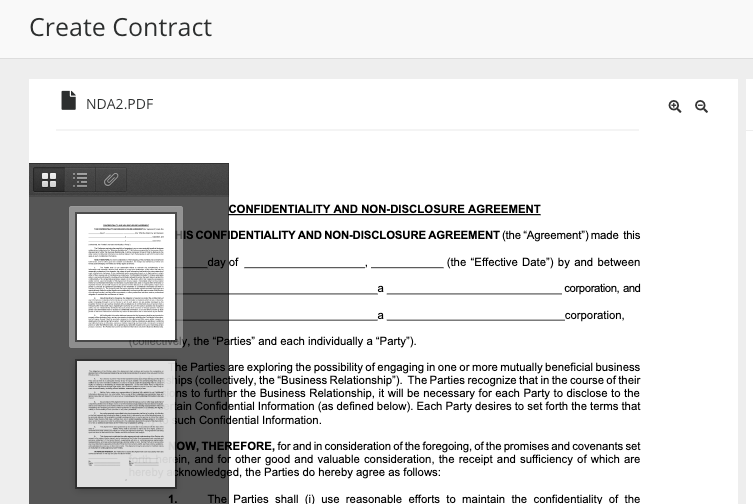
- An optional viewing sidebar tray can be shown to help quickly navigate multiple page documents by clicking within the preview pane and then pressing F4 on your keyboard.

- Expand the Owners and RAG Status sections to complete the fields as required.

- An optional viewing sidebar tray can be shown to help quickly navigate multiple page documents by clicking within the preview pane and then pressing F4 on your keyboard.
- Click Update Contract once you have reviewed the details.
Note: You cannot add relationships or new external vendor users from this view.
Gatekeeper will automatically navigate to the contract record. The uploaded file will also be directly attached to the record and assigned as the master record, available from the Files tab.

The card will remain in the Completed stage, ensuring you have a record of all files that have gone through the Lumin Extract process.
Lumin Extract Troubleshooting
If a file fails to process once uploaded to Lumin Extract, you will receive a notification email with more information and a status link.
Clicking the link provided will open a new tab with a summary inside Gatekeeper. For example, a file may be too large to process if the plain text file size exceeds 102400 bytes.
If you require further assistance, please reach out to our Global Support Team.