
![]() Estimated Read Time: 4 Minutes
Estimated Read Time: 4 Minutes
Sections in this article:
- Enable the Vendor Portal
- Access the Vendor Portal
- Enable 2 Factor Authentication
- Manage Registration Settings
- Assign Vendor Portal Administrators
- Restrict Email Address Editing
- Customise the Invitation Email
- Add Useful Links
- Edit the Vendor Label
For an introduction to the Vendor Portal, see the Vendor Portal Overview.
Enable the Vendor Portal
- From the navigation menu, expand Modules and click Vendor Portal.
- Enable the Vendor Portal toggle.

Access the Vendor Portal
After enabling the Vendor Portal , copy the URL provided. Vendor Portal users can paste this address into their web browser to open the Vendor Portal. 
Enable 2 Factor Authentication
By enabling 2 Factor Authentication, vendor users will be required to log in with their email and password, as well as a one-time passcode. To configure this:
- Enable the 2 Factor Authentication toggle.

- Enter the timeframe in days to define how often vendor users must complete 2 Factor Authentication when logging into the portal.

- Click Save Setting.
When logging in, vendor users see a 2FA verification screen. They are prompted to enter the one-time passcode sent to their email address.

Manage Registration Settings
You can use the Vendor Onboarding settings to manage how vendors create accounts and how their records are populated.

Enable the relevant toggles to apply each option:
-
Self Registration: Allows new vendors to self-register via the Portal, and create their own account if they do not have one already. When disabled, vendor records and associated users must be created by internal users.
-
AutoBuild: Allows vendor users to leverage AutoBuild when completing the self-registration form. AutoBuild uses publicly available information from the vendor's website to fill in key fields automatically.
-
Market IQ | Financial: Connects new vendor records created via self-registration to Market IQ Financial.
-
Market IQ | Cyber: Connects new vendor records created via self-registration to Market IQ Cyber.
Assign Vendor Portal Administrators
You can assign an internal user as a Vendor Portal Administrator, allowing them to oversee vendor interactions through the Vendor Portal Dashboard.
Note: Only Global Collaborators and Global Administrators can be selected to be Vendor Portal Administrators.
- Click Add Administrator.

- Select the user from the dropdown list.
- Click Create.
You can grant administration rights to the Vendor Portal to as many internal users as needed by repeating this process.
Once administrator rights are granted, the user appears in the Vendor Portal Administrators section. To revoke administrator access, expand the 3 dots and select Delete.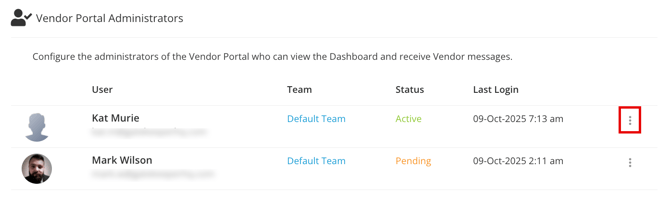
Restrict Email Address Editing
Vendor users can manage their own profile details in the Vendor Portal. You can restrict email address changes by locking email editing. To do this:
-
Click Launch Vendor User Email Control Panel.

-
Select the Lock Vendor User Email Editing checkbox.
-
Click Save.
Customise the Invitation Email
You can change the default message that is sent with the Vendor Portal Invitation email.
To do this:
- Scroll to the Vendor Invite Message section.
- Amend the message as required, then click Save Message.

You can further tailor this message on an individual basis at the point of sending out an invite.
Add Useful Links
You can add either a file or a URL as a useful link in the Vendor Portal. This gives vendor users quick access to resources such as policies, guides, or training materials. To configure this:
- Click Add Link or Upload File, as required.

- Enter a title, then add the URL or upload the file.
- Click Save.
The link is displayed in the navigation panel for all vendor users. If you need to share files with specific vendors only, you can add a folder to the relevant vendor record and share it directly with them.
Edit Vendor Label
You can rename the Vendor or Third Party label used across the platform to match your organisation’s terminology. This change updates the label everywhere it appears, including the name of the Vendor Portal. To do this, follow the instructions in Update Navigation Labels.