
![]() Estimated Read Time: 8 minutes
Estimated Read Time: 8 minutes
Sections in this article:
- Introduction
- Configure a Simple Transition
- Configure a Conditional Transition
- Move Cards Manually
- FAQs
Want to learn more? For an interactive overview of workflow transitions, head to the Gatekeeper Academy course on Transitions and SLAs.
Introduction
Transitions are the rules that determine how cards move from one phase to the next in a workflow. Rather than manually moving each card, transitions automate the routing process. You define the conditions, and Gatekeeper moves cards to the correct phase automatically when those conditions are met.
Without a transition, cards will remain on the phase indefinitely. Gatekeeper does not automatically route cards to the next phase in sequence.
Note: Users require the Workflow Administrator or Local Workflow Administrator permissions to configure workflow transitions.
There are two types of transitions:
- Simple: routes cards based on outcomes that are predefined by the phase type, for example when a form is submitted, or if a card is approved or rejected. You set a fixed destination phase for each outcome.
- Conditional: routes cards based on custom conditions you define, for example routing high-value contracts to a CEO review phase while routing lower-value contracts straight to final approval. Multiple conditions can be combined using the AND or OR operator:
- AND: all specified conditions must be met for the transition to occur.
- OR: only one of the specified conditions must be met for the transition to occur.
Configure a Simple Transition
To configure simple workflow transitions, follow the steps below:
- From the navigation menu, click Workflows and open the relevant workflow.
- Click the name of a phase to edit it, then click Transitions.
- Select the Simple radio button.

- Select the appropriate radio buttons to determine which phase a workflow card should move to for each default outcome. For example, if the card is rejected, it could be moved to the workflow end.
Changes are saved automatically.
Configure a Conditional Transition
Before configuring conditions, it's important to understand the two types of criteria you'll need to combine:
- The event that triggers the workflow to attempt a transition, for example a form submission or an approval decision.
- The data from the form that must match for the transition to apply, for example Contract Value greater than $1,000,000
To configure conditional workflow transitions, follow the steps below:
- From the navigation menu, click Workflows and open the relevant workflow.
- Click the name of a phase to edit it, then click Transitions.
- Select the Conditional radio button.

- Click Add Transition.
- Enter a name, then click Create.
- Click Add to create a condition.

- Select the required values from the dropdown lists:
- Field: the workflow form field or card attribute to evaluate, for example Annual Value or Card Approval Status
- Operator: how the field should be evaluated, for example equal to, greater than
- Data: the value you are checking for, for example Approved
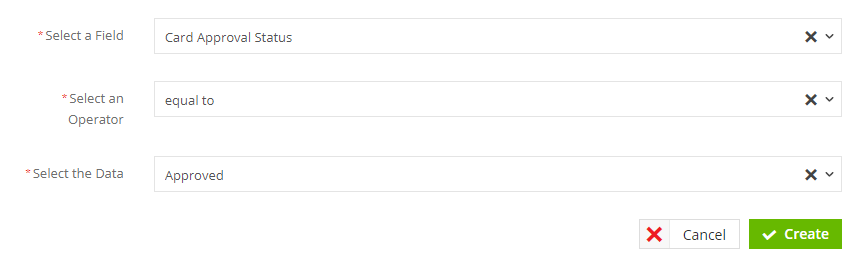
- Click Create.
- Repeat steps 6 to 8 to add further conditions to the same transition if required.
- When combining conditions, click the pencil icon next to Based on and select the appropriate operator, then click Save.
- Click the pencil icon next to Transition to Phase and select the destination phase, then click Save.
- Click the pencil icon next to Transition Status, select Live, then click Update.
- Repeat steps 4 to 11 to configure additional transitions for other routing paths.
Note: If you switch a phase from a simple transition to a conditional one, the existing simple transition rules will be automatically added as conditional transitions. You can amend these as needed.
Reorder Conditional Transitions
Gatekeeper evaluates conditional transitions in order, checking each rule from top to bottom until one is met. The first matching rule takes precedence over all others. For example, if a card matches both the first and second transition rules, it will be routed according to the first rule only.
To change the order in which transitions are evaluated:
- Click Reorder Transitions.

- Drag and drop each transition rule into the desired order.
- Click Update to save your changes.
Move Cards Manually
For closely managed processes, Workflow Administrators or Local Workflow Administrators can move cards between phases manually by dragging and dropping them on the board, without relying on transitions to route them automatically. To move a card manually, drag it from its current phase column and drop it into the destination phase column on the board.

Cards can only be dragged to a phase if all mandatory fields, approvals, and actions have been completed. However, Workflow Administrators or Local Workflow Administrators can bypass these restrictions. For example, this can be useful to skip a phase that has been completed outside of Gatekeeper.
To do this:
- Click on a card to open it.
- Click the Controls tab.
- Select the relevant destination phase and click Move.
