
![]() Estimated Read Time: 10 Minutes
Estimated Read Time: 10 Minutes
![]() Estimated Configuration Time: 1-3 hours
Estimated Configuration Time: 1-3 hours
Sections in this article:
- Introduction
- 🛠 Mandatory Configuration 🛠
- 🛠 Additional Configuration 🛠
- ⚡️ Getting Started ⚡️
- 📚 Additional Reading 📚
Introduction
This Internal Contract Request workflow allows you to fully digitise your request intake, negotiation, approval, and signing processes for new contracts. It helps ensure that every contract added to Gatekeeper is reviewed and approved by the right people, contains complete metadata, and includes a full version history of both the form and the executed contract. See the demonstration video or follow the steps below to learn more:
🛠 Mandatory Configuration 🛠
The steps in this section outline the essential setup required to make your workflow fully functional.
The ⬇️ Additional Configuration ⬇️ section covers optional additions to expand the scope of your process or tailor the workflow to better align with your organisation’s unique policies, procedures, and Gatekeeper subscription features.
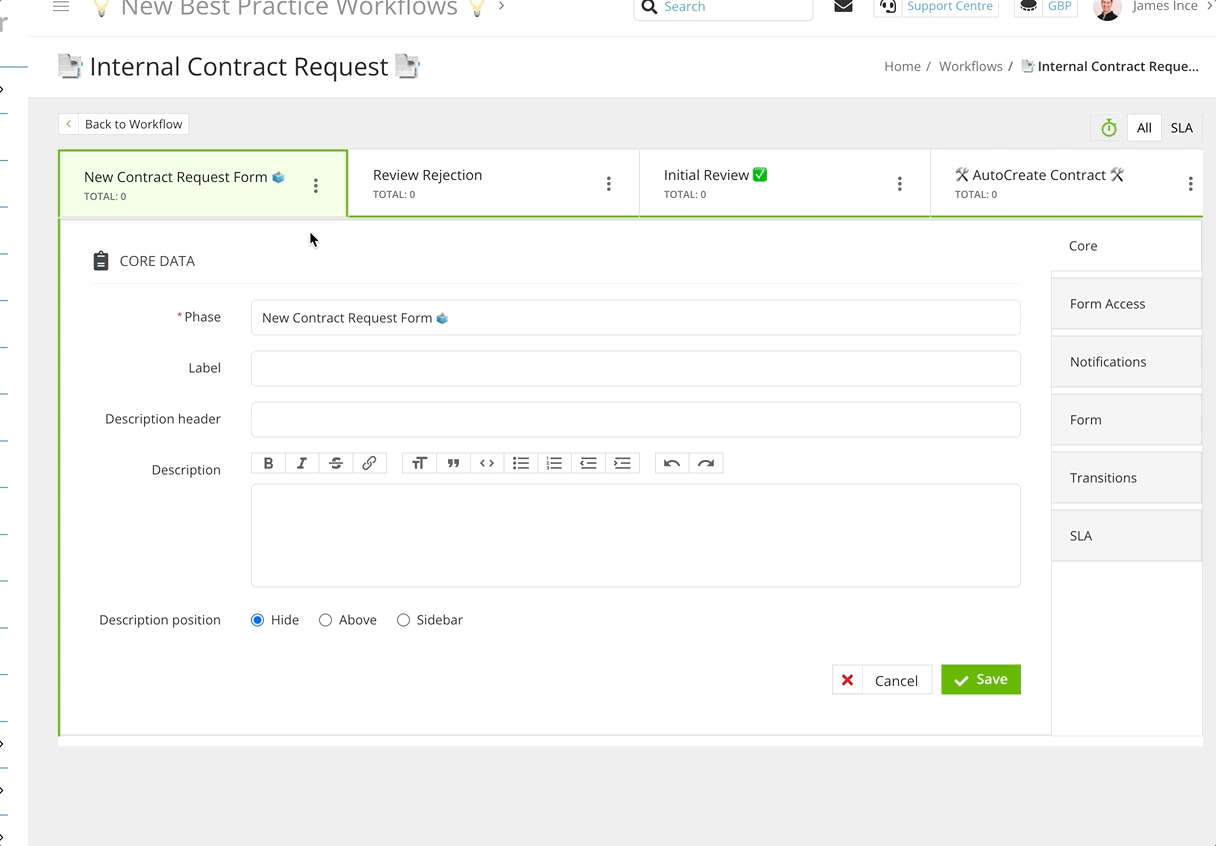
Add the Template
To get started, you'll need to add the template workflow:
- From the navigation menu, click Workflows.
- Click Add, then select Workflow Template.
- Click Create on the Internal Contract Requests template.
- Amend the title if needed, then click Create.
Configure AutoAction Values
Near the start of the workflow, an automatic action takes the contract metadata from the request form and converts it into a record in your contract repository. You can configure this action to define which metadata values are taken from the form, and which are set as default or placeholder values:
- Click the 🛠 AutoCreate Contract 🛠 phase to edit it.
- From Actions, click Edit AutoAction Values for the enabled AutoAction.
- At the top, select the Take Value from Form checkbox.
- Where needed, select backup values from the dropdown lists for any fields that may be left blank, with particular attention to mandatory fields.
-
Deselect the Take Value from Form checkbox for the Status and Approval fields. Select the values for these to be Pipeline and Awaiting Approval. This ensures that, if users view the contract in the repository, they will see that it is not yet approved or executed.
-
Click Save.

Configure Contract Templates
This workflow can use eNegotiate contract templates to create the first draft of a contract. Templates can also be generated automatically based on data provided by the requestor and initial approver(s).
Part 1 - Create the Templates
- From the navigation menu, expand the Settings option, then click Configuration.
- Click eNegotiate Contract Templates.
- Click Add MS Word Template.
- Use the Handlebar Instructions document to set up all dynamic or configurable sections in your Microsoft Word template. For detailed guidance, see 📖 Configure Contract Templates.
- Once finished, upload your MS Word template as the Document file.
- Complete the mandatory fields, then select Live from the Status dropdown list to make the template available for use in your workflow.
- Once finished, click Save.
- Repeat steps 3 - 7 until all required contract templates have been added.
Part 2 - Apply the Templates to the Workflow
- Click the 🛠 AutoCreate Draft 🛠 phase to edit it.
- From Actions, click Edit AutoAction Values on AutoAction | Generate Draft from Contract.
- Select the relevant templates you want Gatekeeper to use for this action, then click Save.

Note: Users can also manually select a template on the Draft Review 📑 phase if the AutoAction does not generate a draft.
Assign Contract Negotiation Owners
There are several steps in the contract setup and negotiation process within this workflow. Configure owners for the phases below to reflect how responsibility is normally assigned in your organisation:
| Phase | Description |
| Draft Review 📑 |
The initial draft is selected and marked up before being sent to the vendor for negotiation. If Gatekeeper has generated the draft from a contract template, users may only need to make final tweaks. If no Gatekeeper template was used, users should assign a Draft Version 1 (for example, a vendor-supplied draft), then make amendments before sending it for vendor review. |
|
Internal eNegotiate 🧑💼 |
The latest draft version will be reviewed and redlined internally. |
| Draft Finalisations ☑️ ☑️ ☑️ |
Final tidy-up of the draft, including accepting redlines, closing comments, and correcting typos, before sending the contract for final internal approval and signature. |
| eSign ✍️ |
The eSign process is initiated, including assigning signatories and configuring the document for signing. The contract can be signed using Gatekeeper eSign or via the DocuSign integration.
|
| External Signature ✍️ | Represents any contract signatures that occur outside of Gatekeeper (for example, when a vendor requires use of their own eSign tool). |
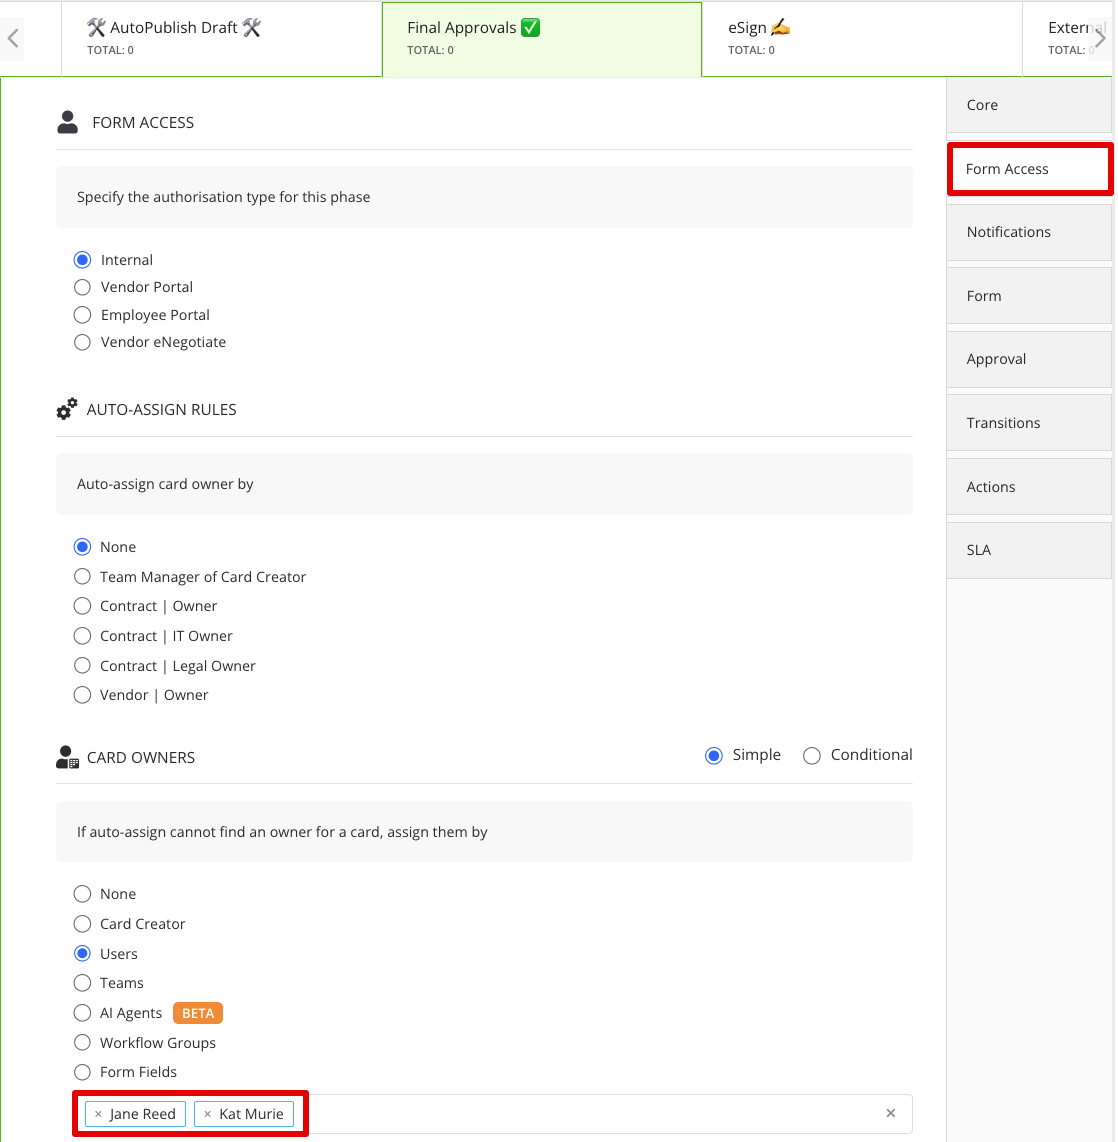
To assign owners:
- Click on a phase where the owner needs configuring to edit it.
- From Form Access, select the relevant radio button to determine how ownership is assigned.
Repeat these steps until owners have been assigned for all the phases outlined in the table.

Note: See 📖 Workflow Phase Owners Overview for more detail.
Assign Approver/s
The Final Approvals ✅ phase is the last opportunity for internal stakeholders to review the agreement before signing. Consider who should be included here:
- Which budget holder needs to review the commitment?
- Which teams need to verify compliance and risk-mitigating clauses?
- Which executives may want to approve, particularly for high-value contracts?
There are multiple options for approvals. Expand the relevant section to learn more, depending on your requirements.
Option 1: Simple Approval ✅
- Click on the approval phase to edit it.
- From Approval, ensure that the Enabled and Single radio buttons are selected.
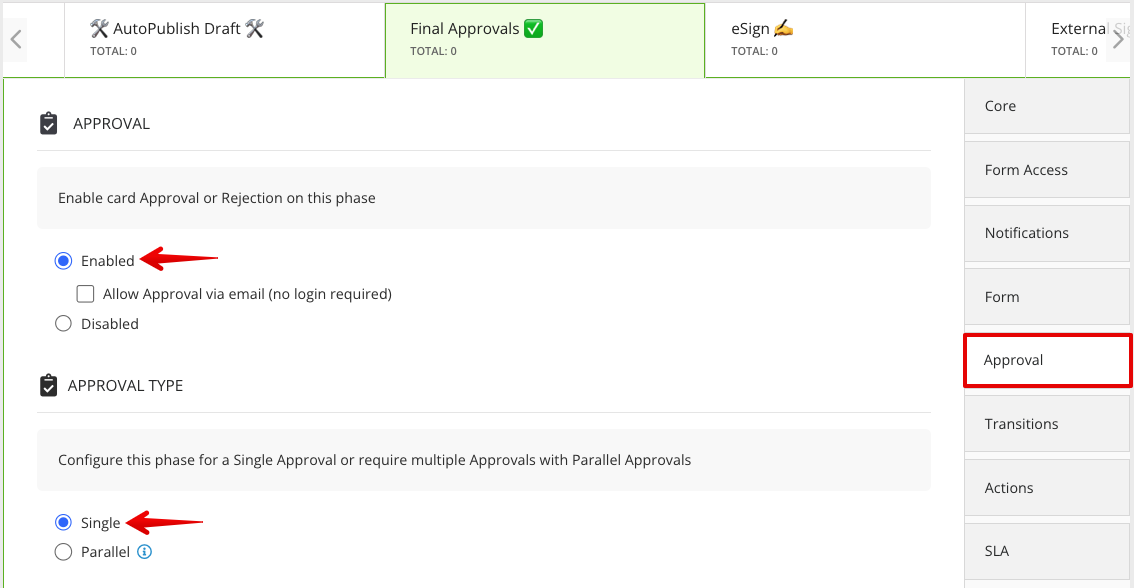
- From Form Access, select the user/group who should provide the approval. If you select multiple users or groups, only one needs to approve the request for it to progress past this phase on the Kanban board.
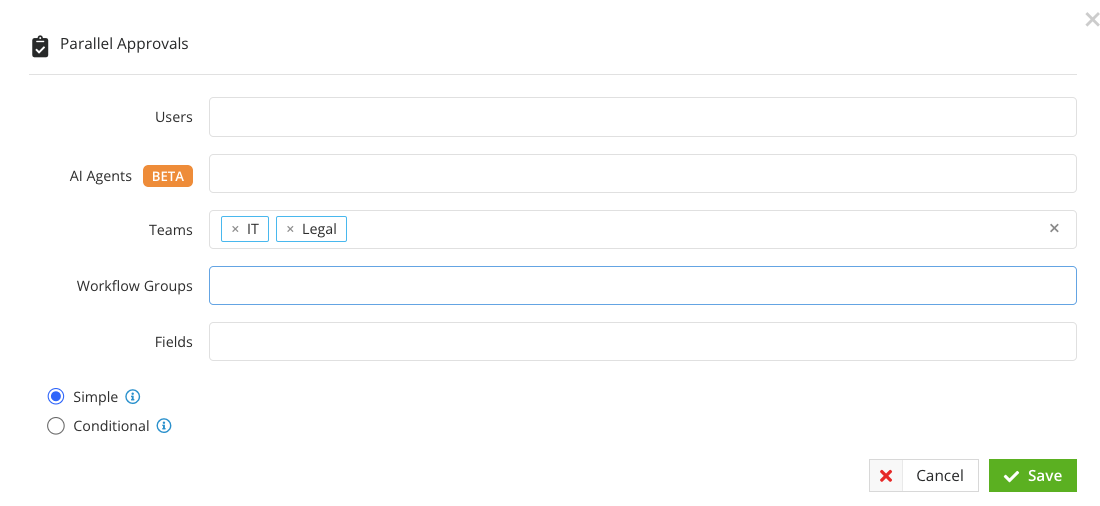
Option 2: Parallel Approvals ✅✅✅
- Click on the approval phase to edit it.
- From Approval, select the Parallel radio button.
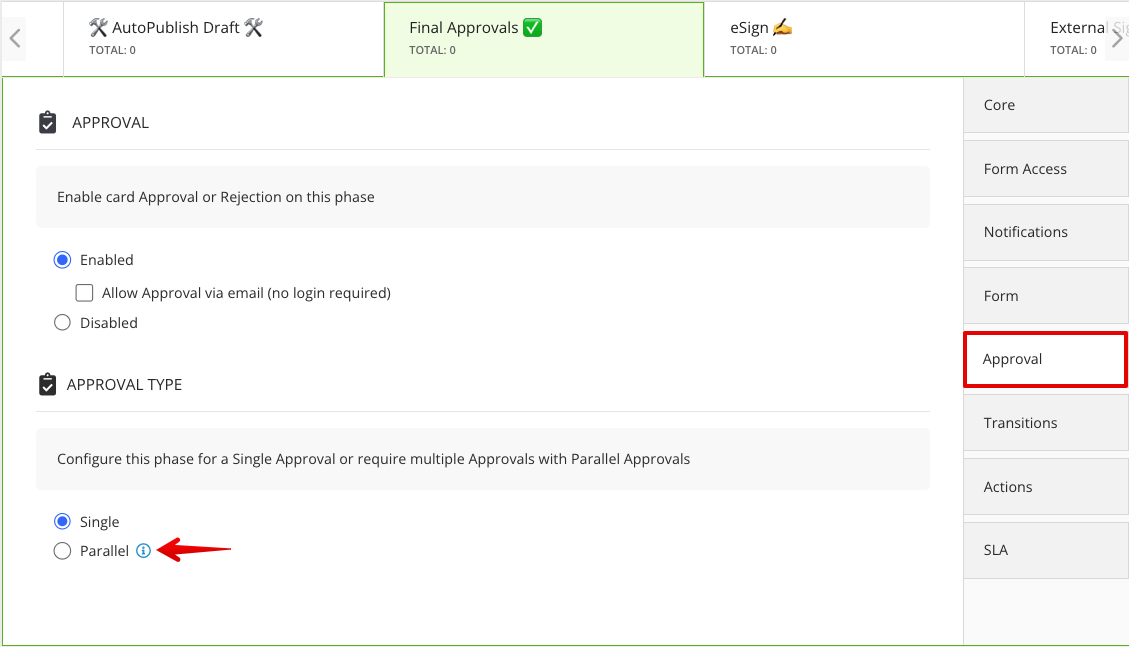
- Select the required users/groups then click Save. All selected users/groups must approve for the contract to progress past this phase.
Option 3: Conditional Parallel Approvals 🔀
- Click on the approval phase to edit it.
- From Approval, select the Parallel radio button.
- Select the required users/groups, then select the Conditional radio button and click Save.
- Click ➕ ADD to assign conditions for the selected user/group to require approval.
- Click Add New Parallel Approval and repeat until all conditional approvers are set.
Gatekeeper will evaluate each rule and apply the relevant approvers when the workflow card meets the defined conditions.
Configure Vendor Selection Options
You need to decide whether users can select new vendors when requesting contracts, or if they must choose from vendors already added and onboarded in Gatekeeper. This decision will likely depend on whether your organisation has a formal vendor onboarding process, and whether a Gatekeeper workflow is in place to support it.
Note: By default, users will have the option to select an existing vendor or enter the name of a new one. If they enter a new vendor, this will require manual input to create the vendor as the Create Contract AutoAction will fail if it cannot be linked to an existing vendor record.
Expand the relevant option to learn more:
Only Existing Vendors
- Click the New Contract Request Form phase to edit it.
- From Form, expand the 3 dots on the Vendor Name field then click the
 pencil icon.
- Select the Select Existing Dropdown Values Only radio button, then click Save.
🛠 Additional Configuration 🛠
This section covers optional steps to adjust the workflow’s scope or default settings, helping you tailor it to your organisation’s needs.
Leverage LuminIQ in Workflow Forms
With LuminIQ, data can be automatically extracted from uploaded contract documents and used to populate the core details of the form. This can be used for contract requests submitted via the Submit Requests dashboard. To enable this:
- Click to edit the start phase.
- From Form Access, select the Create Card from Contract checkbox under Lumin Intake.

Add Custom Data
By default, this workflow includes the contract and vendor core data fields. If you have created custom metadata, you can add the fields to the workflow form so that:
- The values are saved to the finalised record in the repository, and can be used for filtering, saved views, and reporting.
- The values can be pulled into a contract document when generating a draft from a contract template.
To do this:
- Click on the start phase of the workflow to edit it.
- Navigate to Form, then click ADD SECTION and enter a section name.
- Select the following from the dropdown lists:
- Predefined: Contract
- Custom Data Group: The custom group you want to add.
- Click Save.
- Click REORDER to move the new section to your preferred position in the form.

Set Visibility Rules
Once you add a form section, it will be Editable by default in the current phase, and Read Only in all other phases. You can adjust this for specific phases of the workflow if needed:
- Click the settings icon to access the Configuration View.

- To set the section visibility, hover over the relevant section box and select from the dropdown list.

- To set the field visibility:
- Hover over the section box and select the appropriate checkbox to apply the visibility to all fields within the section.
- Hover over an individual field box and select from the dropdown list to apply the visibility to fields one-by-one.
- To copy a section/field visibility settings to other phases, click the copy icon. Then, select the checkboxes to determine which phases you want to copy the settings to, and click Copy.

Set AutoAction Values
For any additional custom metadata sections, you need to ensure the contract record is updated with the values from these fields in any AutoAction phases. In the template, you may configure these values on the following phases:
- 🛠 AutoCreate Contract 🛠
This phase exists near the start of the workflow to create the contract record before the draft document is created and eNegotiate begins. -
✅ Contract Executed ✅
This is the Done phase of the workflow. It captures any updates made after the previous AutoAction and publishes them to your finalised contract records, as well as updating it to Live and Approved.
To configure this:
- Click a phase of the workflow where vendors are created/updated.
- From Actions, click Edit AutoAction Values for the enabled AutoAction.
- For any new fields, select the corresponding Take Value from Form checkbox.
- If required, select an optional backup value in case the field is left blank.
- Click Save.

Enable Office for the Web
If you have a Microsoft business account and use Office for the Web (instead of the desktop version of Microsoft Word) to review and edit Word documents, you can embed this in your workflow to streamline the draft revision cycle:
- Click an internal phase (i.e. Draft Review 📑, Internal eNegotiate 🧑💼, or Draft Finalisations ☑️ ☑️ ☑️) where you want to enable OFTW.
- From Actions, select the Office for the web checkbox alongside the Submit Draft action.
Note: As this feature requires users to log in to Gatekeeper and have Microsoft accounts, it should not be enabled for vendor users during draft review phases.

Amend SLAs
Workflow SLA Timers are used to set deadlines, automate escalations (via conditional transitions), and identify bottlenecks.
These have already been set for certain phases of the workflow:
| Phase | Default SLA Timer | Transition After Expiry |
| Review Rejection | 7 Days | ❌ Contract Rejected ❌ [Done] |
| Initial Review ✅ | 7 Days | - |
| Draft Review 📑 | 7 Days | - |
| Vendor eNegotiate 👷 | 8 Days | Draft Finalisations ☑️ ☑️ ☑️ |
| Internal eNegotiate 🧑💼 | 7 Days | - |
| Draft Finalisations ☑️ ☑️ ☑️ | 7 Days | - |
| Final Approvals ✅ | 7 Days | - |
| eSign ✍️ | 7 Days | - |
| External Signature ✍️ | 7 Days | - |
- Click the phase where you want to edit the SLA.
- From SLA, enter a value, then select the unit (hours or days) from the dropdown list.

Add Extra Phases
This template is designed to be succinct, with flexibility to expand within the pre-configured phases. For example, the single Final Approval phase can accommodate multiple reviews and approvals, depending on your team structure. However, you can also add steps to your workflow to support additional processes, such as:
- Finance e.g Raise PO
If your finance team uses Gatekeeper for information on new vendors or contracts, you can include them in the process so they are aware of agreements requiring payment and can confirm when payments are completed. - Additional Approval e.g. CEO Approval
Although the template workflow can run multiple approvals in parallel through the Final Approvals phase, if you need a specific user or team to complete a standalone review, you can add a dedicated phase to the workflow. This can be configured with conditional transitions, e.g. If contract value is greater than £100,000, transition to CEO Approval. - Fast Track e.g. Fast Track Completed [Done]
This workflow is primarily for contract requests that require setup, negotiation, approval, and signing in Gatekeeper. However, you may receive requests that do not follow this standard process, such as small, simple, or low-risk contracts that do not require approval, negotiation, or signing. Adding this phase would allow these forms to be completed with no further tasks after the Initial Approval phase.
To do this:
- Navigate to the right hand side of the workflow board.
- Next to New Phase, click ADD.

- Enter a phase title and description if needed, then click Save & Next.
- Click
 Reorder to move the phase to the appropriate point in your workflow.
 - Complete the configuration for the phase depending on its purpose, and reconfigure transitions from other phases to ensure your new phase is included in the end-to-end form workflow.
See 📖 Add Phases to a Workflow for more guidance.
⚡️ Getting Started ⚡️
Once your workflow is fully configured, follow the guidance below to start using it:
If using the Employee Portal
Once your workflow is configured, users can initiate a new contract request via the Submit Requests dashboard. To share the form URL, right-click the Request button to copy the link.
If using a Public Form
You will need to copy and distribute the form URL. To do this:
- Click the start phase of the workflow to edit it.
- From Form Access, copy the URL to share with users.

Additional Reading 📚
- ⚡️ Gatekeeper Expert - Only Onboarded Vendors - Learn how to mandate that users onboard a vendor before a contract can be requested.
- ⚡️ Gatekeeper Expert - Parallel Workflows 1 - Learn how to automatically run a new vendor onboarding workflow in tandem with this contract approval to shorten the delivery time for new relationships.
- Create a Contract Template - Learn how to set up contract draft template documents.