
![]() Estimated Read Time: 4 minutes
Estimated Read Time: 4 minutes
Sections in this article:
- Introduction
- Step 1: How Does the Process Start?
- Step 2: The Phases
- Step 3: What Happens in Each Phase?
- Step 4: The Transitions
- Step 5: The Final Details
Introduction
Workflow diagrams are a valuable first step when setting up a new Gatekeeper workflow. They help you:
- Visualise the underlying configuration and process behind the Kanban board
- Capture and organise all requirements clearly before build
- Help new users and collaborators understand the high-level process
- Strengthen your workflow design by validating scenarios and compliance requirements
Once the workflow is built, the diagram remains a useful reference for reviewing the design without needing to click through each phase to assess the configuration. It can also help Gatekeeper provide faster, more effective assistance with any queries.
This article outlines a five-step process to capture your business requirements and map them into a visual representation of how they will function in Gatekeeper.
Note: If you're unsure which diagram tool to use, Gatekeeper recommends Lucidchart or draw.io as a free-to-use alternative.
Step 1: How Does the Process Start?
Understanding how a process begins is an essential part of mapping out a workflow. In Gatekeeper, workflows can be configured to start automatically based on predefined conditions (known as Triggers), or manually by users through methods such as Public Forms, Employee Portal Forms, or Touchless Forms.
Before designing the Kanban board, decide how the workflow will be initiated and capture this in your diagram:
- Triggers: Gatekeeper checks contract and vendor records, and if a trigger’s criteria are met, the record is automatically pulled onto the workflow as a new card. For example, a renewal workflow could have date-based triggers like Notice Period Date occurs in 30 days, or a vendor onboarding workflow could have a trigger that fires when a vendor user self-registers on the Portal.
- Employee Portal Form / Public Form / Touchless Form: These forms allow workflow cards to be created manually. When a form is completed within Gatekeeper or via a public URL, a new workflow card is created. For example, an internal contract request workflow could be initiated by a user submitting a request form in the Employee Portal.

For more details on initiating a workflow process, see the Workflow Initiation Overview.
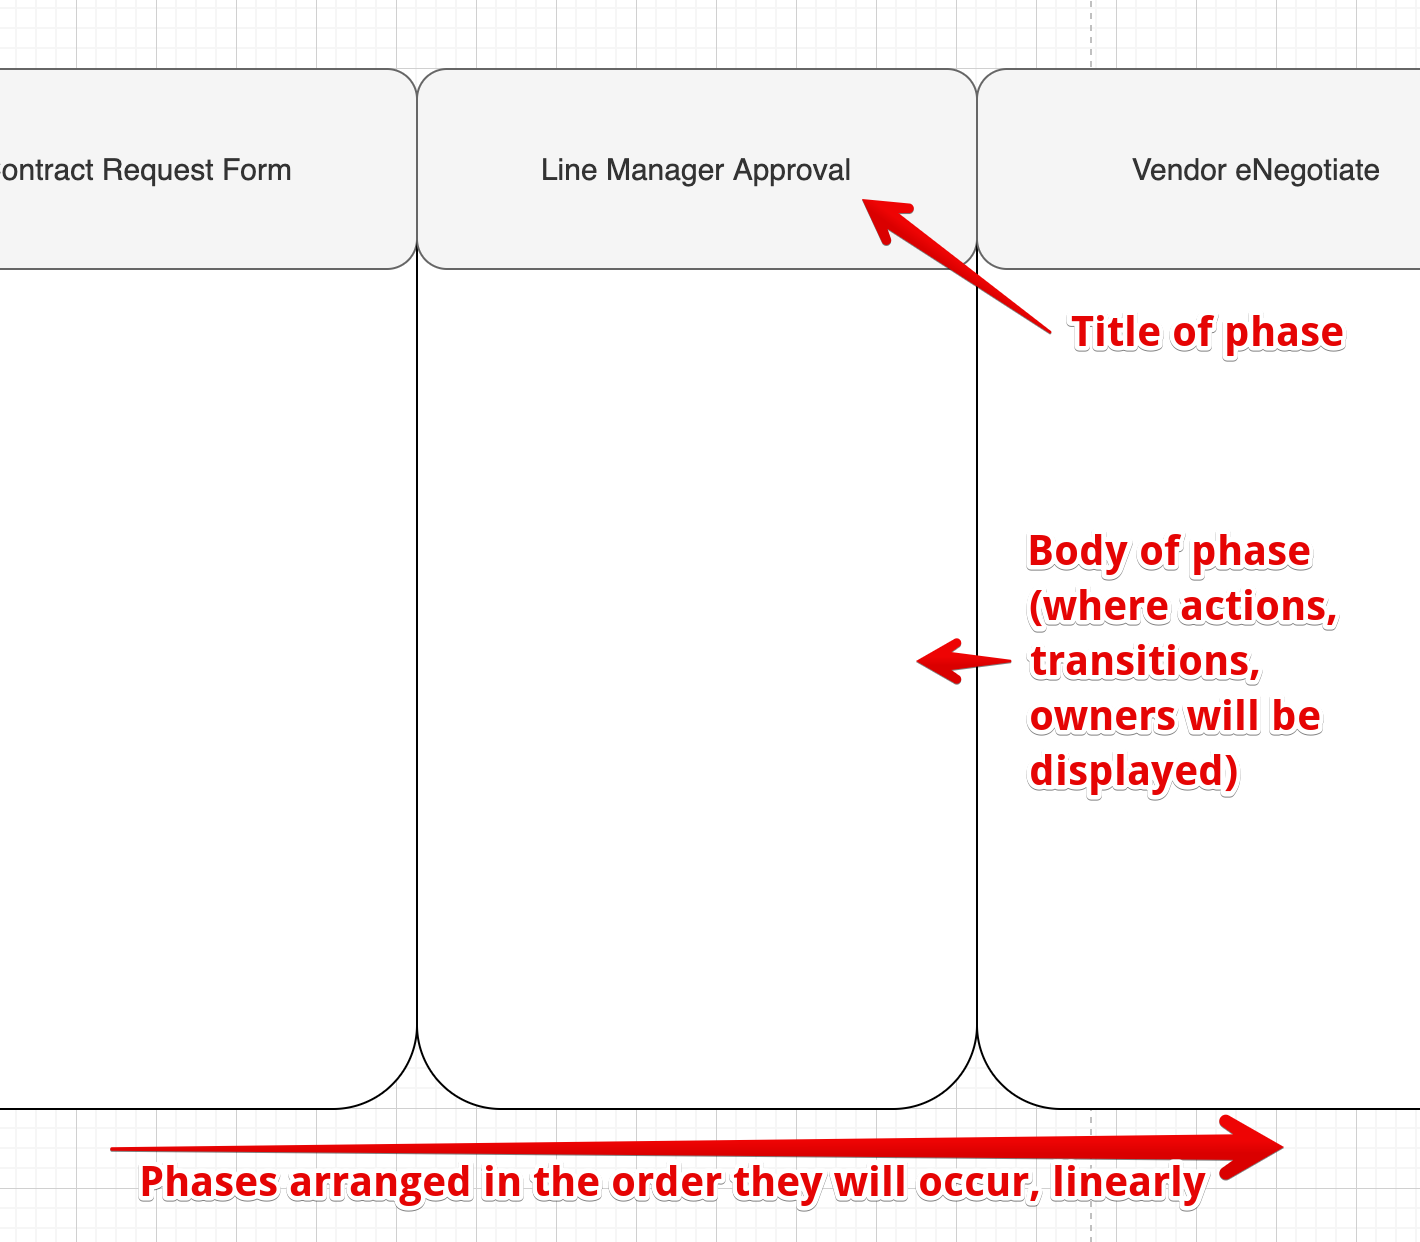
Step 2: The Phases
After defining how the workflow starts, it’s time to structure the process using phases, i.e. the core building blocks of a Gatekeeper workflow.
💡 If you're new to workflows, it helps to understand how Gatekeeper workflows are constructed or to have reviewed an example of a fully built workflow. This gives you context for what an end-to-end process looks like in practice.
In Gatekeeper, phases refer to the stages of a workflow shown on the Kanban board. These may also be known as swimlanes or checkpoints. A useful way to think about phases is as a series of queues. Cards generally move from left to right on the board, aiming to reach a Done phase. But first, they must pause in each phase to complete a specific task, whether it's gaining approval, drafting a contract, or submitting a form.
To design effective workflow phases, follow these guidelines:
- Name each phase based on the action and responsible party. For example: Line Manager Approval, or Legal Team Draft Review
- Lay out the phases in your diagram to reflect the left-to-right structure of a Gatekeeper workflow.
The list below outlines common categories that workflow phases can fall into. While these categories help guide your design, keep in mind that phases can vary - and sometimes combine multiple actions within the same stage.
- Form Submissions: Used to gather key data from stakeholders throughout the process. This information is often essential for building metadata records.
- Approvals: A stage where a specific user or team must review and approve the request before it can proceed.
- Contract Draft Actions: Covers phases related to contract drafting and signing - typically used in eNegotiate or eSign workflows.
- Metadata Actions: These phases update the Gatekeeper repository, either by creating new records or modifying existing ones, based on earlier form submissions. This can be done manually, or automatically using an AutoAction.
- Done Phases: These represent the end of the process, where no further manual input is required. Automated events like notifications or AutoActions may still occur.
To learn more, see Add Phases to a Workflow.
Step 3: What Happens in Each Phase?
Once you’ve mapped out the phases of your workflow, the next step is to identify the key tasks that take place within each phase. At this point, you’ve likely already considered what happens at each stage, now it's time to map these in your diagram. This includes:
- Form submissions: where users submit or update data.
- Approvals: where users provide sign-off.
- Actions: manual or automated (AutoActions) tasks performed within the workflow, for example creating a new contract record.
To improve readability, it's recommended to use a distinct visual indicator for each type. Use the table below for guidance:
| Shape | Example | Description |
| Circle | 
|
Can be used to represent the start of the process, for example the trigger that launches the workflow. |
| Document | 
|
Information being captured, i.e. the form/questionnaire the user fills in. |
| Diamond | 
|
A decision point for approving or rejecting a card, or where exception paths branch off. |
| Rectangle | 
|
A submission phase with a single Submit button and one way out. |
| Database | 
|
An action that updates the underlying record, for example writing new end dates and values back to the contract record at the end of a renewal workflow |
See Configuring Workflow Actions for further details.
Step 4: The Transitions
While a Kanban board is typically laid out in the expected order of tasks, it’s important to define exactly how a card moves between phases. This helps capture both the standard path and any alternate routes a workflow may follow.

One reason to map transitions is to show what events can move a card forward. In Gatekeeper, these include:
- Standard transitions
- Forms being completed and submitted
- Action-based movements, for example Update Contract Record or eSignatures being completed
- Approvals/Rejections
- SLA Timers (see Configure SLA Timers for further details)
- Conditional Logic: Gatekeeper transitions can be configured to route cards based on specific data.
Example: Cards only enter a Line Manager Approval phase if the contract value is over £10,000. If the value is lower, the card skips this step. - Dynamic Actions: In some workflows, user actions can lead to different transition paths.
Example: If a card is approved in a Line Manager Approval phase, it moves to an AutoCreate Vendor phase. If the card is rejected, it is sent back to the original card requester for updates.

For more detail, see Configure Workflow Transitions
Step 5: The Final Details
With the core requirements documented, the final step is to add the details needed to fully leverage Gatekeeper’s workflow configuration options.
Consider capturing the following elements in your diagram:
- Workflow title
- Phase owners
- Notification recipients
- Automated reminder emails
- SLA Timers
- AutoArchive Timers for cards on a Done phase
- Phase instructions for users (if necessary)
- Connection points with other systems (if necessary)