
Learn how to setup this powerful integration and begin syncing Gatekeeper onboarded vendors into NetSuite
In this article:
Netsuite Setup Steps
Enabling the Spend Integration in your Sandbox
Gatekeeper Setup Steps
Sync Vendors From the Repository
Sync Vendors to Netsuite via Workflows
Viewing Netsuite synced Vendors in Gatekeeper
Troubleshooting
Installation Prerequisites
A number of features must be enabled in NetSuite before installing Gatekeeper’s SuiteApp.
- As an Administrator, navigate to Setup > Company > Enable Features:

- Locate the SuiteCloud sub-tab:

- Under the section Manage Authentication, ensure that the following features are enabled:
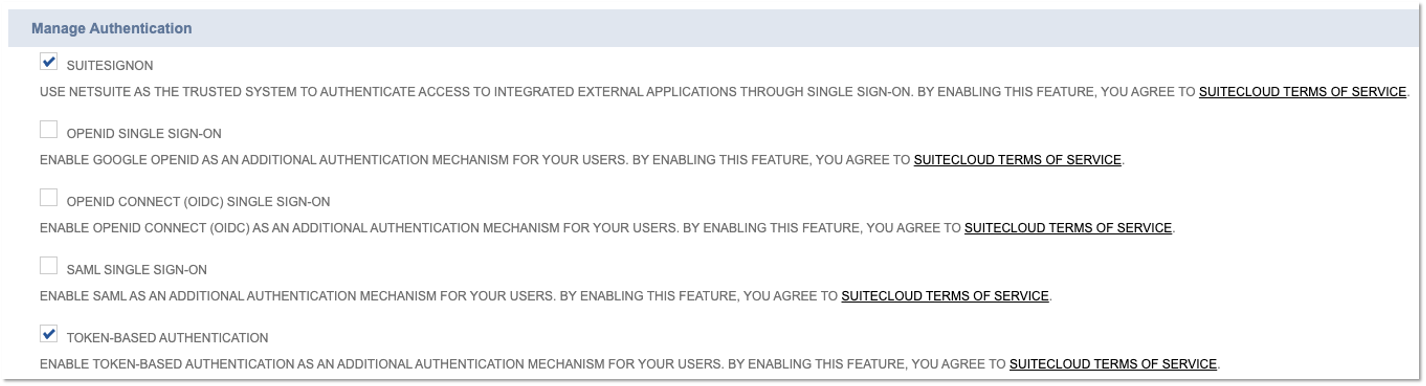
- Review and agree to the Terms of Service.
- Under the section SuiteTalk (Web Services), ensure that the following features are enabled:

- Under the section SuiteCloud Development Framework ensure the following features are enabled:

- Review and agree to the Terms of Service.
- Click Save.
Installation
Gatekeeper’s SuiteApp is available from the SuiteApp Marketplace and may be installed by following these steps.
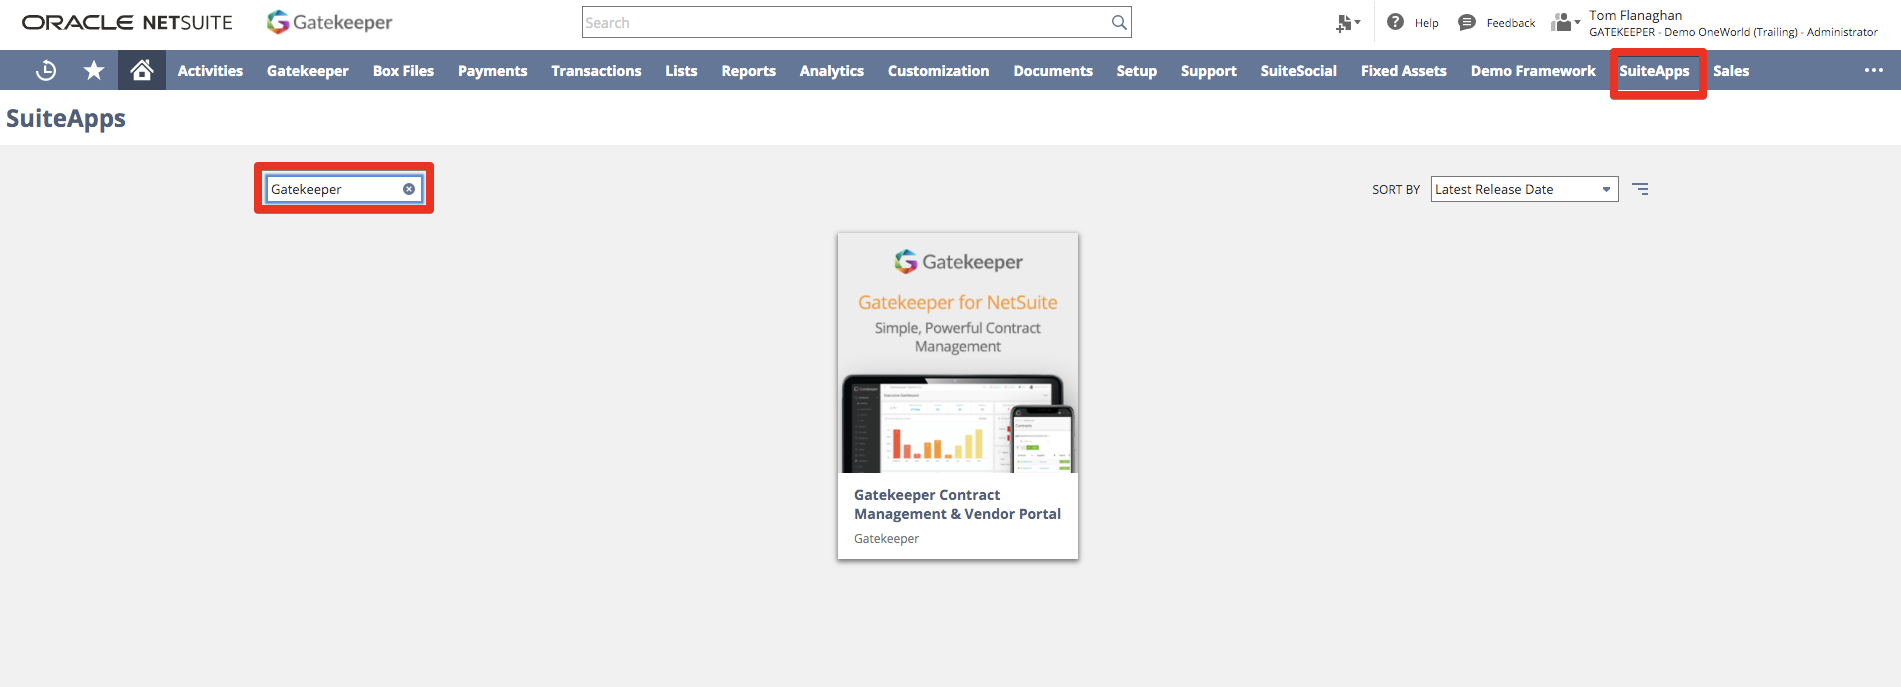
- Navigate to the SuiteApp Marketplace by either:
- Clicking on SuiteApps in the navigation bar (if available):

- Typing SuiteApp into the global search and selecting SuiteApp Marketplace:

- Clicking on SuiteApps in the navigation bar (if available):
- Locate the Gatekeeper SuiteApp using Search Apps and then click on the icon:
- Click Install:
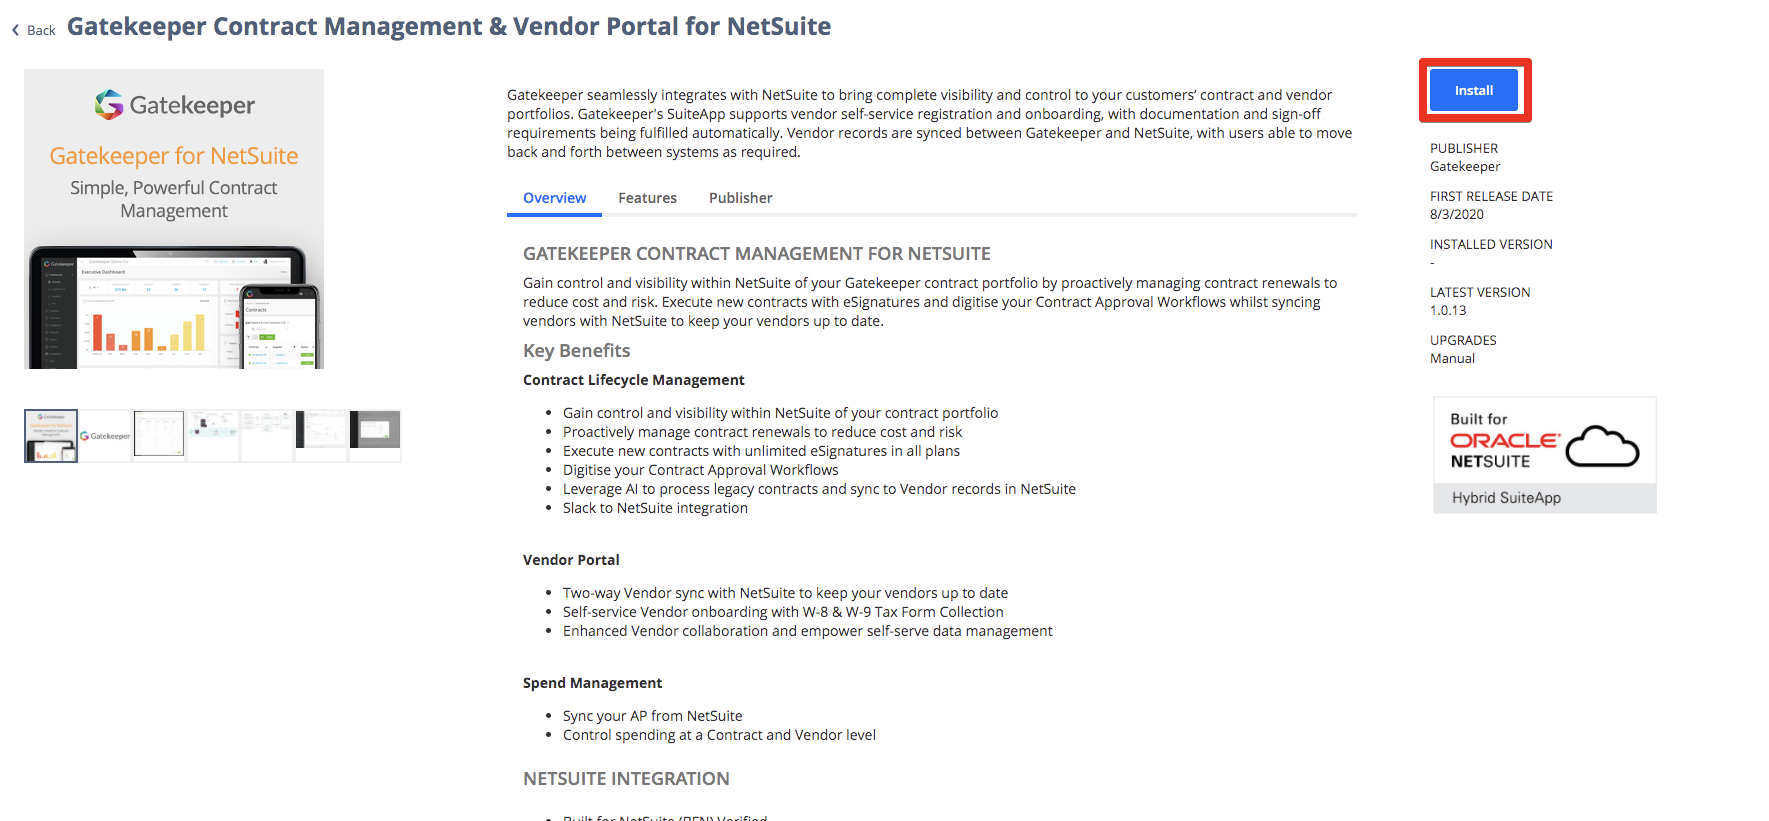
- This page will display the progress and once complete will show the status as Installed.
Integration Configuration
The following steps only need to be performed during installation
Configure Users & Roles
- Select an appropriate User for the integration and Edit the record in NetSuite.
- Under the Access subtab, assign the Gatekeeper Integration role from the SuiteApp:

- Click Save.
Create an Access Token
- Navigate to Setup >Users/Roles > Access Tokens.
- Click New Access Token.
- Select the Application (Integration Record), User and Role configured in the previous steps:
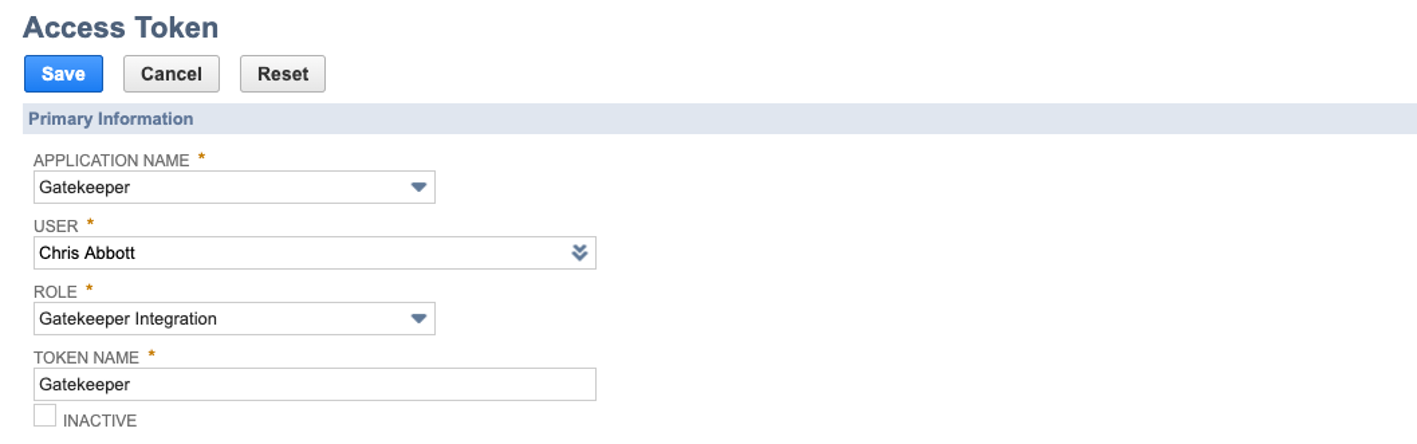
- Click Save.
- Make a note of the Token ID and Token Secret for use in the setup in Gatekeeper.
For security reasons, this is the only time that these values are displayed.
Connect to the Gatekeeper API
Navigate to Setup > Gatekeeper > Gatekeeper Setup and complete the form using the below table for guidance, ensuring you click save afterwards.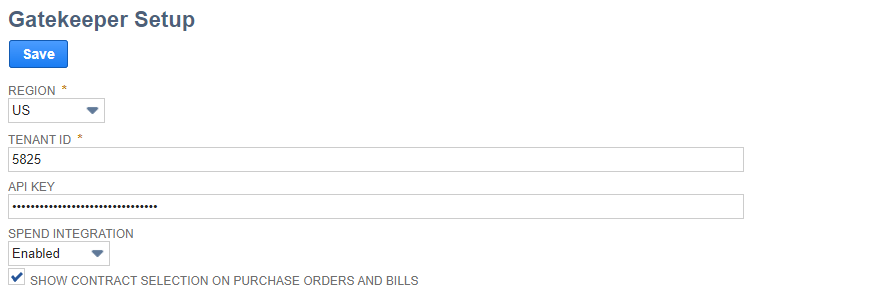
| Configuration | Description |
| Region |
The region your Gatekeeper tenant is located. This can be found in the URL of your tenant e.g. 'https://us.gatekeeperhq.com/5825' |
| Tenant ID |
The ID of your Gatekeeper tenant. This can also be found in the URL of your tenant e.g. 'https://us.gatekeeperhq.com/5825' |
| API Key | The authorisation key to allow Netsuite to interact with the API of your Gatekeeper tenant. This can be found by logging into your tenant and navigating to Settings > Configuration > Integration |
| Spend Integration Enabled/Disabled | If you have the Gatekeeper Spend module then enabling this will create Spend in Gatekeeper from your Vendor Bills for all Vendors that have been synced with Gatekeeper. |
| Show Contract selection | Enabling this will allow you to select a Contract when creating Purchase orders and/or Bills in Netsuite for your Vendors that are synced with Gatekeeper. Any Spend from Bills associated with a Contract will be created and linked against both the Vendor and the Contract in Gatekeeper |
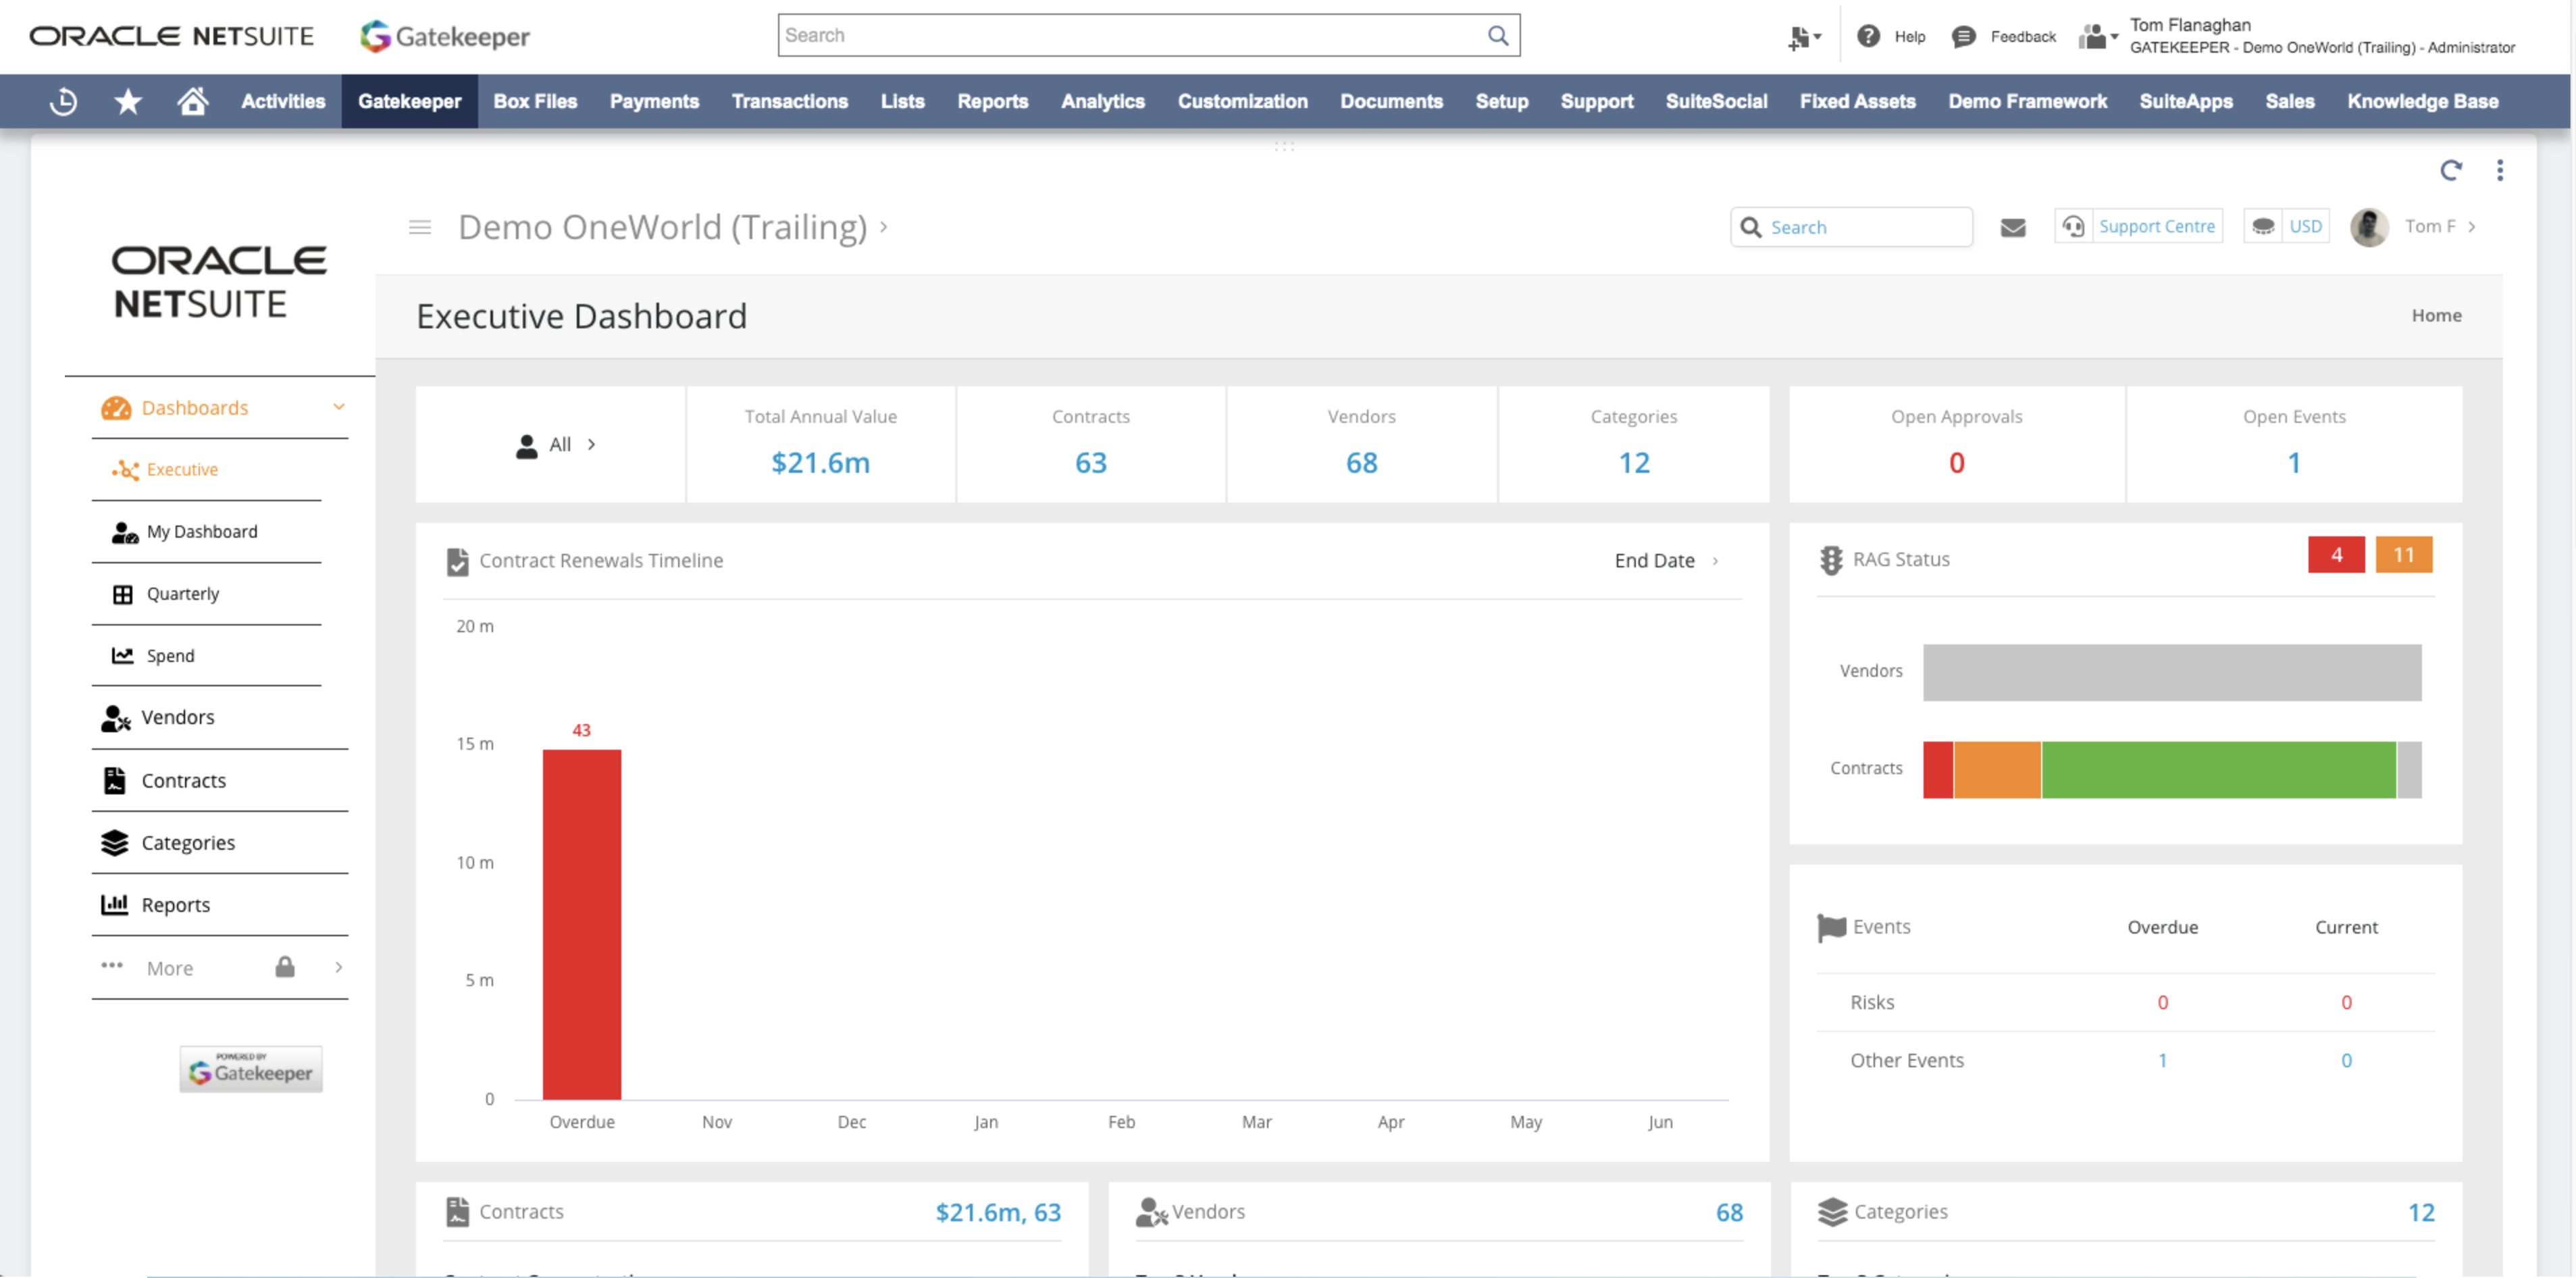
Gatekeeper Portlet
- Navigate to the Gatekeeper tab in Netsuite & click Set Up in the portlet.

- Select the source to be [GATEKEEPER] Visualisation Portlet and click Save.
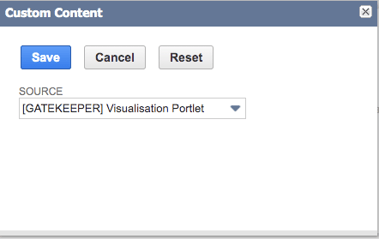
- You should now see your Gatekeeper Tenant within Netsuite.
You can find your API key within the API documentation for your tenant by navigating to the following link (replacing the uppercase with your details): https://REGION.gatekeeperhq.com/TENANT_ID/api_docs
Enabling the Spend Integration for your SANDBOX
The Spend Integration is disabled by default for Sandbox accounts
💡 This to prevent both your Production and Sandbox accounts sending spend data to Gatekeeper at the same time!
Step 1) In Netsuite, navigate to Setup > Custom > Gatekeeper Setup
Step 2) If the advanced settings do not display for your sandbox, add "&advanced=true" to the URL of the page
This will display the Advanced features
Step 3) Tick ☑️ Run Spend Integration in Sandbox
Configuring Gatekeeper
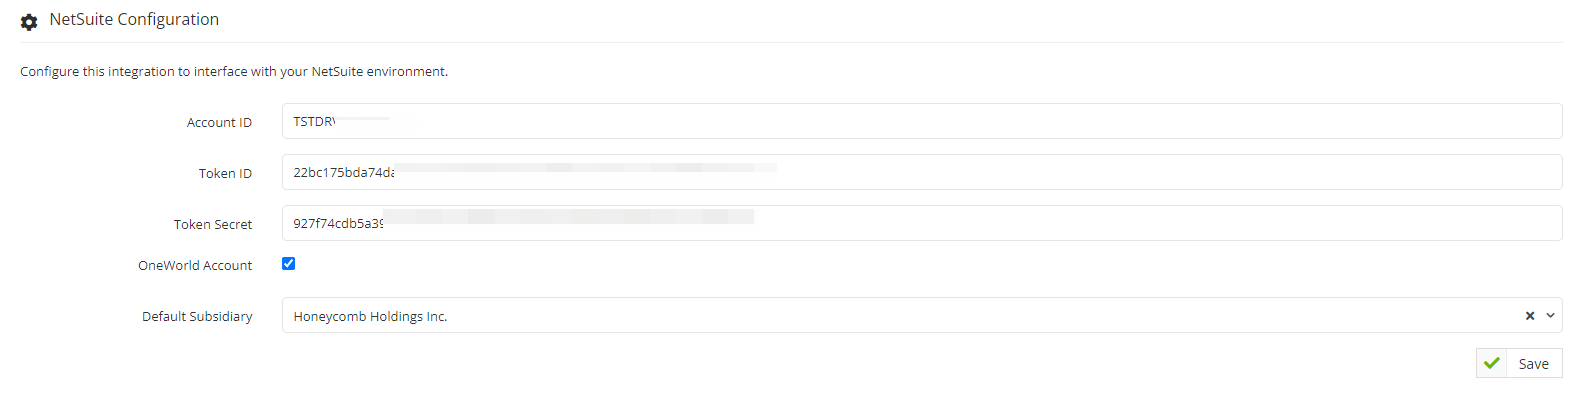
- Within Gatekeeper as an administrator with Configuration access, navigate to Settings > Configuration > Netsuite and click enable.
- Input the details you saved for later whilst configuring Netsuite.
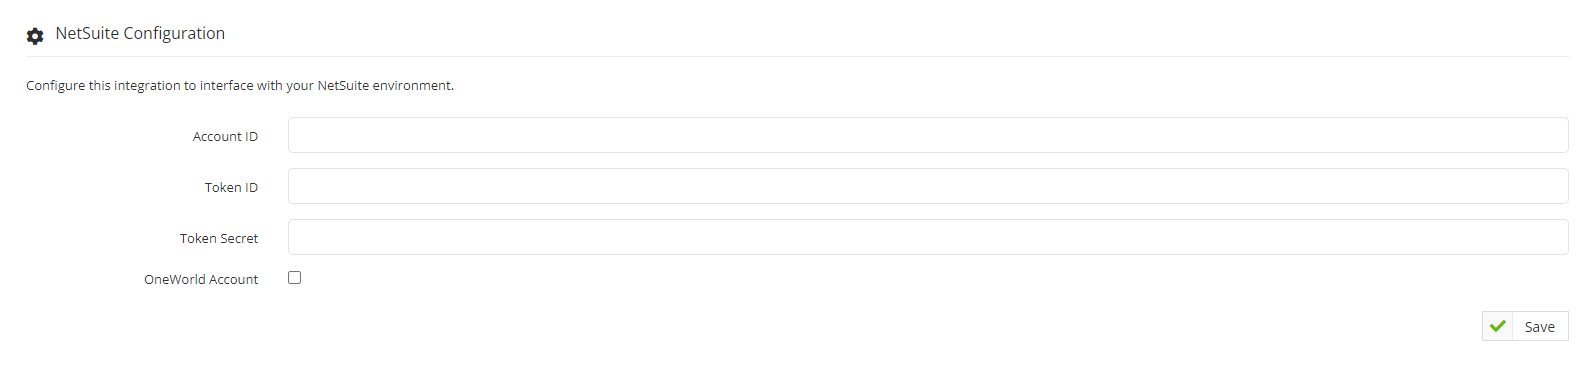
- Click Save.
- Once you have saved the configuration and if you have a Netsuite OneWorld account, tick the OneWorld checkbox and select the default subsidiary for created Suppliers to be assigned to from the dropdown.
- Click save.
Here is an example of a complete configuration of a OneWorld account in Gatekeeper:
Configurable Field Mapping
To begin setting your Configurable Field Mapping, first navigate to Settings > Configuration > Netsuite.
Note: Only Administrator users with the Additional Permission of Configuration can access the Configuration Page within Gatekeeper. For more configuration information, click here.
Within Field Mapping, select Add Field to begin mapping Gatekeeper Data to your Netsuite Custom Entity Fields.
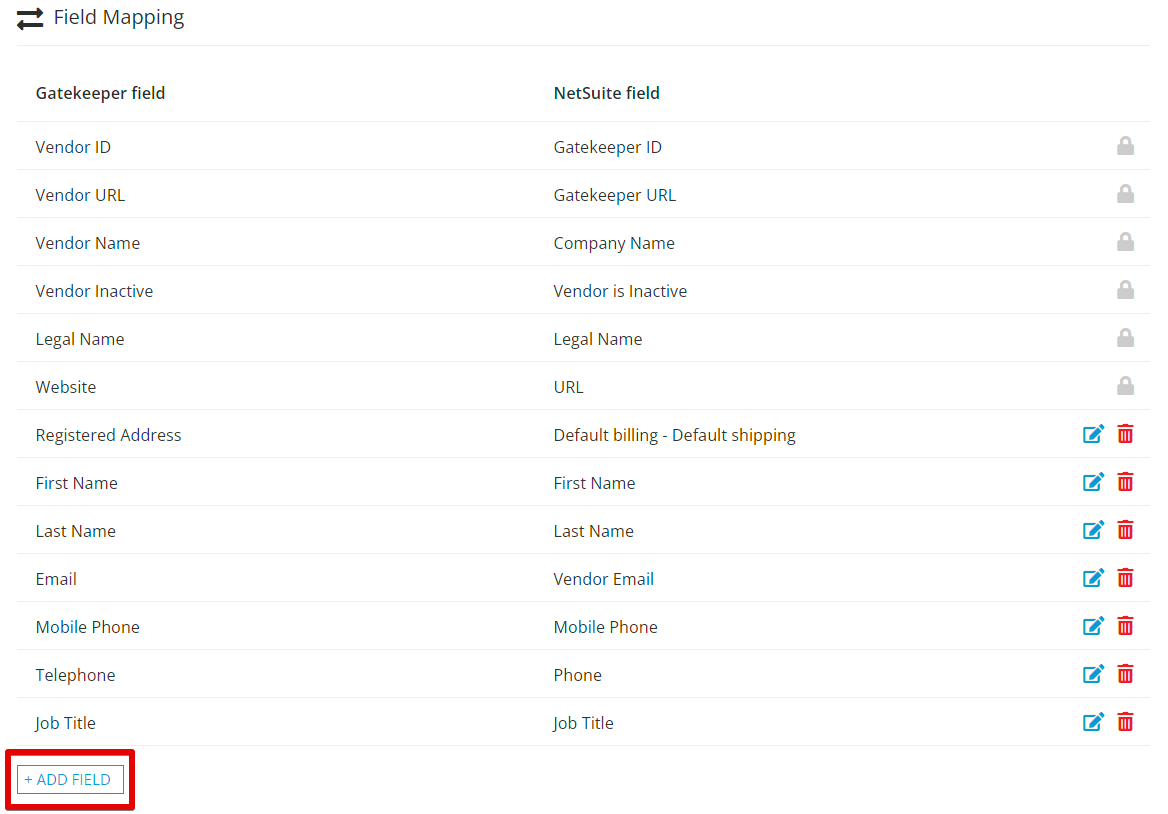
Then select the required Gatekeeper field to map to the required NetSuite field, and select Save.
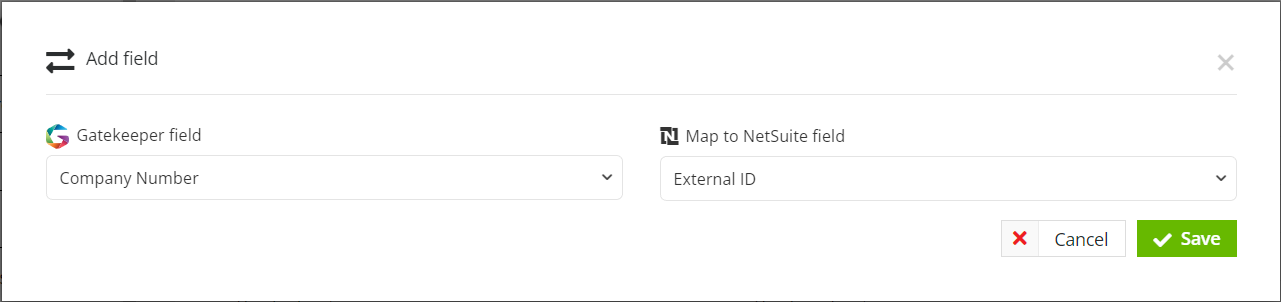
Continue to populate your field requirements until all required fields are complete.
If you need to create additional Gatekeeper Custom Data Fields as part of this process, please see our Knowledge Base Article here.
Supported Field Mapping Table
Both Vendor Core Data and Vendor Custom Data can be used for Gatekeeper Field Mapping.
Note: In the instance of a Netsuite Custom Entity Type that can be associated with dropdown values, the values for Netsuite must be entered manually, and must match precisely those that reside within your Netsuite instance.
| Gatekeeper Field Type | can be mapped to | Netsuite Custom Entity Type(s) |
| Single/Multi-Line Text | ➡️ |
|
|
Multi-Line Text |
➡️
|
|
| Address | ➡️ |
|
| Yes/No | ➡️ |
|
| Integer | ➡️ |
|
| Float | ➡️ |
|
| **Single Dropdown List | ➡️ |
|
| Multi-pick Dropdown List | ➡️ |
|
| Attachment | ➡️ |
|
| **Custom Entity | ➡️ |
|
**Default Subsidiary
The default Subsidiary field will only map to 1 singular Entity and is a mandatory field.
If you would like to map more than 1 Subsidiary, you can create a Custom Data Field against the Vendor Record of the type 'Entity', or map a Multi-select dropdown which can then be used to override the default Subsidiary field.
Syncing Vendors to NetSuite from the Repository 🔁
If you have Vendors in Gatekeeper to synchronise with NetSuite (but do not have a Workflow in place to facilitate this) certain Admin users will be able to push metadata records directly from the Gatekeeper Repository to NetSuite
If you would like to get a structured worklfow in place to facilitate this synchronisation, below are some of our suggested examples:
• Vendor Onboarding - to sync newly added Vendors after they complete onboarding
• Simple NetSuite Update Request - to allow your internal users to request updates to Vendor data in Gatekeeper & NetSuite
• Vendor Portal Update Request Form - to allow the Vendor themselves to request updates to Vendor data in Gatekeeper & NetSuite
Part 1 - Granting the NetSuite Sync Permission
Step 1) Head to your Users menu
Step 2) Alongside your chosen user, click the ![]() settings menu then choose Edit
settings menu then choose Edit
Step 3) Enable the ☑️ NetSuite Administrator permission
Step 4) Hit ✅ Save

NB. This permission can also be enabled en-masse via a bulk user update
Part 2 - Performing the Sync as a User
Step 1) Open a Vendor record in the Repository
Step 2) In the top right-hand corner, hit Sync to NetSuite
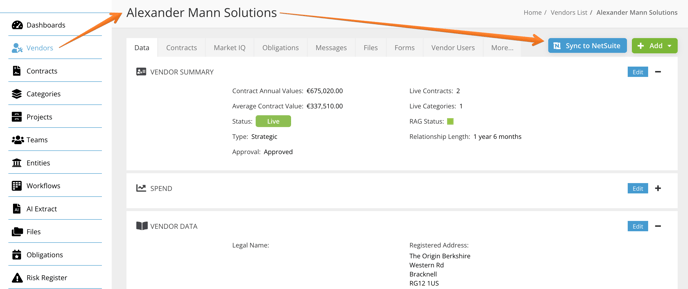
NB. This Sync To NetSuite action can be used for creating new Vendors in NetSuite or updating existing Vendors in NetSuite which have already been connected
Enabling the Sync to Netsuite actions in Workflows 🔁
Please ensure you have completed all of the above requisites before attempting to enable the actions within Workflows
- Navigate to the Workflow Phase Action configuration which has a Supplier action of Create or Update that you would like to sync to Netsuite along with that action.
- Enable the 'sync to NetSuite' sub-action.

- Click Save.
All Suppliers that have this action executed will now be synced to Netsuite.
Viewing Netsuite synced Vendors in Gatekeeper
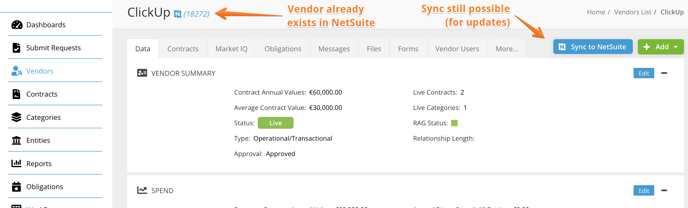
Once you have synced a Vendor to Netsuite via gatekeeper it will be tagged with a link to the associated record in Netsuite within the Vendors data page in Gatekeeper.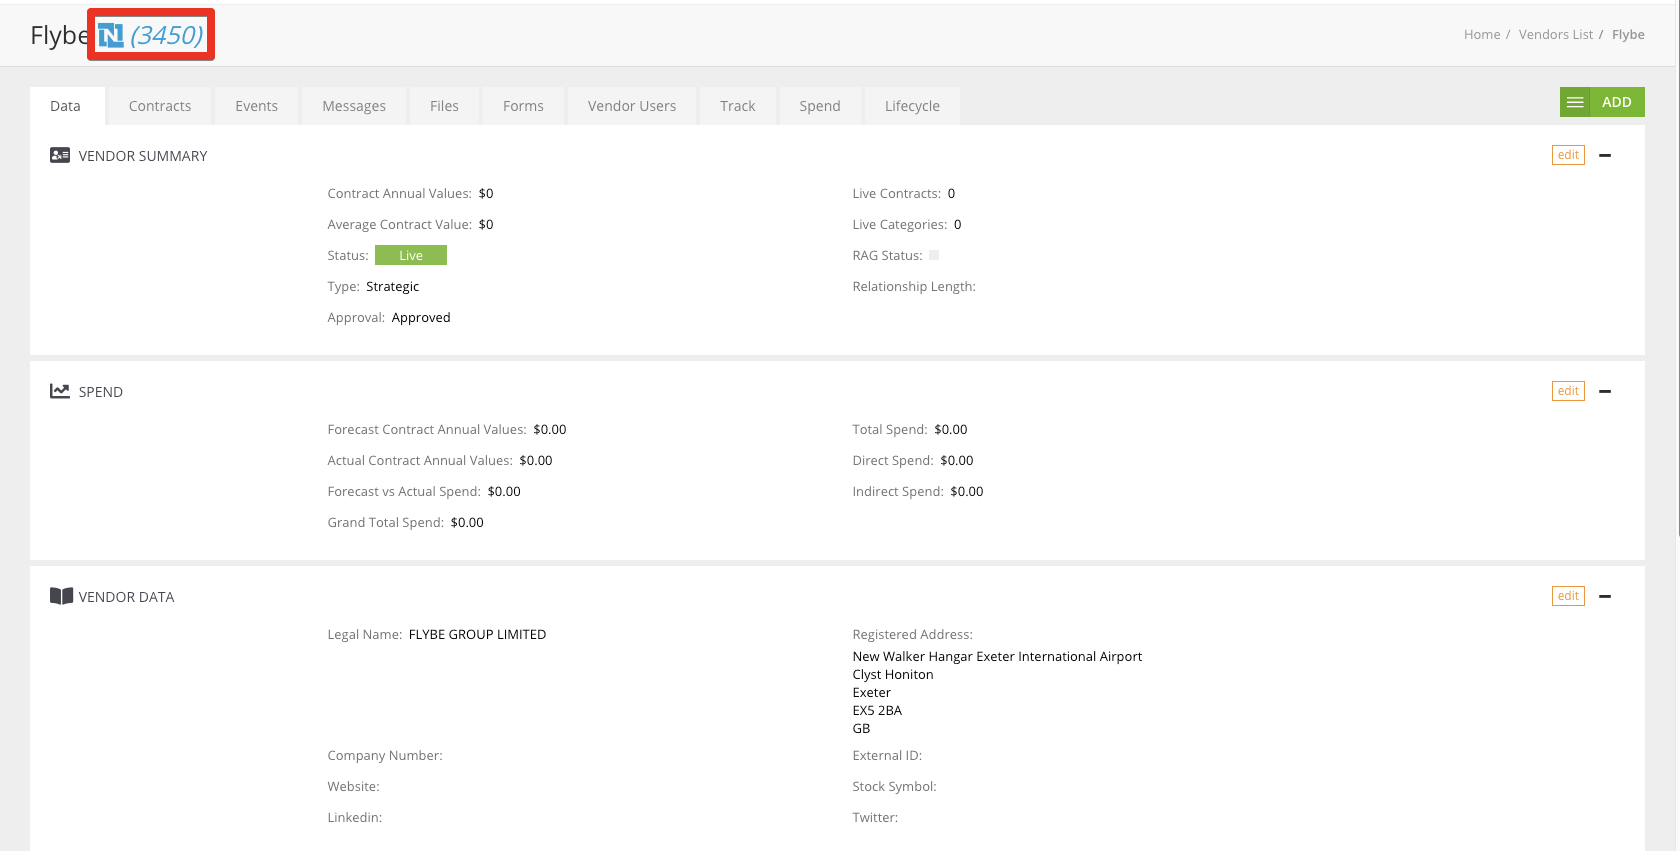
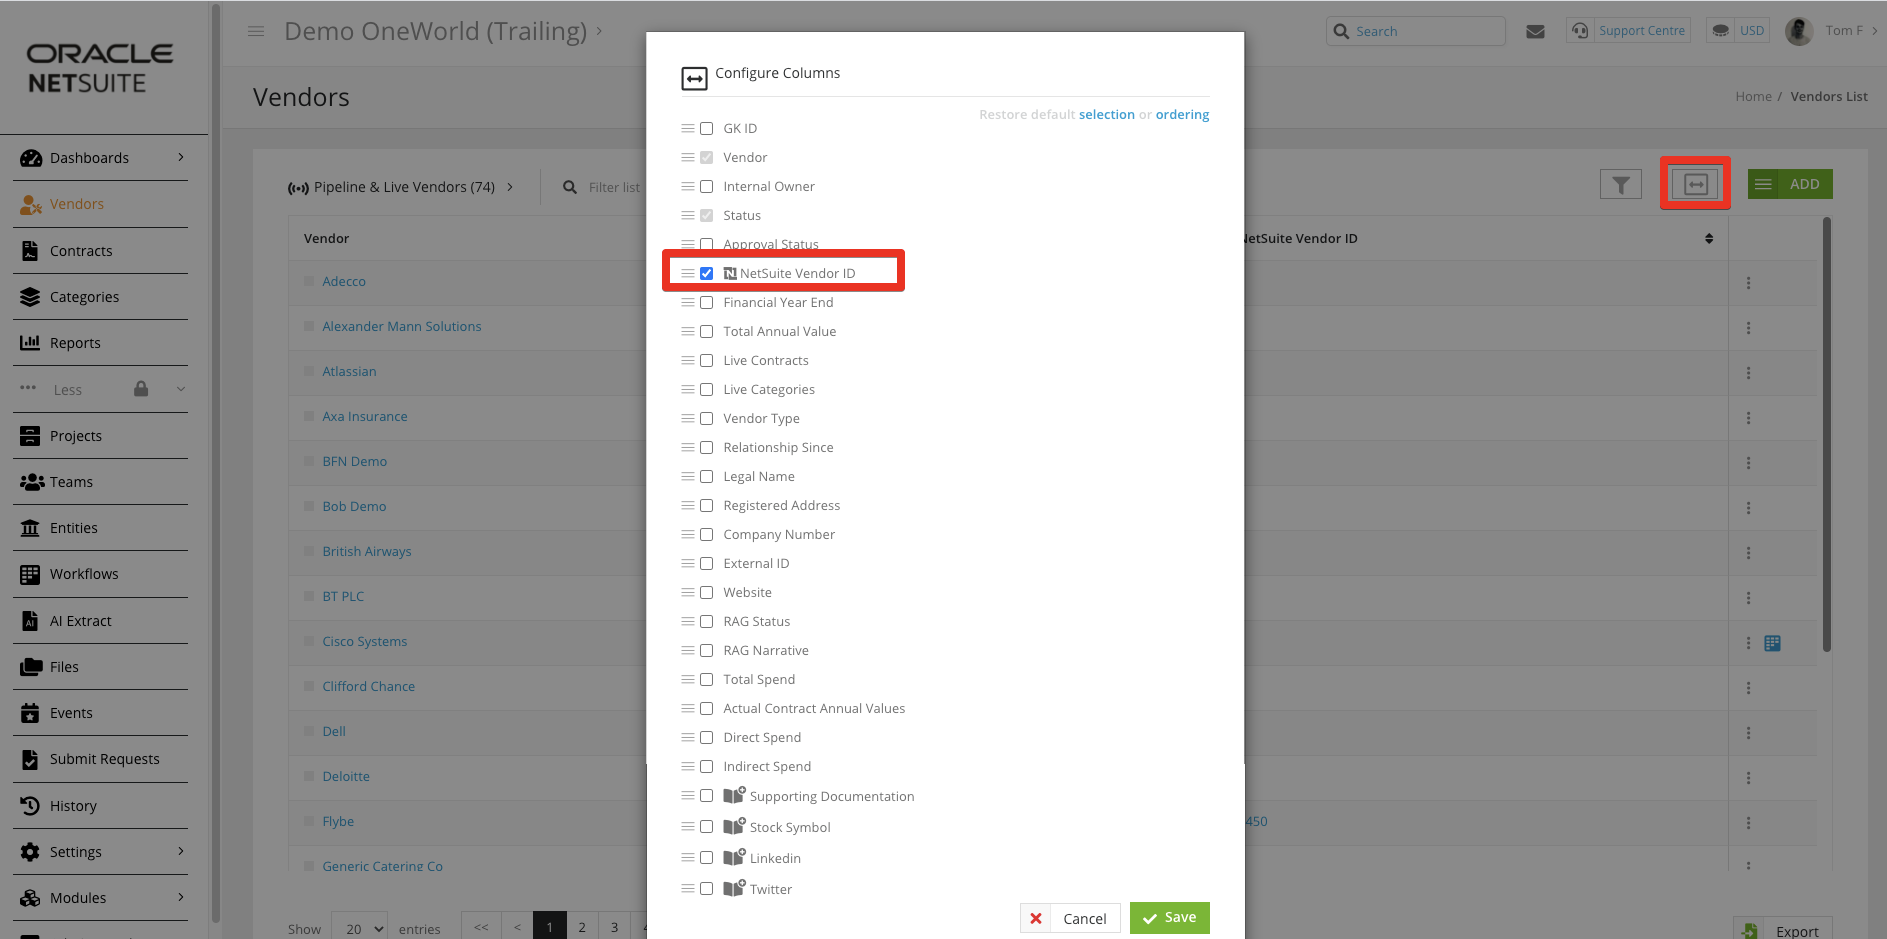
You will also have a new column that you can enable within the Vendor repository view which will allow you to view all Vendors that have been synced to Netsuite.
Upgrading the SuiteApp
It is recommended to regularly update the SuiteApp in order to access new features, enhancements, and issue fixes.
- Follow steps 1-2 from “Installation”
- Click Upgrade
This page will display the progress and once complete will return the status to Installed.
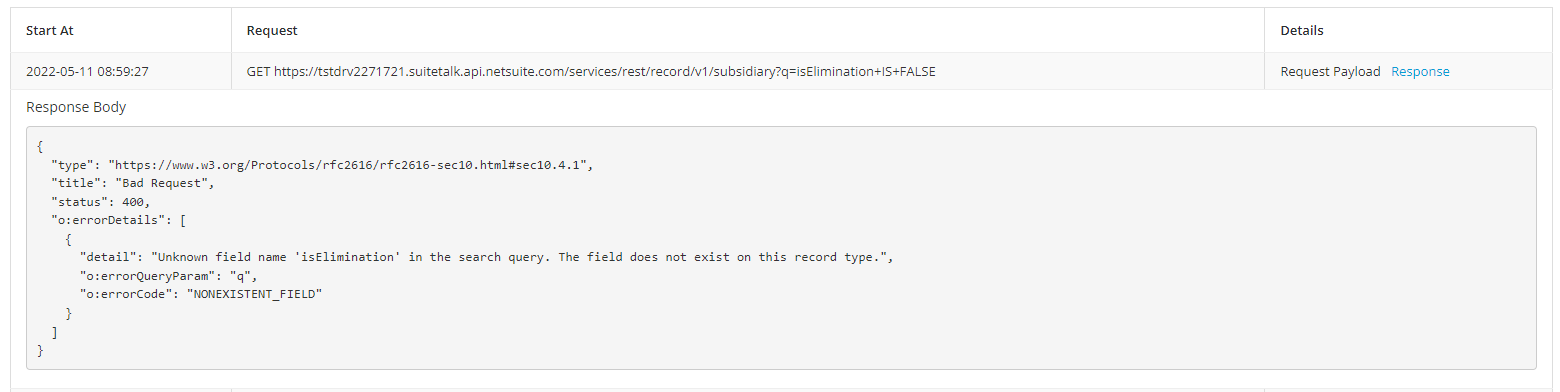
Troubleshooting Issues
Should you ever have any issues with the syncing of data from Gatekeeper to Netsuite then you can access the integration logs directly from your Gatekeeper Tenant:
Logs are stored for seven days before being destroyed.
You will need the Configuration additional Permission within your Gatekeeper environment
- Navigate to Settings -> Configuration -> Netsuite
- Under the Request Log section, you can view each request we send to Netsuite and its associated response which should detail the reason for any failed requests:
- Should you require any support interpreting the logs then please do not hesitate to raise a Support ticket