⚡️ Gatekeeper Expert: Give Teams Visibility of Contracts in Workflows⚡️
This article covers how to give users with Owned Only permissions visibility of all contracts coming through the pipeline for their team.
![]() Estimated Read Time: 4 minutes
Estimated Read Time: 4 minutes
![]() Estimated Configuration Time: 30 Minutes
Estimated Configuration Time: 30 Minutes
Sections in this Article:
- Introduction
- Add the Custom Field
- Update the Field with AutoActions
- Create the Saved View
- What Users Will See
Introduction
Gatekeeper workflows help onboard new vendors and set up agreements efficiently. They ensure procedures are followed, metadata is complete, and key actions (such as approvals, redlining, and signatures) are embedded in the process.
Access to workflows is intentionally limited and granted only if a user:
- Submitted the request (and can view their own submissions)
- Is responsible for a phase in the workflow e.g. an approval phase
- Has Workflow Administrator permissions, so can see all workflow cards
For further information on granting a user access to a workflow, see 📖 Workflow Authorisation Overview.
If users don't meet these criteria but still need visibility of contracts progressing through workflows for their team, you can provide this through saved views. For users with Own Team access, you can set up repository views that show contract records that are currently linked to a workflow process. As long as a contract is created from a workflow card, users with access to that contract can see information about the associated workflow.
To configure this, you'll need to first add a new custom data field to act as a Workflow Status indicator. This will be a dropdown list, containing options that mirror the phases of your workflow. You can then configure AutoActions to automatically update this status as cards progress through the kanban board. Users will be able to configure a Saved View in the repository to filter using this status indicator.
Add the Custom Field
- From the navigation menu, expand the Settings option, then click Configuration.
- Click Custom Data.
- Click Add, then select Custom Group.
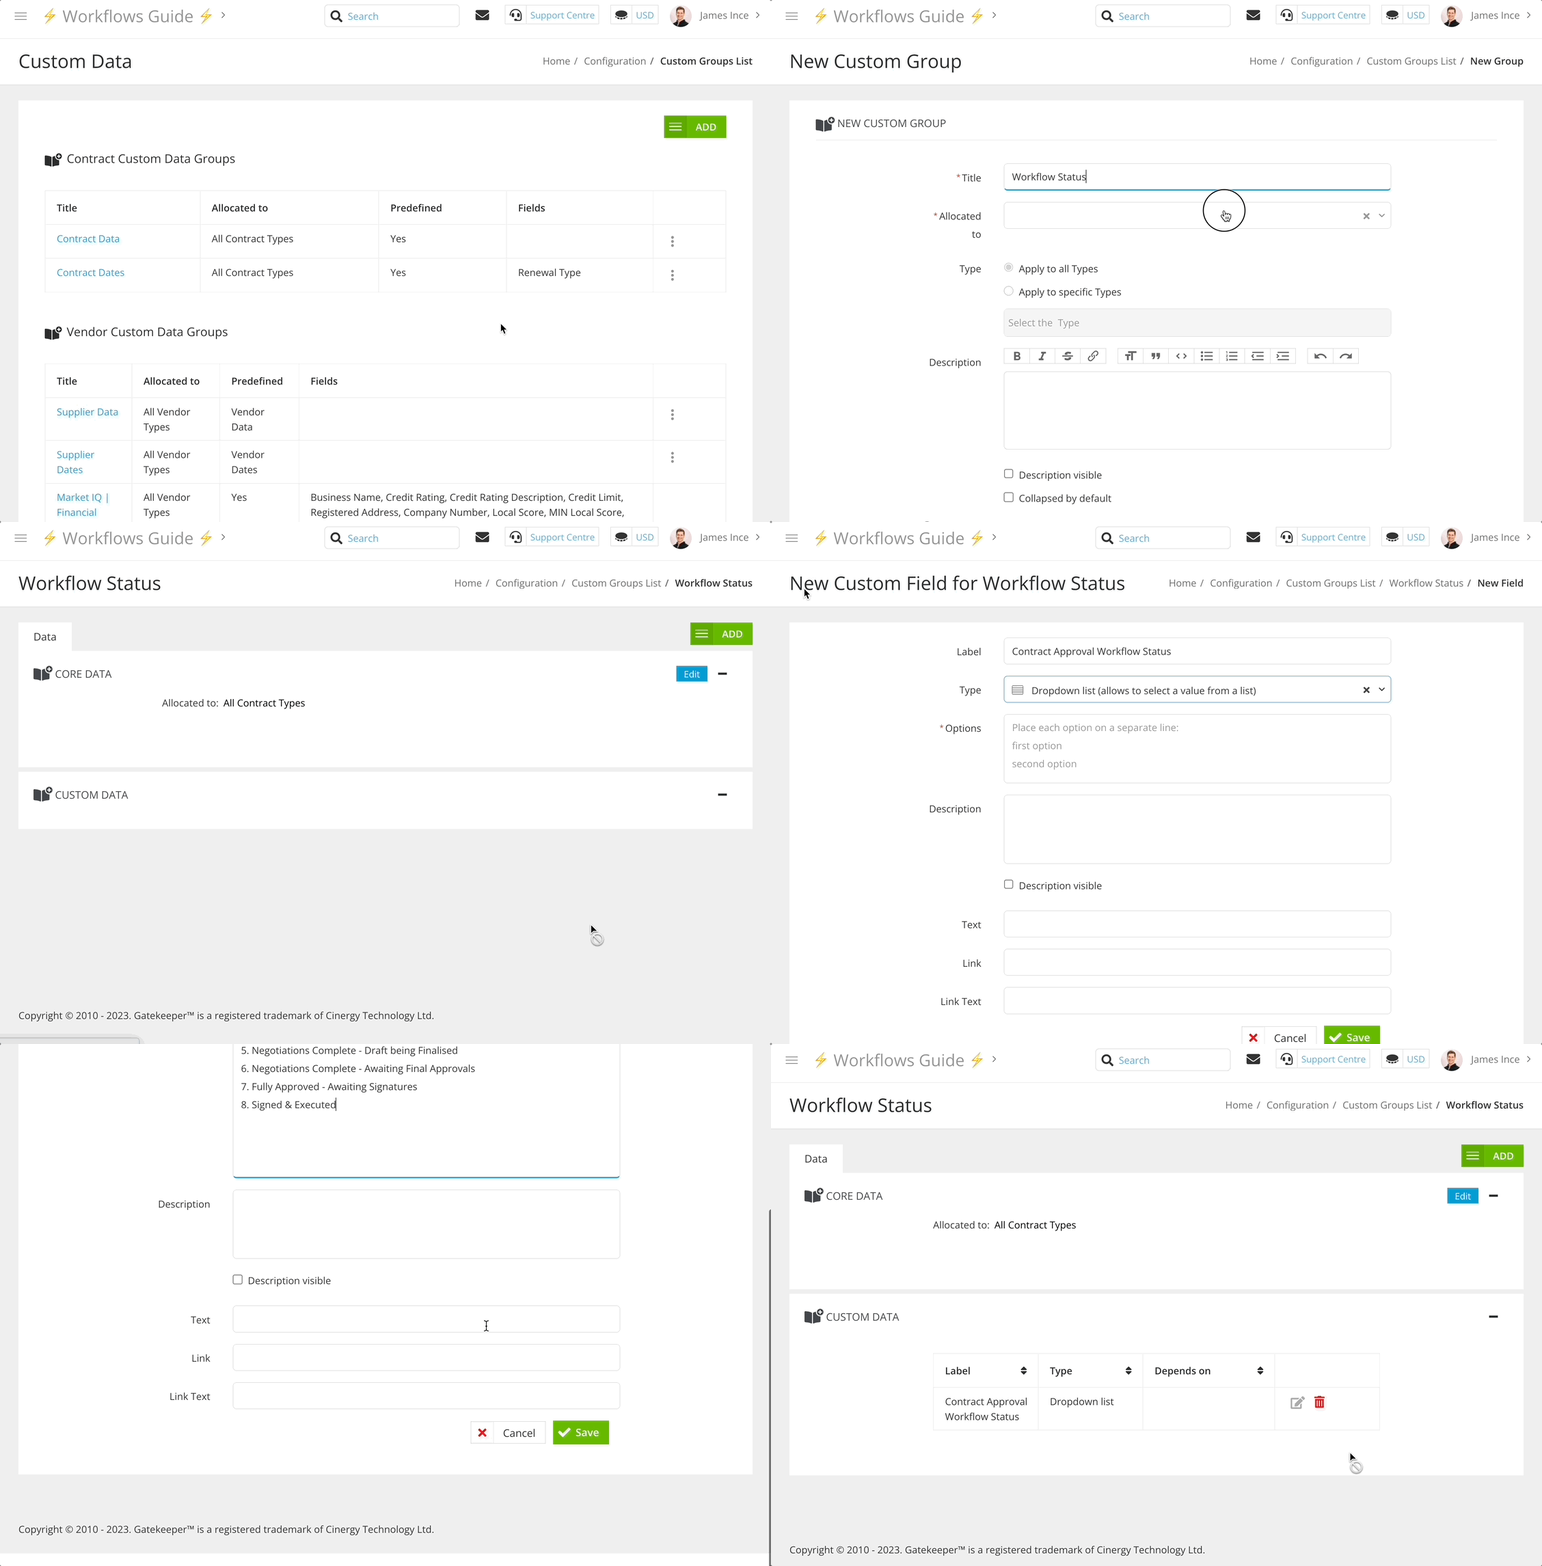
- Enter a title, e.g. Workflow Statuses and select Contract from the Allocated to dropdown list.
- Select the Collapsed by default checkbox, then deselect the Editable in Repository checkbox and click Save.
- Within the custom group, click➕ Add New Custom Field.
- Enter a label for the field to match the workflow, e.g. if the workflow name is Contract Approval Workflow, set the Field Label to Contract Approval Workflow Status.
- Select Dropdown List as the Type, then add the relevant workflow phases as dropdown options and click Save.

The example below demonstrates how the dropdown options can be named to correspond to workflow phases:

Note: You don’t need to include every workflow phase, you can choose to only include the key milestones that matter most to your team.
Update the Field with AutoActions
Once you have created the custom status field, you can leverage AutoActions to update this field when a card transitions through the kanban board.
Note: This requires an AutoAction phase ahead of pre-existing phases to make updates to the record in the repository.
Add AutoAction Phases
- Navigate to the right hand side of the workflow board, then next to New Phase, click ADD.
.png?width=670&height=126&name=add%20new%20phase%20(resubmission).png)
- Enter a phase title e.g. 🛠 AutoUpdate [x] 🛠, then click Save & Next.
- Click Back to Workflow, then repeat the process to add a new phase for each existing phase.
- Once all phases are added, click
 Reorder to move the new phases to the appropriate point in the workflow, and select the Minimise checkboxes.
Re-Point Transitions to the New AutoAction Phases
For any transitions that originally pointed to an existing phase, you'll need to update them to now point to the preceding AutoAction phase instead.
Tip: To find out which transitions point to a phase, try deleting that phase. Gatekeeper prevents deleting if there are active transitions pointing to the phase. When this happens, a list of blocking transitions will appear, each with a hyperlink so you can quickly access and update the destination of that transition rule.
- Click on a phase to edit it, then click Delete.
- Click the name of a Transition to edit it.

- Click the
 pencil icon to edit the Transition to Phase, and change it to the AutoAction phase that comes before the phase you attempted to delete.
 - Click Update to save your changes.
Repeat these steps until no transitions point to the original phases, all transitions should now point to the AutoAction phases that precede them.
Add the Status Field to the Workflow
You'll need to add the new status field to the workflow form, so that records can be updated automatically as cards move through the kanban board.
- Click the start phase of the workflow to edit it.
- Navigate to Form, then click ADD SECTION and enter a section name.
- Select the following from the dropdown lists:
- Predefined: Contract
- Custom Data Group: The custom group that contains the status field
- Click Save.
You should then hide this field on the workflow form, so that users cannot update it manually. To do this:
- Click the cog icon to access the workflow configuration.

- Locate the form section that contains the custom status field.
- Select Hidden from the dropdown list on the start phase, then click the copy icon.

- Select the checkboxes for all other phases in the workflow. This will apply the settings for this section from the start phase to all other phases.

- Click Copy to save the changes.
Configure the AutoActions
After adding the field to the workflow form, you'll need to configure the AutoActions so that it can be updated automatically.
- Click an AutoAction phase to edit it.
- From Actions, select the AutoAction | Contract checkbox, then select the Submit Card On Action and Update Form on Action checkboxes.
- Click Edit AutoAction Values.
- Ensure the Take value from form checkbox is selected for all fields except the new custom field. Set this field to indicate the card’s status at the current workflow phase.
- Click Save.
Repeat these steps for all AutoAction phases.

Note: If a contract record had not been created yet, the first of these AutoActions must be ⚙️AutoAction | Create Contract
Configure the New Transitions
You'll now need to configure the transitions on the new AutoAction phases.
- Click on an AutoAction phase to edit it.
- From Transitions, select the phase immediately afterwards in the workflow.

Repeat these steps for all AutoAction phases
Create the Saved View
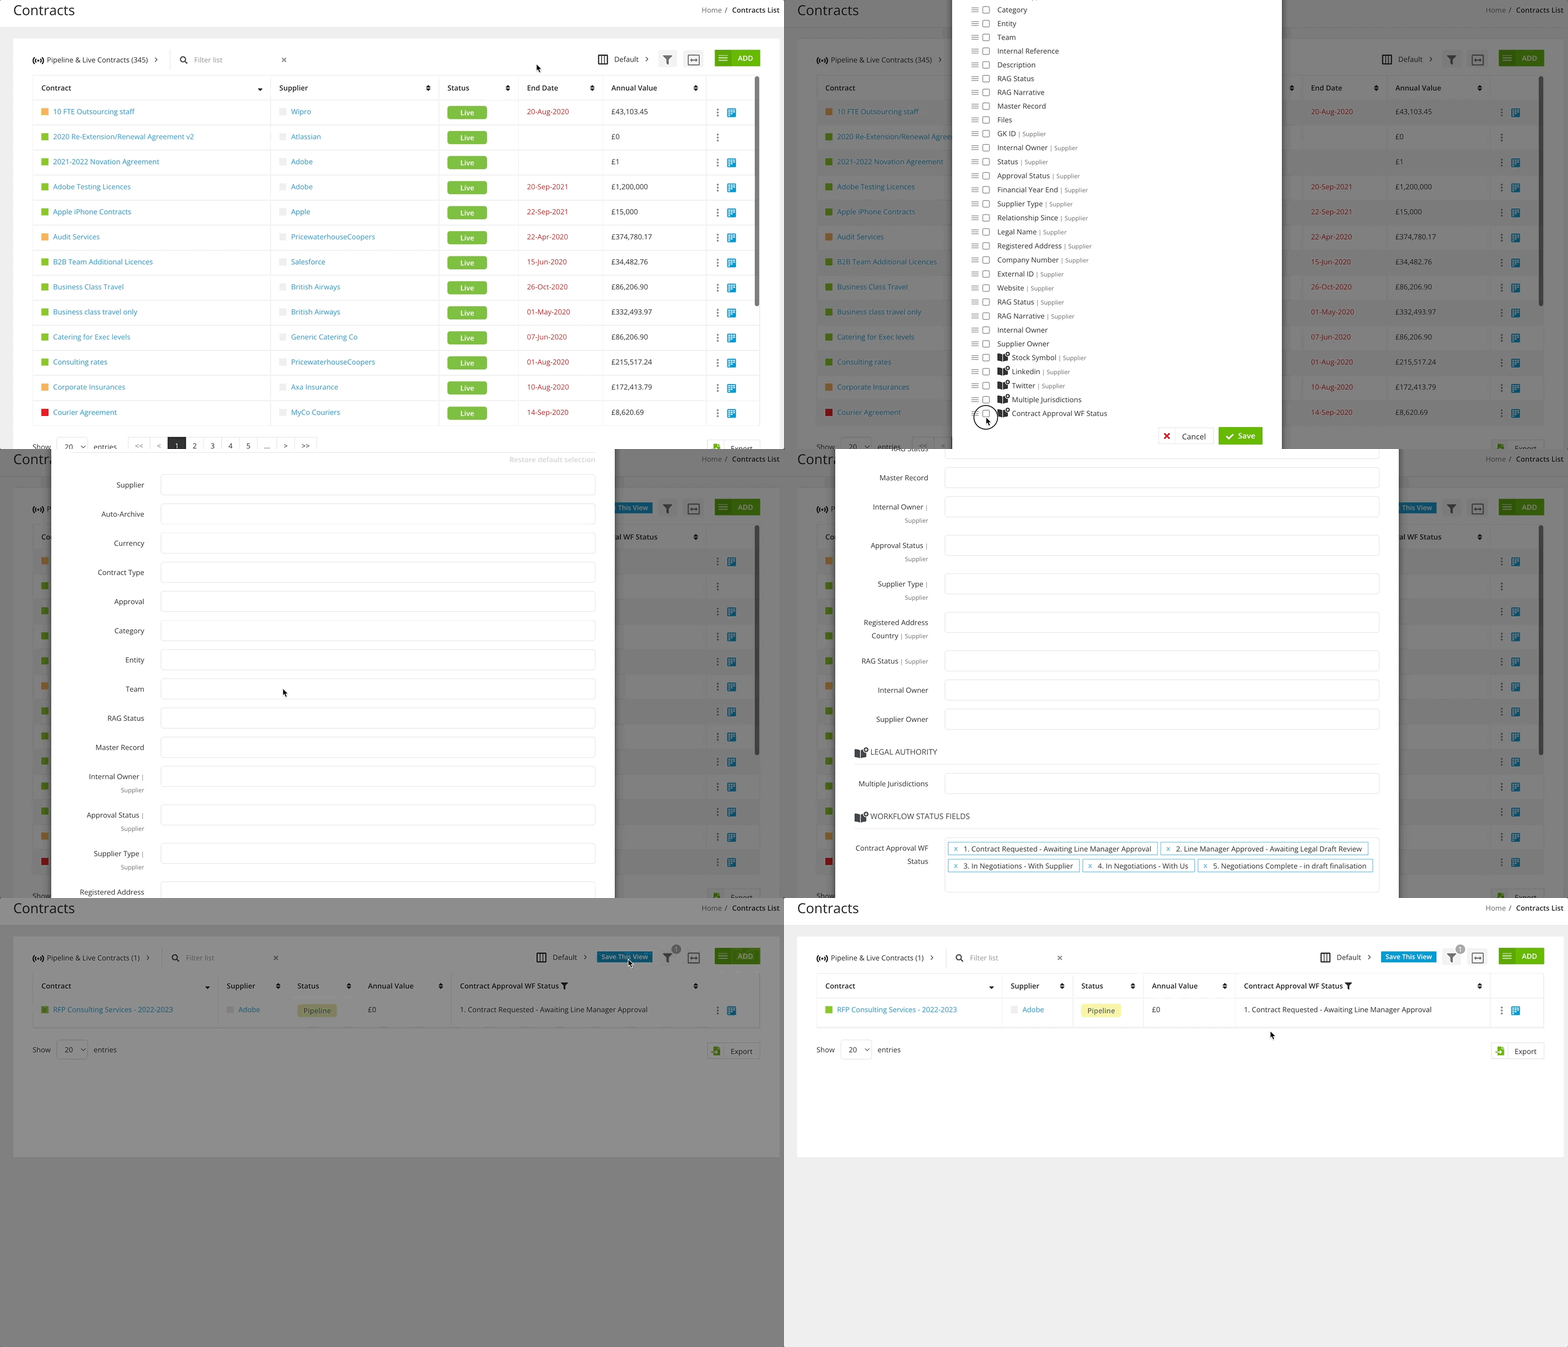
Once the custom field is created and the workflow has been configured to automatically update the value, users can create a Saved View by selecting the fields and the workflow statuses relevant to them:
- From the navigation menu, click Contracts.
- Click
 Configure Columns and select the Workflow Status field, as well as any other relevant fields for this view, then click Save.
 - Click
 Filter and select all the options from the Workflow Status field, then click Save.
 - Click Save This View, then enter a Title and click Submit.
Note: To show only in-progress contracts in the view, select all status options except the final completed value.

What Users Will See
Users can now view all new and in-progress contracts directly from the repository and see their status in the contracts pipeline - regardless of workflow access. This approach avoids exposing confidential information or irrelevant records from other departments.
Additional Reading 📚
- Saved Views - Learn about configuring and using Saved Views in your repository list views.
- Configure Workflow Actions - See a list of all the available AutoActions in Gatekeeper workflows