
 Estimated Read Time: 5 Minutes
Sections in this article:
- Introduction
- Configuration
- End User Experience
- Configure an Approval Phase (Optional)
- Additional Reading
Introduction
If you run due diligence on new vendors through a vendor onboarding workflow, you can configure your contract request workflow to only allow vendors that are already onboarded. This means that users can't request a contract with a vendor who hasn't been through your due diligence process, which helps you maintain control over budgets, supply chains, and compliance with industry standards.
Configuration
Note: The steps below require a Vendor Onboarding and Contract Request workflow to already be configured.
Part 1: Restrict Contract Requests to Existing Vendors
The first step is to require that vendors are onboarded and approved before they can be used in new contract requests. It's recommended to do this by adding a core vendor data section to the workflow form, which ensures the vendor record is correctly associated with the workflow card. To do this:
- Navigate to the contract request workflow.
- Click the start phase to edit it, then click Form.
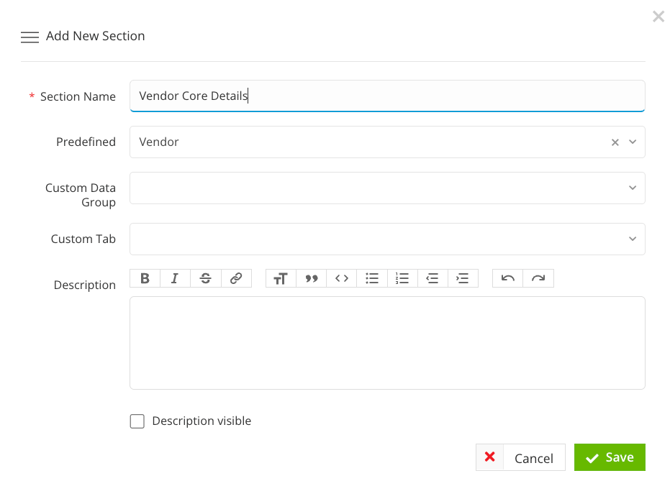
- If the core vendor data section has not already been added, click ADD SECTION and select Vendor Core Data from the Predefined dropdown list.
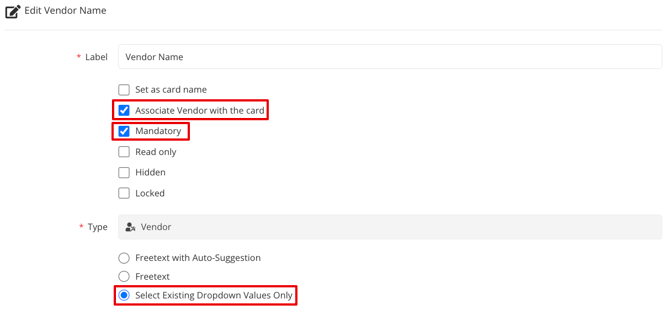
- In the new vendor data section, click the 3 dots on Vendor Name, then click the pencil icon to edit the field.

- Select the Associate Vendor with the card and Mandatory checkboxes.
- Select the Select Existing Dropdown Values Only radio button, then click Save.
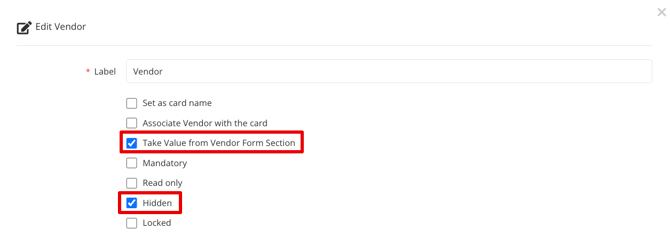
- In the core contract data section, click the 3 dots on Vendor Name, then click the pencil icon to edit the field.
- Select the Take Value from Vendor Form Section and Hidden checkboxes, then click Save.
Part 2: Guide Users to Vendor Onboarding Request Form
If no vendor record exists yet, users won't be able to proceed with a contract request. To guide them to submit a vendor onboarding request instead:
- Get the link for your vendor onboarding request form.
- For Employee Portal forms, navigate to the Submit Requests dashboard and right-click Submit Form on the relevant tile to copy the link address.
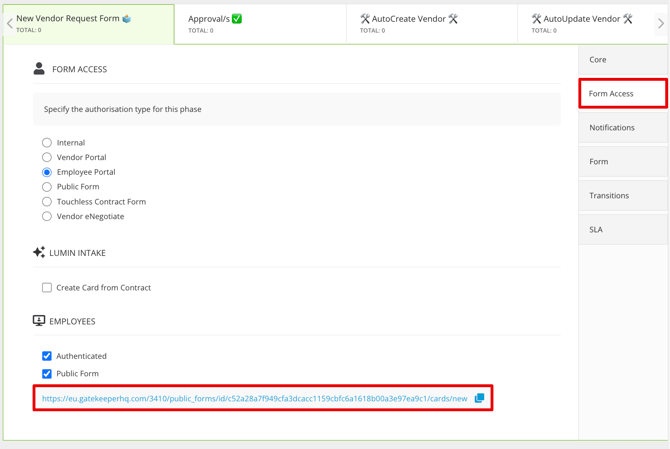
- For Public Forms, navigate to the Vendor Onboarding workflow and click the first phase to edit it, then from Form Access copy the Public Form URL.
- Navigate back to the contract request workflow form, and click on the first phase to edit it.
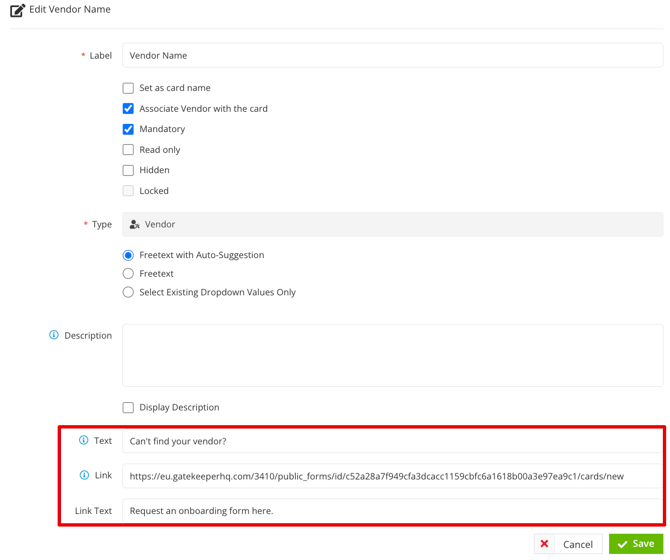
- From Form, click the 3 dots on Vendor Name (within the core vendor data section), then click the pencil icon to edit the field.
- Enter the Text, Link, and Link Text to prompt users when they cannot find a relevant vendor record, then click Save.
To let a vendor be used for a contract request as soon as onboarding starts, ensure there is a phase containing the AutoAction | Create Vendor immediately after the submission phase in your vendor onboarding workflow.
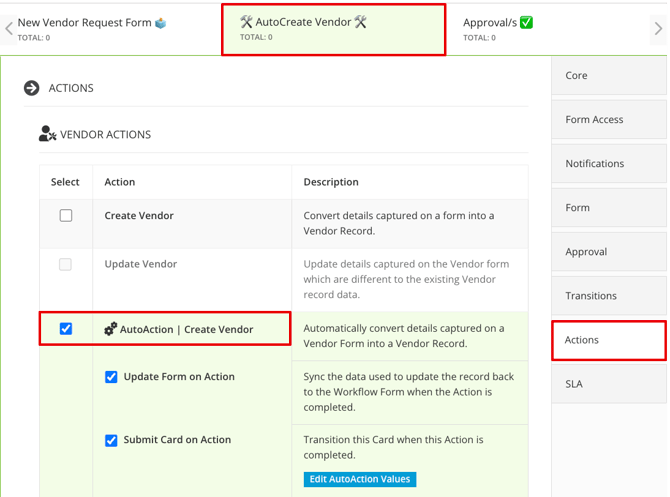
Note: This AutoAction must set the vendor status to Live for it to be selectable in your Contract Request workflow form.
End User Experience
After configuring the settings above, users will only be able to select onboarded vendors. If they need to contract with a new vendor, they’ll be directed to submit a vendor onboarding request.

Configure an Approval Phase (Optional)
You can adjust your workflow configuration so vendors still being onboarded can begin contract negotiations, while requiring a final approval from the relevant team (for example, Procurement or Legal) before the contract is signed. This ensures contracts aren't executed with vendors who haven't completed onboarding.
Go to the relevant section below, depending on whether your contract request workflow already has an approval phase before contracts are sent for signature.
If you already have a Pre-eSign Approval phase in your Contract Request workflow
Part 1: Create the Conditional Approval
- Click the approvals phase to edit it.
- From Approvals, select the Parallel radio button.
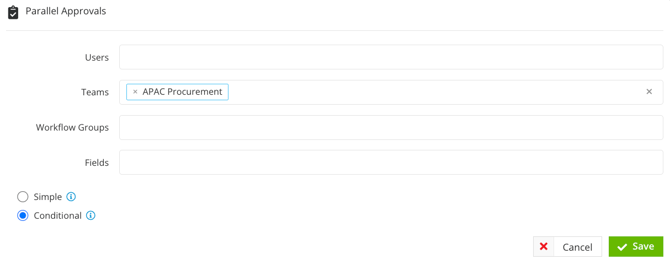
- Click ➕ ADD NEW PARALLEL APPROVAL and select the user/team who should verify that the vendor is onboarded.
- Select the Conditional radio button, then click Save.
- Click ➕ ADD to set the approval conditions, then select Vendor Details / Approval is one of Awaiting Approval.
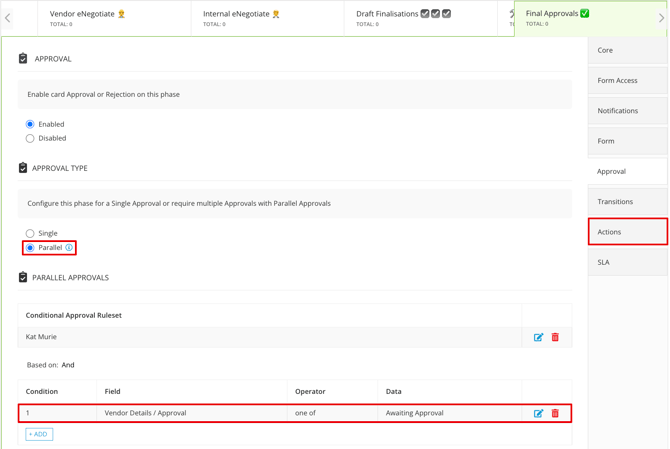
It's recommended to add instructions to this phase, directing the approver to check the vendor's onboarding progress before approving the contract.
Part 2: Configure a Conditional Transition
If your workflow uses conditional transitions to route cards to the approval phase dynamically, ensure that Approval = Awaiting Approval is added to the list of conditions:
- Click the phase before your approvals phase to edit it.
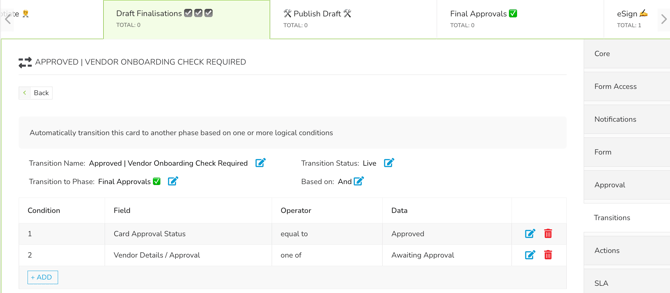
- From Transitions, click ➕ ADD TRANSITION and enter a name e.g. Approved | Vendor Onboarding Check Required.
- Click Add to create two conditions for your transition.
- First, add the action which should move the card (e.g. Card Approval Status is equal to Approved)
- Next, add Vendor Details / Approval is one of Awaiting Approval
- Click the pencil icons to set the Transition to Phase to your approvals phase, then set the Transition Status to Live.
🛠 If you don't have a Pre-eSign Approval phase in your Contract Request workflow 🛠
Part 1: Add the Approval Phase
- Click Add to create a new phase.

- Enter a title, e.g. Vendor Onboarding Approval, and add instructions telling the approver to check the vendor's onboarding progress before approving the contract.
- Click Save & Next.
- From Form Access, select the radio button for the user/group responsible for the approval.
- From Notifications, enable the email notification toggle for the card owner, then click the pencil icon to amend the email template.
- From Form, select the appropriate radio buttons for each section to determine whether they are Read only or Hidden.
- From Approval, select the Enabled radio button.
- From Transitions, select the appropriate radio buttons to decide where cards should be transitioned to upon approval or rejection.
- Click Back to Workflow then click
 Reorder to position this phase immediately before the eSignature stage.
Part 2: Configure the Conditional Transition
Next, update your transitions so that cards move to this new stage instead of the eSignature phase.
- Find any transitions which point to the eSignature phase. The easiest way to do this is by clicking on the eSignature phase, then clicking Delete. This lists every phase with a transition pointing to the eSignature phase, so you can identify which transitions to update.
- For each of these phases, click Add Transition to create a new conditional transition.
- Enter a name, and use the pencil icon to set the Transition to Phase to the new approval phase.
- Add a condition for Vendor Details / Approval is one of Awaiting Approval.
- Add any additional conditions if needed.
- Use the pencil icon to set the new transition to Live.
- Click Back, then click REORDER TRANSITIONS and drag the new transition to the top of the list. This ensures that Gatekeeper evaluates this condition first:
- If the vendor is awaiting approval → route to the new approval phase.
- If not → continue directly to eSignature as usual.
- Repeat this process for all relevant transitions to ensure they are rerouted appropriately.
Additional Reading 📚
- ⚡️Parallel Workflows - Contract Request ⓧ New Supplier Onboarding - Discover how to automatically start a vendor onboarding workflow process for incoming contract requests.