
 Estimated Read Time: 7 Minutes
Sections in this article:
- What are Custom Tables?
- Configure a Custom Table
- Export Custom Table Data
- Amend Existing Custom Tables
- Delete a Column
- Delete a Custom Table
- FAQs
What are Custom Tables?
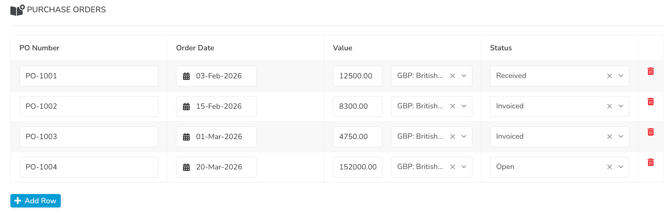
Custom tables allow you to store and manage structured tabular data within your contract and vendor records. Each table is made up of columns, each assigned a field type such as text, number, date, or dropdown. Once configured, users can add rows to the table directly from within a record.
Configure a Custom Table
To set up a new custom table:
- From the navigation menu, expand Settings, then click Configuration.
- Click Custom Data.
- Click Add, then select Custom Table.
- Enter a title, then select the relevant record type from the Allocated to dropdown list, e.g. Vendor or Contract.
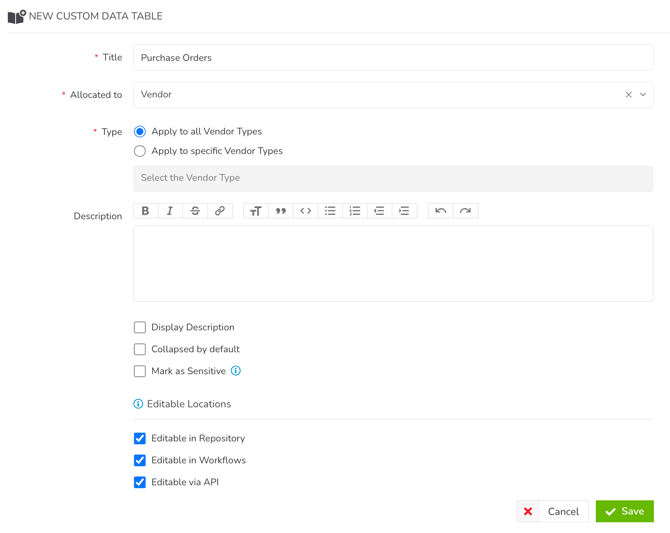
- Select the appropriate radio button to configure whether the custom table will be available on all record types, or only specific types (for example, you may have tables that are specific to SOWs or NDAs).
- Complete the optional fields as needed:
- Add a description and select whether to display this to users.
- Select Collapsed by default if you want the table to be minimised when users open a record. Note that users can still expand this section if required.
- Select Mark as Sensitive to restrict user access to this table. See Sensitive Data for further details.
- Select the appropriate checkboxes to configure where the table will be editable.
- Once finished, click Save.
Once your custom table has been created, you can add columns within that table. To do this:
- Open the custom table and click Add New Custom Table Column.
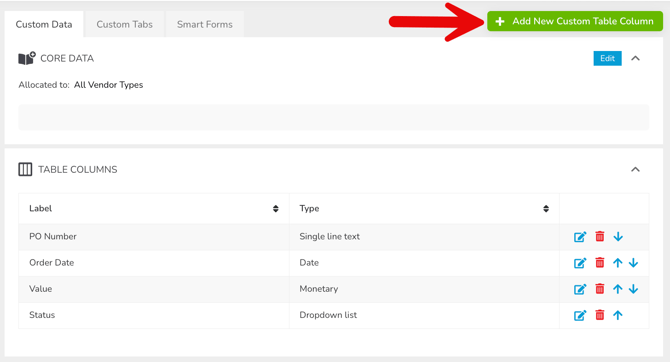
- Enter a unique label for the column.
- Select the column type, then click Save.
Repeat this process for each column required.
Note: For further information on column types, see the Field Types for Custom Data article. File Attachment and object-type fields (i.e. Vendor, Category, Team, Entity) are not supported in custom table columns.
Export Custom Table Data
Once you've added rows to a custom table on a contract or vendor record, you can export that data in bulk as a CSV file.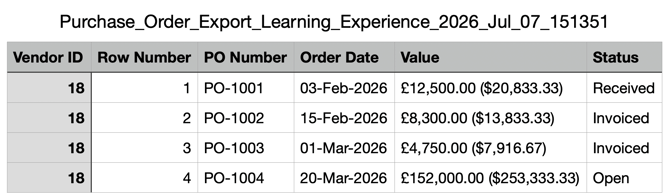
To export data from a custom table:
- From the navigation menu, expand the Vault and click Contracts or Vendors as required.
- Click Exports, then select Data Tables.
-
Select the relevant table to export its data as a CSV file.
Amend Existing Custom Tables
Edit Table Details
To make changes to a custom table configuration:
- From the navigation menu, expand Settings, then click Configuration.
- Click Custom Data.
- Expand the 3 dots on the relevant table, then select Edit.

- Amend the information as required, then click Save.
Note: To conserve data integrity, the record type allocated to a custom table cannot be changed.
Edit a Column
To make changes to a custom table column:
- Click the name of the custom table, then click the pencil icon
 next to the relevant column.
![edit table column]](https://knowledge.gatekeeperhq.com/hs-fs/hubfs/edit%20table%20column%5D.png?width=670&height=143&name=edit%20table%20column%5D.png)
- Amend the information as required:
- Update the label.
- To add new values to Dropdown or Multi-select Dropdown field types, click the link next to Options, then Add Dropdown Option.
- Click Save.
Note: To conserve data integrity, you cannot change the column type.
Reorder Columns
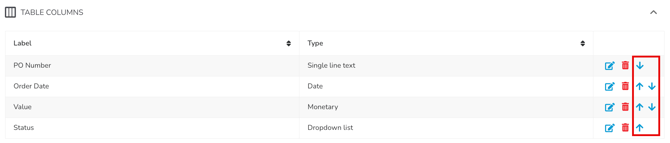
To change the display order of columns in a table, click the name of the custom table, then click the up or down arrow next to the relevant column. Repeat this process until the columns are in the desired order.
Delete a Column
To remove a column within a custom table:
- Click the name of the custom table, then click the Delete
 icon on the relevant column.
 - Click Yes, Delete to confirm.
If the column has some data values populated on records in your repository, Gatekeeper will warn you before confirming that the column should be deleted.
Note: Deleting columns is permanent and cannot be reversed. All data values associated with that column will be removed from every record in your repository.
Delete a Custom Table
Before deleting a custom table, delete all columns within it first. Then, to delete the custom table:
- From the navigation menu, expand Settings, then click Configuration.
- Click Custom Data.
- Expand the 3 dots on the relevant table, then select Delete.
- Click OK to confirm.
FAQs