
![]() Estimated Read Time: 4 minutes
Estimated Read Time: 4 minutes
Sections in this article:
- Who Can Configure Workflow Notifications?
- Who Can Notifications Be Sent To?
- Manage Workflow Notifications
- Configure Email Templates
- FAQs
Overview
Workflow notifications keep users informed about a workflow card's activity. They can be set up to send automated email alerts to specific users or workflow groups when a card enters a designated phase. Additionally, workflow reminders will alert users at set intervals after a card has arrived at a phase.
These are configured for each workflow phase, ensuring users stay updated on key progress and actions needed.
Who Can Configure Workflow Notifications?
The following users can configure workflow notifications:
- Global Workflow Administrators
- Local Workflow Administrators
To learn more, see the Workflow Authorisation Overview.
Who Can Notifications Be Sent To?
A workflow notification or reminder can be sent to the following types of recipients:
- Card Owner: notifies the users or groups assigned to the phase via the Form Access section.
- Card Collaborator: notifies any users manually granted read-only access to a card.
- Card Creator: notifies the user who was responsible for initiating the workflow process for a specific card.
- All Vendor Users: notifies all external users linked to the vendor associated with a workflow card.
- CC Group: notifies a group of individuals assigned to a specific workflow group.
Note: For details of how the Card Creator is selected for a triggered workflow, see Configure Workflow Phase Access and Ownership.
Manage Workflow Notifications
To enable workflow notifications or reminders:
- From the navigation menu, click Workflows.
- Click on the relevant workflow to open it.
- Click the name of the phase to edit it, then click Notifications.
- Enable the toggle alongside the relevant recipients. Changes are saved automatically.
- For email reminders, enter a number into the Reminder every X days column.

-
Once a notification is enabled, Gatekeeper sends an email alert to all enabled recipients for any cards that land on this phase.
-
Once a reminder is enabled, Gatekeeper sends an email alert after the specified number of days and continues to send reminders at the set interval. Once a card moves to the next phase or is archived/deleted, reminders will stop automatically.
Configure Email Templates
Once notifications have been enabled, you can customise the templates to ensure each recipient receives relevant, tailored information. To configure these:
-
Click the pencil icon on the relevant row.

-
Enter the details for the email template.
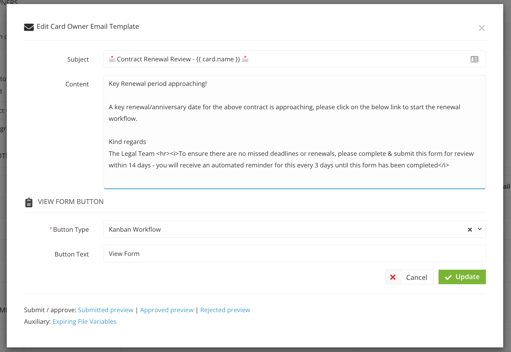
-
Subject - The email subject line as it will appear in the recipient's inbox.
-
Content - The main body of the email, where you can include the key context and any necessary guidance.
- Button Type - This controls what button link is displayed on the email:
- Hide - no button included
- Object - links to the contract/vendor record associated with the workflow form
- Kanban Workflow - links to the workflow card
- Portal - links to the Vendor/Employee Portal
- eNegotiate - the email will contain Submit Draft / Accept Draft / Reject draft options (if the Submit Draft Action has been enabled)
- Button Text - For Kanban, Object or Portal buttons, determine what text appears on the button. If left blank, View Form will show by default
-
-
Once finished, click Update.
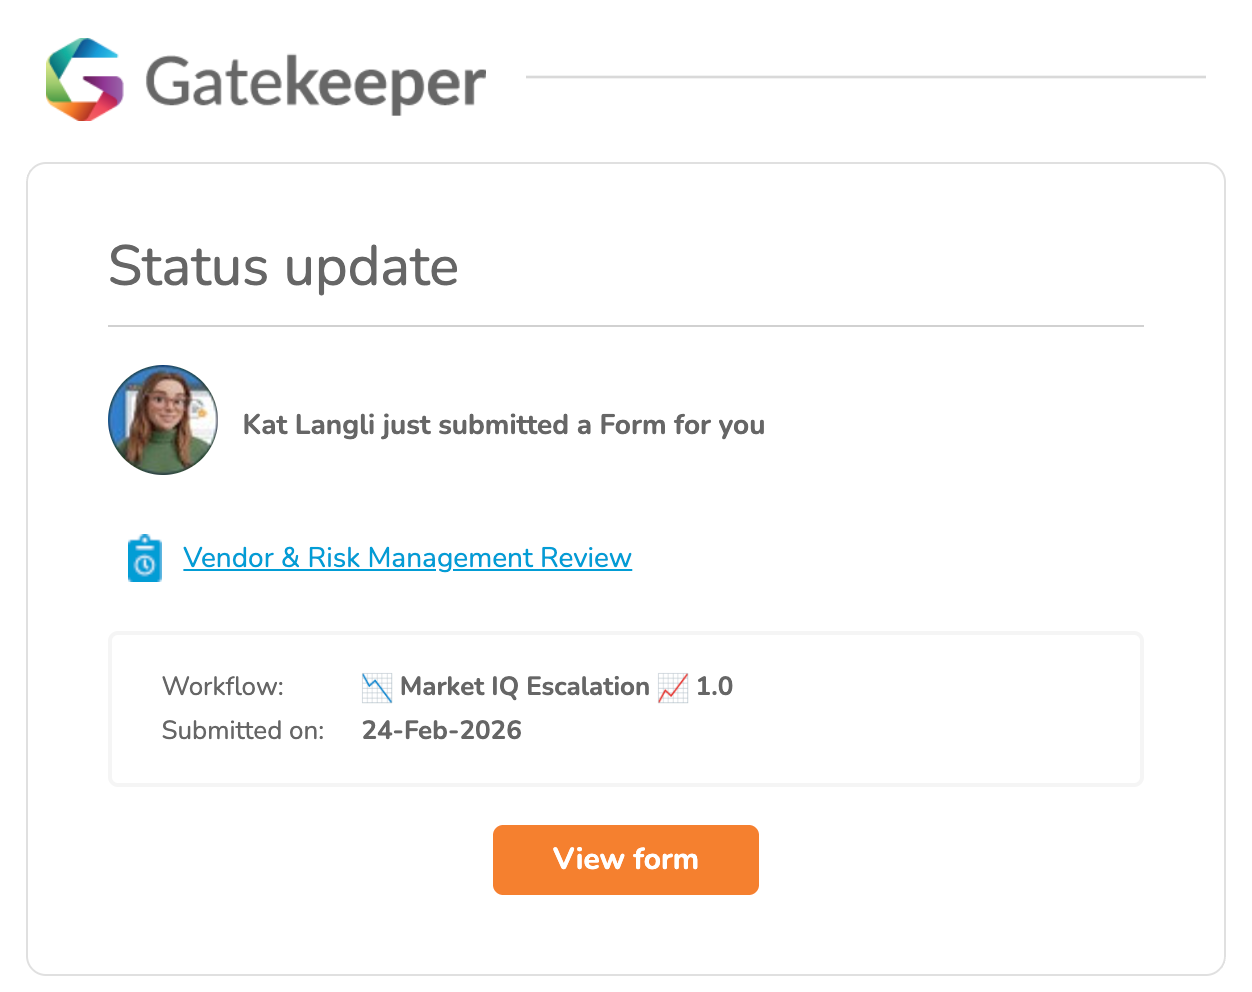
See the screenshot below for an example of an email notification sent from Gatekeeper:
Dynamic Tags
Within the Email Subject and Content, you can include tags which will include information about the workflow card for your recipients, for example the card name. These work like placeholders, and are automatically replaced with real data when the email is sent.
Within the Email Template editor, scroll to the bottom and click one of the preview links. This will display the complete list of dynamic tags available alongside an example of the value they will provide in your notification.

Once you have inserted tags into the email content, you can test them by clicking the preview links:

Markdown Formatting
Gatekeeper email templates use the Markdown syntax, which is a simple formatting language. This allows you to easily add bold, italics, links, lists, paragraphs, headers, and images. For further details, see Markdown and Dynamic Content.
FAQs
Why aren't notifications sending?
If notifications or reminders are not being received, check the following:
- Notifications are not enabled for the phase: confirm the toggle is switched on for the relevant recipient type in the Notifications section of the phase settings.
- No user is associated with the recipient type: for example, if Card Owner is enabled but no owner has been assigned to the phase, or Contract Owner is enabled but the record has no owner populated, no notification will be sent for that recipient type.
- No contract/vendor record is associated with the workflow card: for example, if All Vendor Users is enabled but the card has no associated vendor, no notification will be sent. Check whether the card displays Vendor: not set and see Associate Existing Contracts and Vendors in a Workflow for further details.
- The card was already on the phase when notifications were enabled: notifications only apply to cards that arrive on the phase after the toggle is enabled. Existing cards will not receive a retrospective notification. To apply updated settings to an individual card, open the card and click Re-enter current phase from the Controls tab.
- The email has gone to spam: check the recipient's spam or junk folder, and add Gatekeeper as a trusted sender if needed.
- The recipient's email address is incorrect: if a user's email address is out of date or contains a typo, notifications will fail to deliver. Check the user or vendor users' profile in Gatekeeper to confirm the correct address is recorded.
What happens if no email template is configured?
A default notification email will be sent with minimal details. See the screenshot below for an example:
Can notifications be sent conditionally, for example to different recipients based on data captured in the form?
Notifications cannot be configured with conditional rules directly. However, the same outcome can be achieved by adding separate phases with different notification settings, and using conditional transitions to route cards into the relevant phase based on the required criteria.