
 Estimated Read Time: 12 minutes
☑️ Requires: Vendor Portal
Sections in this article:
- Introduction
- Mandatory Configuration
- Additional Configuration
- Additional Setup Outside the Workflow
- Getting Started - Activate the Triggers
- Additional Reading
Introduction
This workflow automatically triggers a review process for replacing key documents stored in Gatekeeper, such as accreditation or insurance certificates, as they approach their expiry date. It notifies the associated vendor and reminds them until they submit updated documents directly in Gatekeeper.
Watch the video below for a demonstration:
Workflow Diagram

Note: This workflow uses a manual Update Vendor action to replace the file approaching its expiry date, as AutoActions do not support the Attached file with Expiry date field.
🛠 Mandatory Configuration 🛠
The steps in this section outline the essential setup required to make your workflow fully functional. Complete the steps below for a fully operational, end-to-end process for replacing expired files:
- Add the File Expiry Review workflow template to your tenant as the starting point for the build
- Decide who's responsible internally for confirming a vendor's updated file and applying it to the vendor record
See the Additional Configuration section below for optional additions that expand the scope of your process or align the workflow with your organisation's unique policies and procedures.
Add the Template
To get started, you'll need to add the template workflow:
- From the navigation menu, click Workflows.
- Click Add, then select Workflow Template.
- Click Create on the File Expiry Review template.
- Amend the title if needed, then click Create.

Assign Internal Review Phase Owner/s
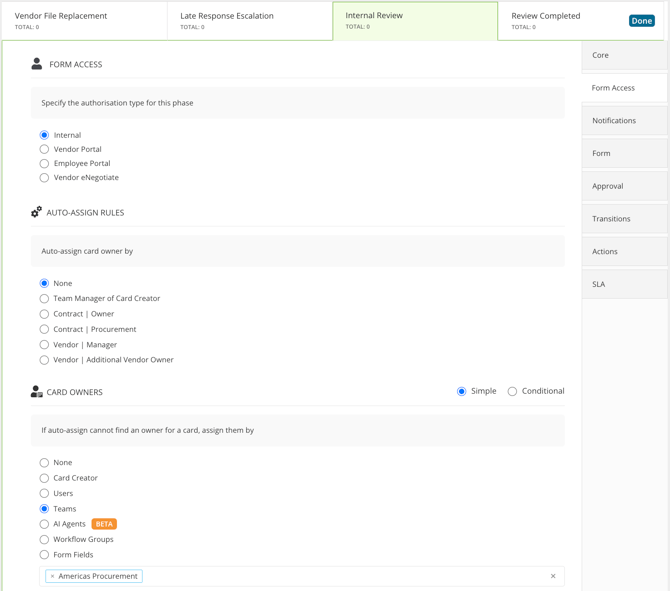
The Internal Review phase requires an internal owner to update the vendor record in the Vault with the new file provided by the vendor. This is typically assigned to your primary Gatekeeper admin team, such as Procurement, Vendor Management, or Contract Management. To configure this:
- Click the Internal Review phase to edit it.
- From Form Access, select the relevant radio button to determine which user/group should confirm the file update.
🛠 Additional Configuration 🛠
This section covers optional steps to adjust the workflow’s scope or default settings, helping you tailor it to your organisation’s needs.
Amend Triggers
The default trigger for this workflow initiates a review when a file is due to expire in 14 days' time. You can amend this, or add additional triggers, to better align with your organisation's review procedures and timelines.
For example, you could create separate triggers for different document types, such as ISO certificates triggering 14 days before expiry, while insurance or indemnity evidence replacements may need a same-day trigger, since they're often only available on the expiry date. To configure triggers:
- From the navigation menu, click Workflows.
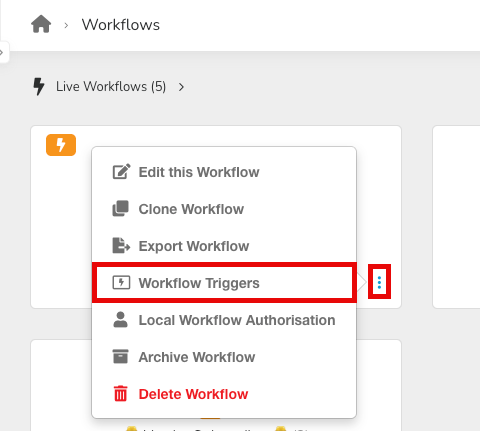
- Expand the 3 dots on the relevant workflow, then select Workflow Triggers.
- Click ➕ ADD TRIGGER to create additional triggers.
- If the default trigger isn't relevant to your process, click the
 Delete icon to remove it.
- To amend the triggers, click the name of the trigger you want to edit, then configure any necessary amendments:
- Click the
 pencil icon to amend a condition's parameters.
 - Click the delete icon to remove a condition.
- Click ➕ ADD to create additional conditions.
- Click the
See Configure a Workflow Trigger for a full walkthrough.
Amend Late Response Escalation Phase Owner
By default, if no response is received before the SLA deadline, the workflow escalates the card to the internal vendor owner. If none is assigned, it escalates to the Card Creator instead. As this is a triggered workflow, the Card Creator will be assigned using the following rules:
- If an internal owner exists → they become the Card Creator.
- If not, and a vendor creator exists → they become the Card Creator.
- If neither, the workflow creator is assigned as the Card Creator.
To amend the default owner:
- Click the Late Response Escalation phase to edit it.
- From Form Access, select the radio button for the user/groups responsible for managing vendor file replacements.
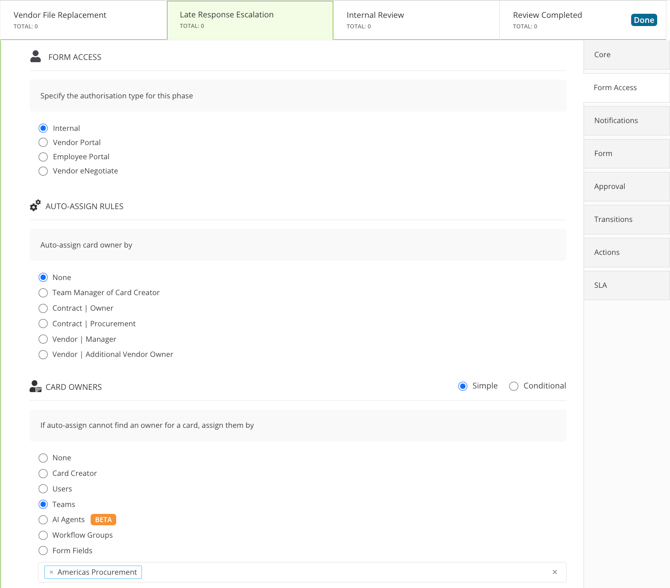
You can assign individual users, teams, or workflow groups. If you haven't already created workflow groups in your tenant, see Manage Workflow Groups for step-by-step instructions on creating groups and adding users.
Amend the SLA Deadline
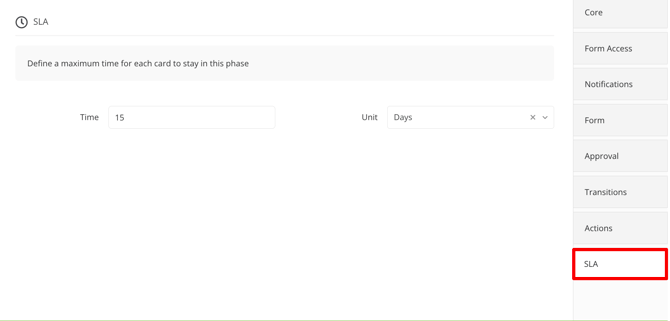
After 14 days, the SLA timer for the Vendor File Replacement phase automatically transitions cards to the Late Response Escalation phase, which sends a notification to the assigned internal user. You can amend this if needed:
- Click the Vendor File Replacement phase to edit it.
- From SLA, enter a value, then select the unit (hours or days) from the dropdown list.
Amend the Reminder Email Frequency
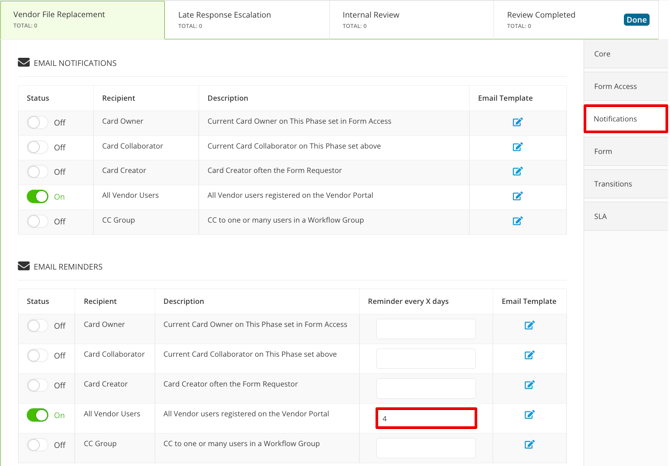
By default, while cards are in the Vendor File Replacement phase, reminder emails are sent to vendors every 3 days. To amend this:
- Click the Vendor File Replacement phase to edit it.
- From Notifications, amend the number in the Reminder every X days column to define how often emails are sent after a card arrives at the phase.
Add an Invite Vendor User to Portal Phase
If this is your first Vendor Portal workflow, your vendor users may not have been invited to the Vendor Portal yet. Since this workflow requires them to log in to upload file replacements, you can enable an action that automatically invites users to activate their accounts, if they haven't already.
Part 1: Add a New Vendor File Review Phase
Automatically inviting vendors to the Portal requires a workflow action. These can't be applied to the Start Phase, so you'll need to move this new phase to position 2 on the Kanban board.
- Navigate to the right-hand side of the workflow board.
- Next to New Phase, click ADD.

- Enter a phase title, then click Save & Next.
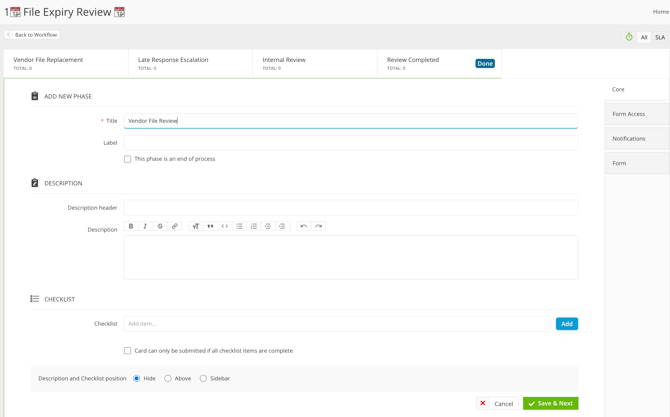
- From Form Access, select the Vendor Portal radio button.
- From Actions, select the Invite / notify Card Owner to the Vendor Portal checkbox.
- Replicate the settings from the Start Phase (i.e. Form, Notifications, SLA, Transitions).
- Click Back to Workflow, then click
 Reorder to move the phase to position 2 on the workflow.
Part 2: Reconfigure the Start Phase
- Click the Start Phase to edit it.
- Give the phase a new name e.g. AutoStart.
- From Transitions, click the Submitted transition, then click the Transition to Phase
 pencil icon and set it to the newly created Phase 2.
 - From Notifications, disable all toggles.
- Click Back to Workflow.
- Click Reorder, then select the Minimise checkbox for Phase 1 and click Update.
Part 3: Update the Trigger/s
- From the navigation menu, click Workflows.
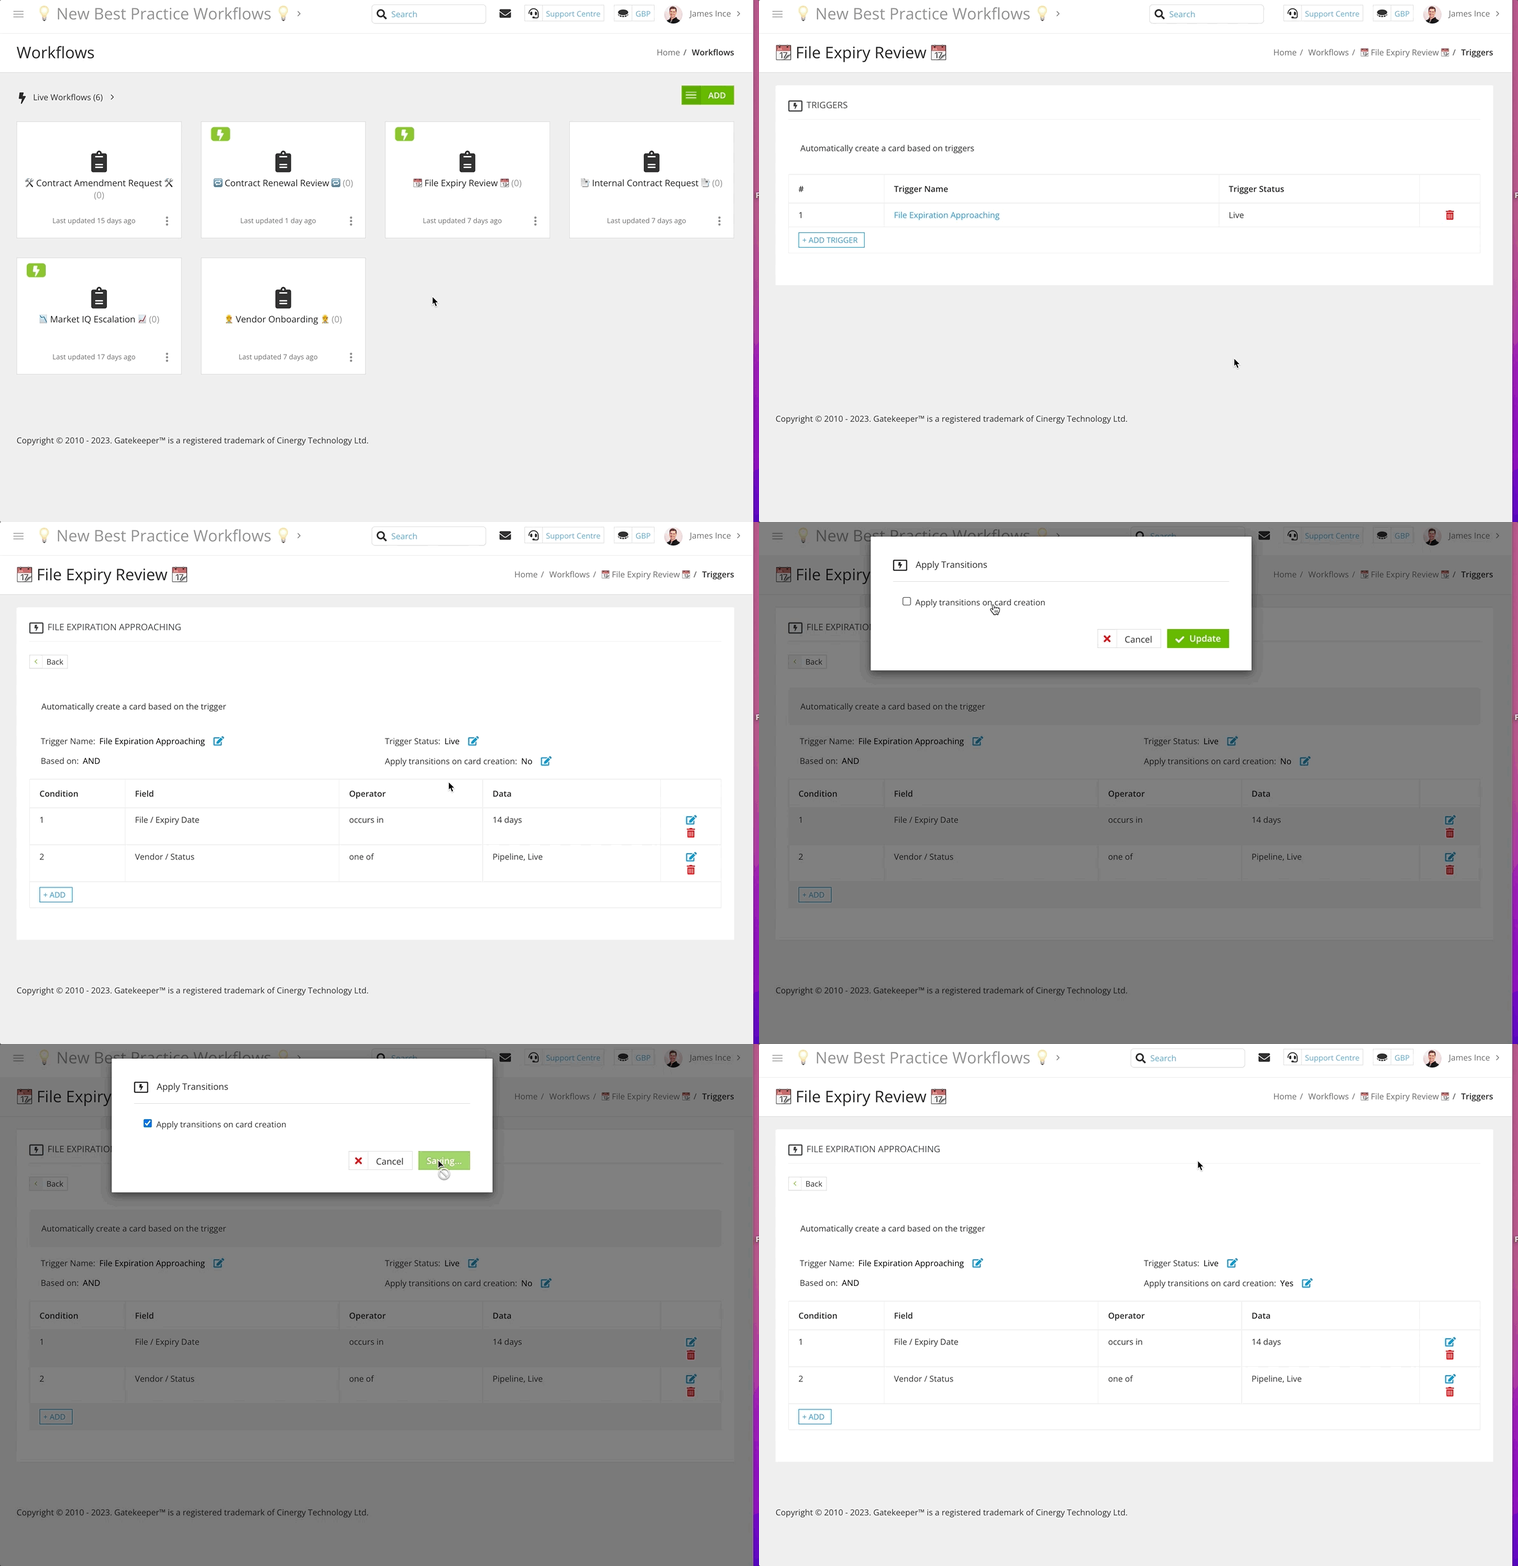
- Expand the 3 dots on the relevant workflow, then select Workflow Triggers.
- Click on the trigger to edit it, then click the
 pencil icon next to Apply transitions on card creation.
 - Select the Apply transitions on card creation checkbox, then click Update.
- Repeat steps 3-4 for any additional triggers you have added.
Additional Setup Outside the Workflow
If you’ve followed all of the steps above, your workflow is nearly ready to launch. However, to help the process run as smoothly and reliably as possible, there are a few additional areas of your Gatekeeper tenant worth reviewing.
Add Vendor Users
Before launching your workflow, make sure you have added the relevant external contacts for each vendor.
- From the navigation menu, expand the Vault, then click Vendors.
- Search for and click the vendor record that the vendor user belongs to.
- Click Add, then select Vendor User.
- Enter the relevant details, and if you want to invite them to the Vendor Portal straight away, select Invite into Gatekeeper.
- Click Save.
If you do not want to invite them to the Vendor Portal straight away, consider adding an Invite Vendor User to Portal phase to the workflow to invite them when they have a file to replace.
Complete File Metadata
Files must have an expiry date to trigger review and replacement. It's also recommended to assign a file type if any triggers use this field as a condition. To do this:
- From the navigation menu, click Files.
- Expand the 3 dots on the relevant file, then select Edit.
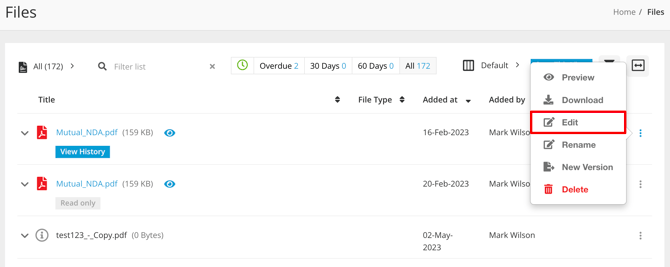
- Enter the Expiry Date and select the File Type.
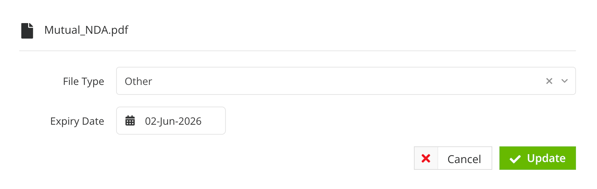
- Click Update.
Note: To learn how to amend the list of file types in your tenant, see Configure Dropdown Lists.
⚡️ Getting Started - Activate the Triggers⚡️
Once your workflow is fully configured, activate the triggers to make it live:
- From the navigation menu, click Workflows.
- Expand the 3 dots on the relevant workflow, then select Workflow Triggers.
- For any trigger with a Pipeline status, click on the trigger's name.
- Click the
 pencil icon on Trigger Status.
 - Select Live from the dropdown list, then click Update.
- Click < Back to return to the list of triggers.
- Repeat steps 3-5 until all triggers are live.
Your file expiry workflow is now active. Any files approaching their expiration date will automatically begin the review and replacement process.
Additional Reading 📚
- Vendor Portal Expert Series: Learn how to make the most of the Vendor Portal so vendor users find your workflows clear and easy to use, positioning your team as a reliable partner to external stakeholders.
- File Expiry Dates: Learn how to set and view file expiry dates in Gatekeeper