
 Estimated Read Time: 8 minutes
➕ Requires the Vendor Portal
⚠️ SIG Lite Workflow Automatically Creates 169 Custom Fields
Sections in this article:
- Introduction
- Mandatory Configuration
- Additional Configuration
- Additional Setup Outside the Workflow
- ⚡️Getting Started - Activate the Triggers⚡️
- FAQs
Introduction
The SIG Lite workflow provides a fast, reliable way to assess vendor and third party risk using the industry-standard Standardised Information Gathering (SIG) Lite questionnaire. Licensed by Shared Assessments, the SIG Lite questionnaire is pre-mapped to major compliance frameworks, offering broad coverage without unnecessary complexity.

Combined with scored forms and visual tracking, this approach saves time, supports regulatory audits, and eliminates the need to create custom questionnaires. See our Third-Party Risk Onboarding Forms: Standardise for Success blog post to learn more.
SIG Lite Questionnaire (Smart Form)
The questionnaire has 169 questions, each answered with either a dropdown selection (Yes, No or N/A) or a file attachment. It's built as a Smart Form, so every question is pre-scored and weighted based on the response, and the final score is stored on the vendor record for easy access and transparency.
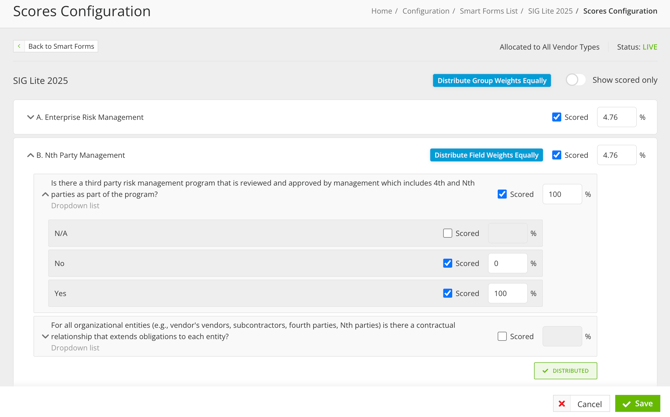
Note: While the default scoring provides a structured approach, it's recommended to adapt the weightings to your organisation’s requirements. This keeps the assessment aligned with your internal guidelines and priorities.
Vendor Experience
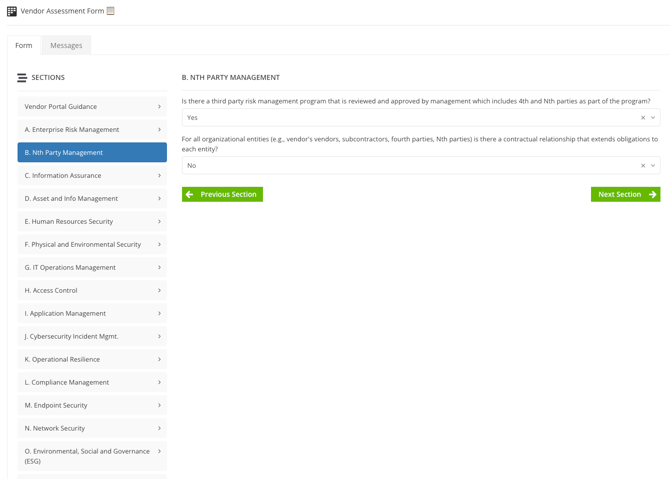
Once the assessment is sent, the vendor receives an email asking them to complete and submit the form via the Vendor Portal. The screenshot below shows how the form is displayed.
Mandatory Configuration
The steps in this section outline the essential setup required to make your workflow fully functional:
- Add the SIG Lite Assessment workflow template to your tenant as the starting point for the build
- Create the custom SIG Lite Status field that pulls vendors onto the workflow
- Configure the trigger to start the workflow when a vendor’s SIG Lite Status is set to SIG Lite Assessment Required
- Add the SIG Lite Status to the workflow form, and configure the AutoAction so that the status updates when the review is complete
See the Additional Configuration section for optional additions to expand the scope of your process or tailor the workflow to your organisation’s policies and procedures.
Add the Template
To get started, you'll need to add the template workflow:
- From the navigation menu, click Workflows.
- Click Add, then select Workflow Template.
- Click Create on the SIG Lite Assessment template.
- Amend the title if needed, then click Create.
Note: Adding the SIG Lite Assessment template automatically creates 169 custom fields. If you decide not to use the workflow, these fields need to be removed manually, so check that this setup suits your needs before proceeding.
Configure the SIG Lite Assessment Status Field
A custom SIG Lite Status field is required, so that vendor records are pulled onto the workflow automatically. To configure this:
- From the navigation menu, expand Settings, then click Configuration.
- Click Custom Data.
- Click an existing Vendor Custom Data Group or add a new one to store this field in. If you're planning to run more contract and vendor management processes in parallel, consider adding a custom data group to store all related statuses.
- Within the custom group, click Add New Custom Field.
- Enter a label for the field, e.g. SIG Lite Status, and select Dropdown list as the type.
- Add the following dropdown options, then click Save.
- SIG Lite Assessment Required
- SIG Lite Assessment Complete
- N/A
- SIG Lite Assessment Required
Configure the Trigger
After creating the custom SIG Lite Status field, configure the trigger using it as a condition:
- From the navigation menu, click Workflows.
- Expand the 3 dots on the relevant workflow, then select Workflow Triggers.
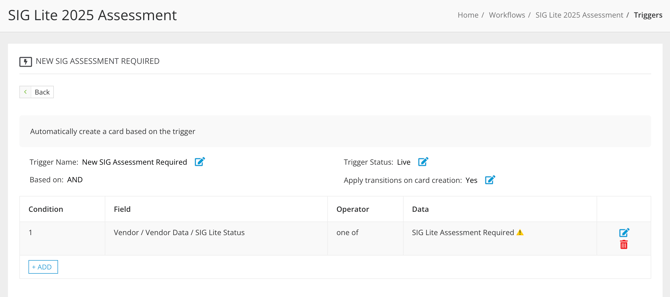
- Click the New SIG Assessment Required trigger to edit it.
- Click Add to assign the field you created as the trigger condition, as below:
- SIG Lite Status ➡️ is one of ➡️ SIG Lite Assessment Required
- Click Create.
Add the SIG Lite Status to the Workflow
You'll need to add the new SIG Lite Status field to the workflow form, so that it can be updated automatically once a vendor completes the process.
- Click the start phase of the workflow to edit it.
- Navigate to Form, then click Add Section and enter a section name.
- Select the following from the dropdown lists:
- Predefined: Vendor
- Custom Data Group: The custom group that contains the SIG Lite status field
- Click Save.
You should then hide this field on the workflow form, so that users cannot update it manually. To do this:
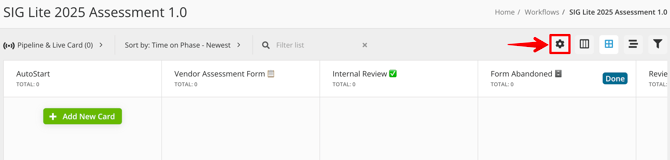
- Click the cog icon to access the workflow configuration.
- Locate the form section that contains the SIG Lite Status field.
- Select Hidden from the dropdown list on the start phase, then click the copy icon.
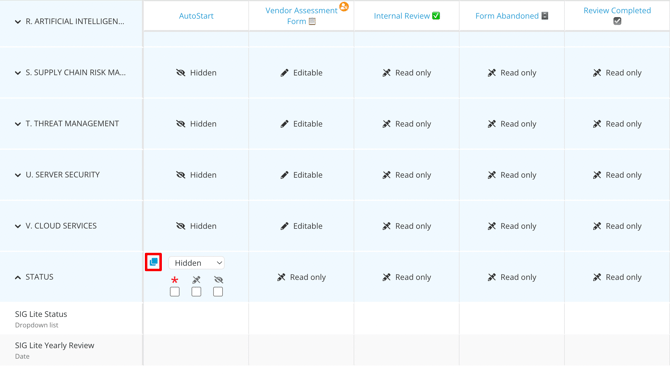
- Select the checkboxes for all other phases in the workflow. This will apply the settings for this section from the start phase to all other phases.
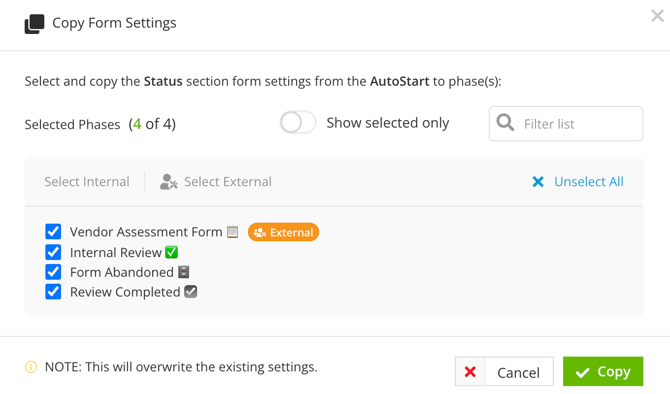
- Click Copy to save the changes.
Set the AutoAction Values
Once you’ve added the field to the form, configure the AutoAction so that a vendor’s status is updated when the workflow is complete:
- Click the Review Completed phase to edit it.
- From Actions, click Edit AutoAction Values alongside AutoAction | Update Vendor.
- Set the SIG Lite Status dropdown value to SIG Lite Assessment Complete.
- Click Save.
Additional Configuration
This section covers optional steps to adjust the workflow’s scope or default settings, helping you tailor it to your organisation’s needs.
Configure Recurring Reviews
If your organisation requires SIG Lite checks on an annual or recurring basis, you can configure the workflow to repeat at scheduled intervals.
Part 1: Add a Custom Date Field
First, add a custom date field that will pull vendors onto the workflow at the right time.
- From the navigation menu, expand Settings, then click Configuration.
- Click Custom Data.
- Click an existing Vendor Custom Data Group or add a new one to store this field in.
- Within the custom group, click Add New Custom Field.
- Enter a label the field, e.g. SIG Lite Review, and select Date as the type.
- Click Save.
Part 2: Add the Date Field to the Form
Next, add the date field to the workflow form, so that it can be populated automatically as part of the workflow.
- Click the start phase of the SIG Lite Assessment workflow to edit it.
- Navigate to Form, then click Add Section and enter a section name.
- Select the following from the dropdown lists:
- Predefined: Vendor
- Custom Data Group: The custom group that contains the SIG Lite Review field.
- Click Save.
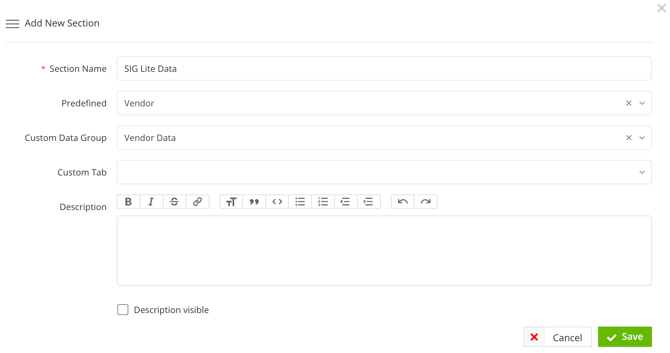
Note: If the custom data group has already been added as a form section, click Add Field to add the new SIG Lite Review field.
Part 3: Set the Date via AutoActions
Configure the AutoAction so that the field is populated on the vendor’s record when the workflow is complete:
- Click the Review Completed phase to edit it.
- From Actions, click Edit AutoAction Values alongside AutoAction | Update Vendor.
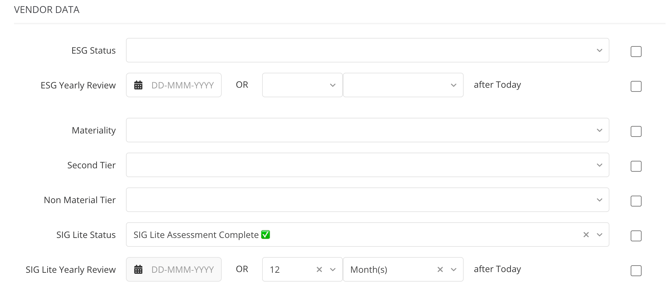
- From the SIG Lite Date field, select the relevant period of time e.g. 12 Months after Today.
- Click Save.
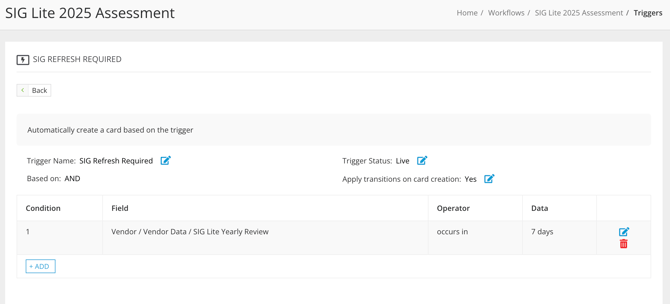
Part 4: Create a Trigger
Finally, set up a trigger to pull vendors onto the workflow automatically when their review date is approaching.
- From the navigation menu, click Workflows.
- Expand the 3 dots on the relevant workflow, then select Workflow Triggers.
- Click the SIG Refresh Required trigger to edit it.
- Under Conditions, click Add then locate the newly created custom date field.
- Configure the condition, for example Next SIG Lite Review occurs in 7 Days, then click Create.
Additional Setup Outside the Workflow
If you’ve followed all of the steps above, your workflow is nearly ready to launch. To help the process run smoothly and reliably, there are a few additional areas of your tenant worth reviewing.
Add the Custom Status Field to Other Workflows
When running the SIG Lite workflow alongside other vendor assessment processes, such as onboarding, it’s recommended to start it automatically when a new vendor is added.
To do this, add the SIG Lite Status field to the other workflow’s form, then use an AutoAction to set it to SIG Lite Assessment Required when the vendor is created. This lets multiple onboarding activities run in parallel, helping you onboard vendors faster. To learn about configuring this, see Parallel Workflows.
Add Vendor Users
Before vendors can complete the questionnaire on the Vendor Portal, ensure the relevant contacts have been added as vendor users:
- From the navigation menu, click Vendors.
- Click on the relevant vendor record to open it.
- Click the Vendor Users tab to view existing contact details.
- Click Add, then select Vendor User to add a new contact.
⚡️Getting Started - Activate the Triggers⚡️
Once your workflow is fully configured, activate the triggers to make it live:
- From the navigation menu, click Workflows.
- Expand the 3 dots on the relevant workflow, then select Workflow Triggers.
- For any trigger with a Pipeline status, click on the trigger’s name.
- Click the pencil icon on Trigger Status.
- Select Live from the dropdown list, then click Update.
- Click < Back to return to the list of triggers.
- Repeat steps 3-5 until all triggers are live.
FAQs