
![]() Estimated Read Time: 4 minutes
Estimated Read Time: 4 minutes
Sections in this article:
- Contract Clause Library (Conditional Handlebars)
- Preview a Contract Template
- Edit a Contract Template
- Frequently Asked Questions
What is a Contract Template?
Contract Templates are a way of centrally storing your compliant and pre-approved legal Microsoft Word® contract documents in Gatekeeper.
These can be configured with dynamic tags which allow Gatekeeper to populate and customise the document for you when generating new contract drafts.
Note: Templates can be manually or automatically selected in Workflow Actions to generate drafts during contract setup workflow processes. To understand how these templates are used, see Create a Draft from a Contract Template.
You can store an unlimited number of eNegotiate Templates in Gatekeeper, as well as multiple documents per associated Contract Type.
Create a Contract Template
To use a contract template in Gatekeeper, it must first be configured as an eNegotiate Template.
Note: Users require the Global Administrator role, and the Configuration additional permission to add or modify eNegotiate Templates.
- From the navigation menu, expand the Settings option, then click Configuration.
- Click eNegotiate Contract Templates.

- Click Add MS Word Template.
- Complete the mandatory fields.

- Title - This is the name of the template that appears in the associated workflow phase.
- Contract Type - Selected the contract type that this template will be associated with.
- Status - Both Pipeline and Live eNegotiate Templates will be visible in a workflow.
- Document - This is the Microsoft Word® file used to generate the eNegotiate draft. If you wish to have details within the contract automatically populated during the eNegotiate workflow, you can use predefined handlebars.
- If required, add a description and an optional PDF preview that users can download within a Touchless Contract Form.
- Once finished, click Save.
Note: Ensure that the Template file type is docx instead of doc. This may require you to update to a newer version of Microsoft Word®.
What is a Handlebar?
Handlebars allow you to pull data from Gatekeeper to automatically populate eNegotiate Templates. When a contract draft is generated, Gatekeeper replaces the handlebars with relevant data and clauses. There are five types of handlebars that can be configured in Gatekeeper:
- Contract - including core and custom data
- Vendor - including core and custom data
- Entity
- Contract Clauses
- eSign
Configure Handlebars
When creating a contract template, click Handlebar Instructions to see the list of available handlebars that can be added to your Microsoft Word® Template. You can then Export Instructions to PDF as needed.

Simply enter the relevant Key in the left column to your document where appropriate before you upload and save it as a template in Gatekeeper. The Key will be substituted with the relevant metadata entered into the form where available.
Note:
- Handlebar keys will be removed from the generated Contract Draft if the associated fields are empty.
- Handlebars will only work for templates added via the eNegotiate Configuration area. Handlebars will not function for files uploaded manually in Gatekeeper.
Using Handlebars with Office for the Web
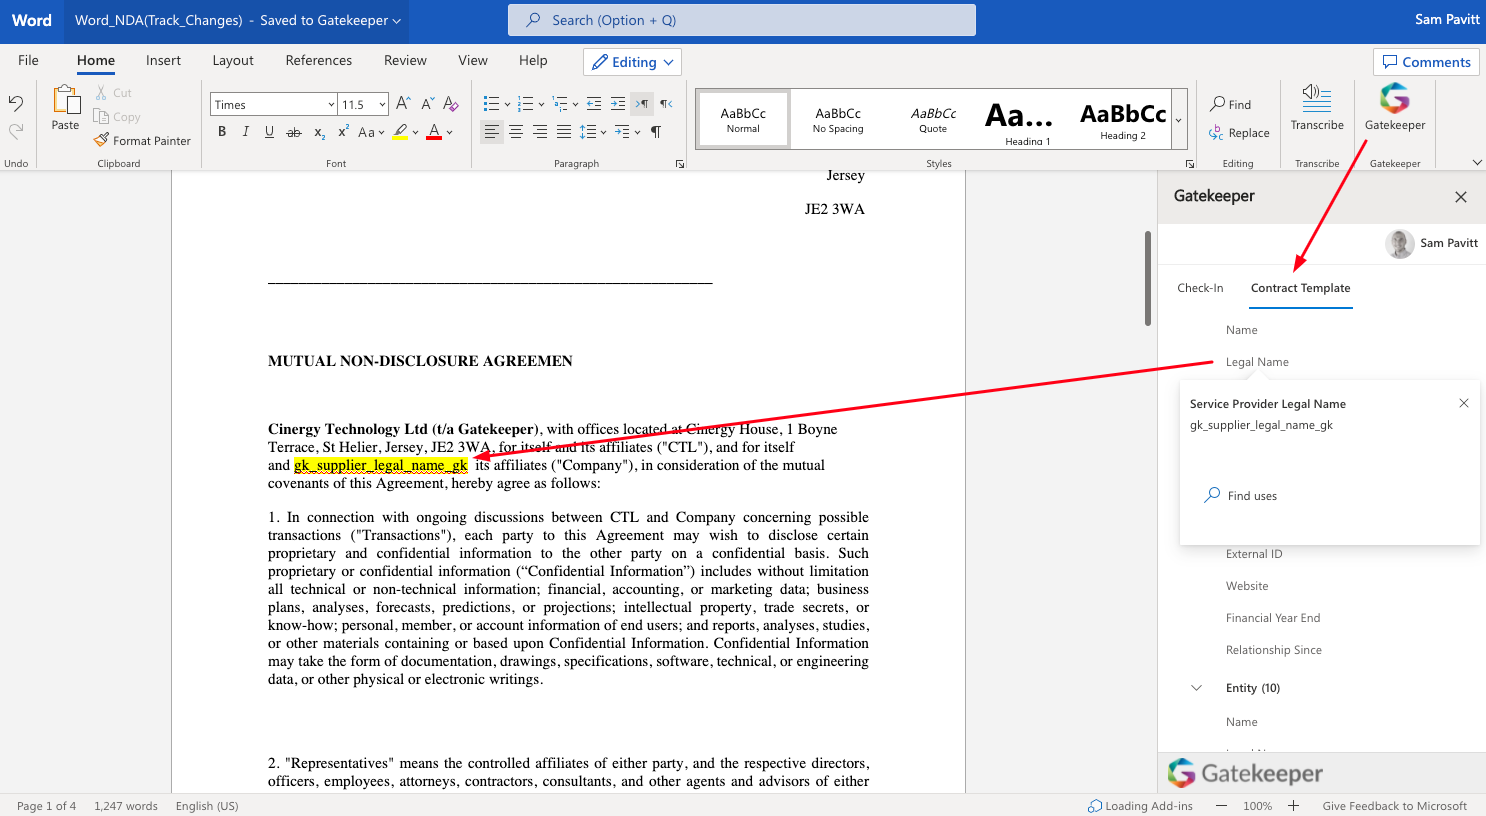
When editing a Microsoft Word® agreement in Office for the Web, you can insert handlebars via the Gatekeeper Add-In, which automatically loads when opening an Office for the Web document from within Gatekeeper.
Click the Gatekeeper logo within the Office for the Web ribbon, then click Contract Template and double click the relevant handlebar to place it at your current cursor location.
Contract Clause Library (Conditional Handlebars)
In addition to metadata and eSign handlebars, you can also build a Contract Clause Library in the eNegotiate Configuration area using conditional handlebars. This removes the manual task of adding complex clauses based on conditional data for the contract, and automates the generation of compliant, pre-approved legal agreements.
To use this feature:
- First, create some custom data fields with the type of dropdown list.
- From the eNegotiate Contract Templates configuration area, click Add Handlebar.
- Enter a title, then enter the clause for each option of the dropdown list. A default value should also be added in the case no values are selected.

- Click Save.
This will now be available as a conditional handlebar under the Contract Clauses tab of your handlebar instructions page. Once the conditional handlebar is added to an eNegotiate Template, the appropriate clause will appear in the contract draft based on the dropdown option selected for the contract.

Edit Contract Clauses
Any of the contract clauses added to the Contract Clause Library can be edited by expanding the 3 dots and selecting Edit.

Click Save after making the required changes.
Preview a Contract Template
Within the eNegotiate Contract Templates configuration area, you can view all your contract templates and preview them:
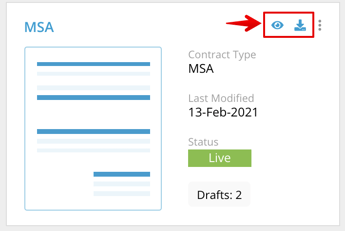
- Click the eye icon to preview the .docx version of the eNegotiate template within the browser window
- Click the download icon to download the document to your device.
- Clicking the template name will display further options for the file.

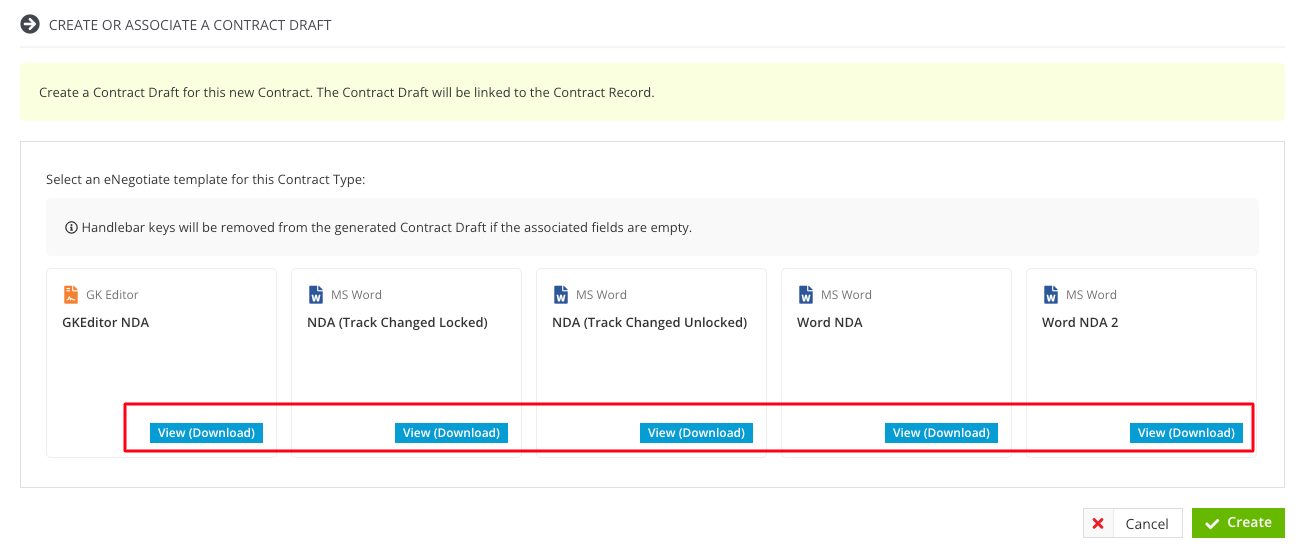
eNegotiate Templates can also be viewed within a workflow phase designed for contract draft creation. Click View (Download) to review the docx version.
If using a Touchless Contract Form within a workflow process, the eNegotiate template can be configured to display in a preview pane. Click the blue download icon to view in a separate browser tab or click the grey document icon to download it directly as a PDF to your computer.

Edit a Contract Template
eNegotiate Templates can be edited from the configuration area by expanding the 3 dots and selecting Edit.
Any of the available fields can be adjusted, including the associated Microsoft Word® file. If updating the file, it is also recommended to update the PDF Document (if required).
Frequently Asked Questions
Question: My template is not formatted correctly. It shows blank pages and/or odd spacing.
- Update MS Office: Ensure that MS Office software is up to date.
- Check for hidden characters: In Word, go to the "Home" tab and click on the paragraph symbol (¶) in the "Paragraph" section. This will display all the hidden formatting characters in the document. Look for any unusual or unnecessary characters, such as extra spaces, line breaks, or special symbols. Remove or adjust them as needed.
- Remove manual page breaks: Manual page breaks can sometimes cause formatting issues when converting to PDF. Go through the document and remove any manual page breaks that may be unnecessary or cause problems. To do this, place the cursor just before the manual page break and press the "Delete" key.
- Check for unsupported fonts: Certain fonts may not be supported by PDF converters, leading to formatting problems. Review the document for any unusual or custom fonts and replace them with more common fonts. To do this, select the text with the unsupported font, go to the "Home" tab, and choose a common font (i.e. Arial).
- Split the document into smaller sections: If the formatting issues occur only in specific sections of the document, try splitting the document into smaller parts and converting them individually. This can isolate the problem - then, focus on troubleshooting and adjusting the formatting in that specific section.
- Important: Remember to save backups of the Word document before attempting troubleshooting steps to avoid unintended changes to the original document.