⚡️ Gatekeeper Expert - Parallel Contract Request and Vendor Onboarding Workflows ⚡️
Discover how to run concurrent workflows for multi-layered processes to save time and administrative effort.
![]() Estimated Read Time: 5 Minutes
Estimated Read Time: 5 Minutes
![]() Estimated Configuration Time: 20 - 30 Minutes
Estimated Configuration Time: 20 - 30 Minutes
Sections in this article:
Introduction
Vendor and contract lifecycle processes such as onboarding, NDA signing, risk assessments, internal approvals and contract negotiations can be time-consuming, especially when completed in sequence.
However, AutoActions and automated triggers allow you to run these processes in parallel. This reduces lead times by minimising manual intervention and bypassing bottlenecks caused by multiple stakeholders or compliance steps.
The Use Case - Contract Request and Vendor Onboarding
When requesting a contract for a new vendor, formal onboarding is typically required first. This can delay negotiations, and contract requestors may be reluctant to wait for the full onboarding to finish before starting discussions.
Using AutoActions allows you to run both workflows in parallel. This allows progress on negotiations while holding execution until the vendor passes all compliance and risk checks.
Diagram
When an existing vendor is selected in a contract request, no due diligence assessments are required as they should already be onboarded. However, requests with a new vendor will automatically trigger a separate onboarding workflow. The vendor can then complete any questionnaires and onboarding assessments while negotiations on the contract continue.
Before the contract is eSigned and executed, there is a final approval stage to ensure that the vendor has successfully completed the onboarding process.
🛠 Configuration 🛠
The steps below will walk through how to configure your contract request and vendor onboarding workflows to run in parallel. If you do not already have these workflows set up, see the Vendor Onboarding and Contract Request best practice templates.
Add the AutoCreate Vendor Action
First, you'll need to add an AutoAction phase to the contract request workflow. While it can be placed immediately after the request phase, it's recommended to place it after an initial review or approval to confirm the request is valid. This prevents triggering onboarding for vendors tied to unapproved services.
- Navigate to the contract request workflow, then next to New Phase, click ADD.

- Enter a phase title e.g. AutoCreate Vendor then click Save & Next.
- From Actions, select the AutoAction | Create Vendor checkbox.

- Click Edit AutoAction Values, then ensure that the Take Value from Form checkbox is selected for all fields except Status and Approval, which should be set Pipeline and Awaiting Approval respectively.

- From Transitions, select the radio button for the next phase in the process.
- Click Back to Workflow, then click
 Reorder to move the phase to the appropriate point in your workflow, ensuring it comes before the Create Contract phase.
- Click to edit the phase before the new AutoAction phase, then from Transitions select the radio button for the new AutoCreate Vendor phase.

Trigger the Vendor Onboarding
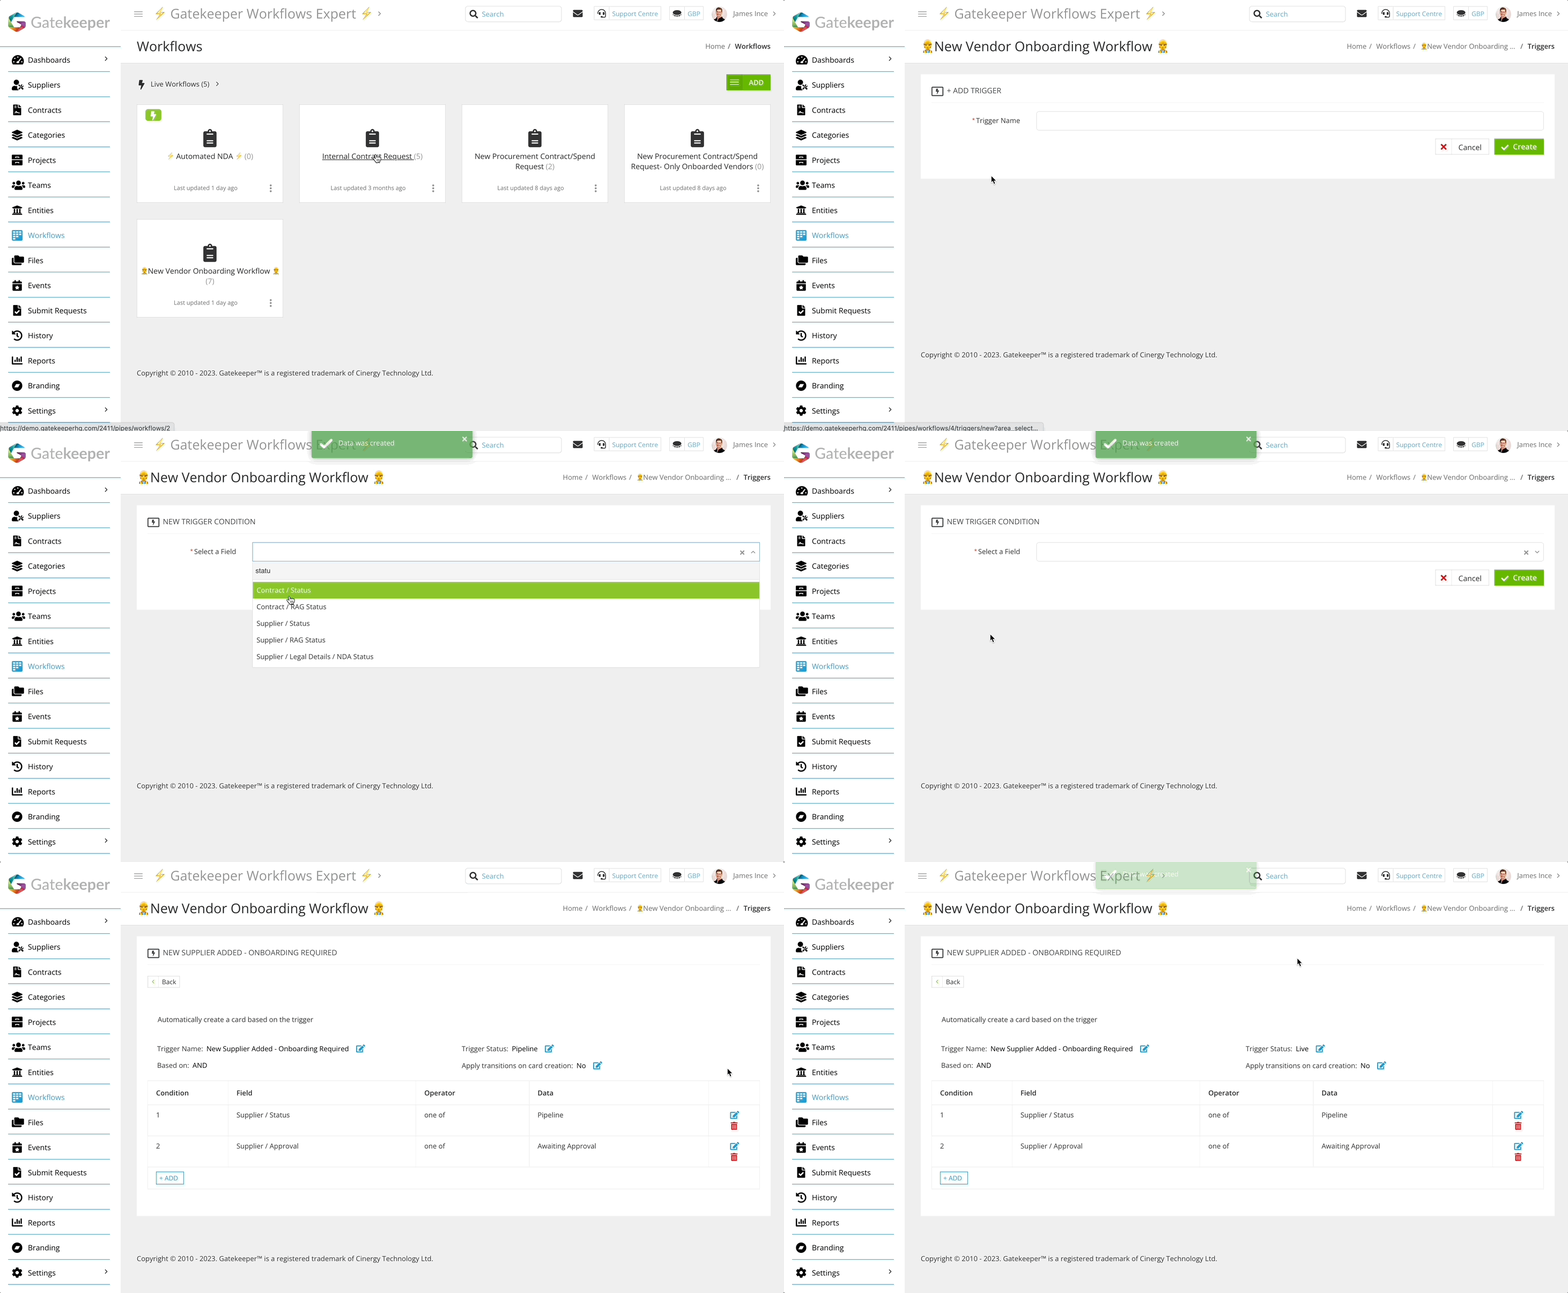
Next, configure a trigger on the vendor onboarding workflow to pull in new vendors.
- From the navigation menu, click Workflows.
- Expand the 3 dots on the vendor onboarding workflow, then select Workflow Triggers.
- Click ➕ ADD TRIGGER
- Enter a name, e.g. New Vendor Added - Onboarding Required then click Create.
- Click➕ ADD to assign the following conditions:
- Vendor / Status is one of Pipeline
- Vendor / Approval is one of Awaiting Approval
- Click Create.
- Click the pencil icon next to Trigger Status and select Live, then click Update.

Add a Conditional Approval
To confirm vendor onboarding is complete, add an approval at the end of the contract request workflow before eSigning. This can be handled by a central vendor management user or team.
- From the contract request workflow, click the final approval phase to edit it.
- From Approval, ensure that the Enabled and Parallel radio buttons are selected.
- If you currently have Simple enabled, navigate to Form Access to check who is responsible for this phase, then add them as a parallel approver first.
- Click➕ ADD NEW PARALLEL APPROVAL.
- Select the required users or groups, then select the Conditional radio button and click Save. Usually this would be the main Gatekeeper admin, or the Vendor Management/Procurement team.
- Click➕ ADD to assign the following conditions:
- Vendor / Status is one of Pipeline
- Vendor / Approval is one of Awaiting Approval
If you do not have a final approvals phase:
- Add a new phase to the workflow.
- Enable approvals, then configure the settings in Form Access, Notifications and Transitions accordingly.
- Reorder the phase into the correct position.
- Add a conditional transition to the preceding phase to repoint any new vendors to this phase, while existing vendors will bypass it.
Edit AutoAction Values for Onboarded Vendors
Finally, you'll need to configure the vendor onboarding workflow to automatically update the values for Status and Approval on the vendor record.
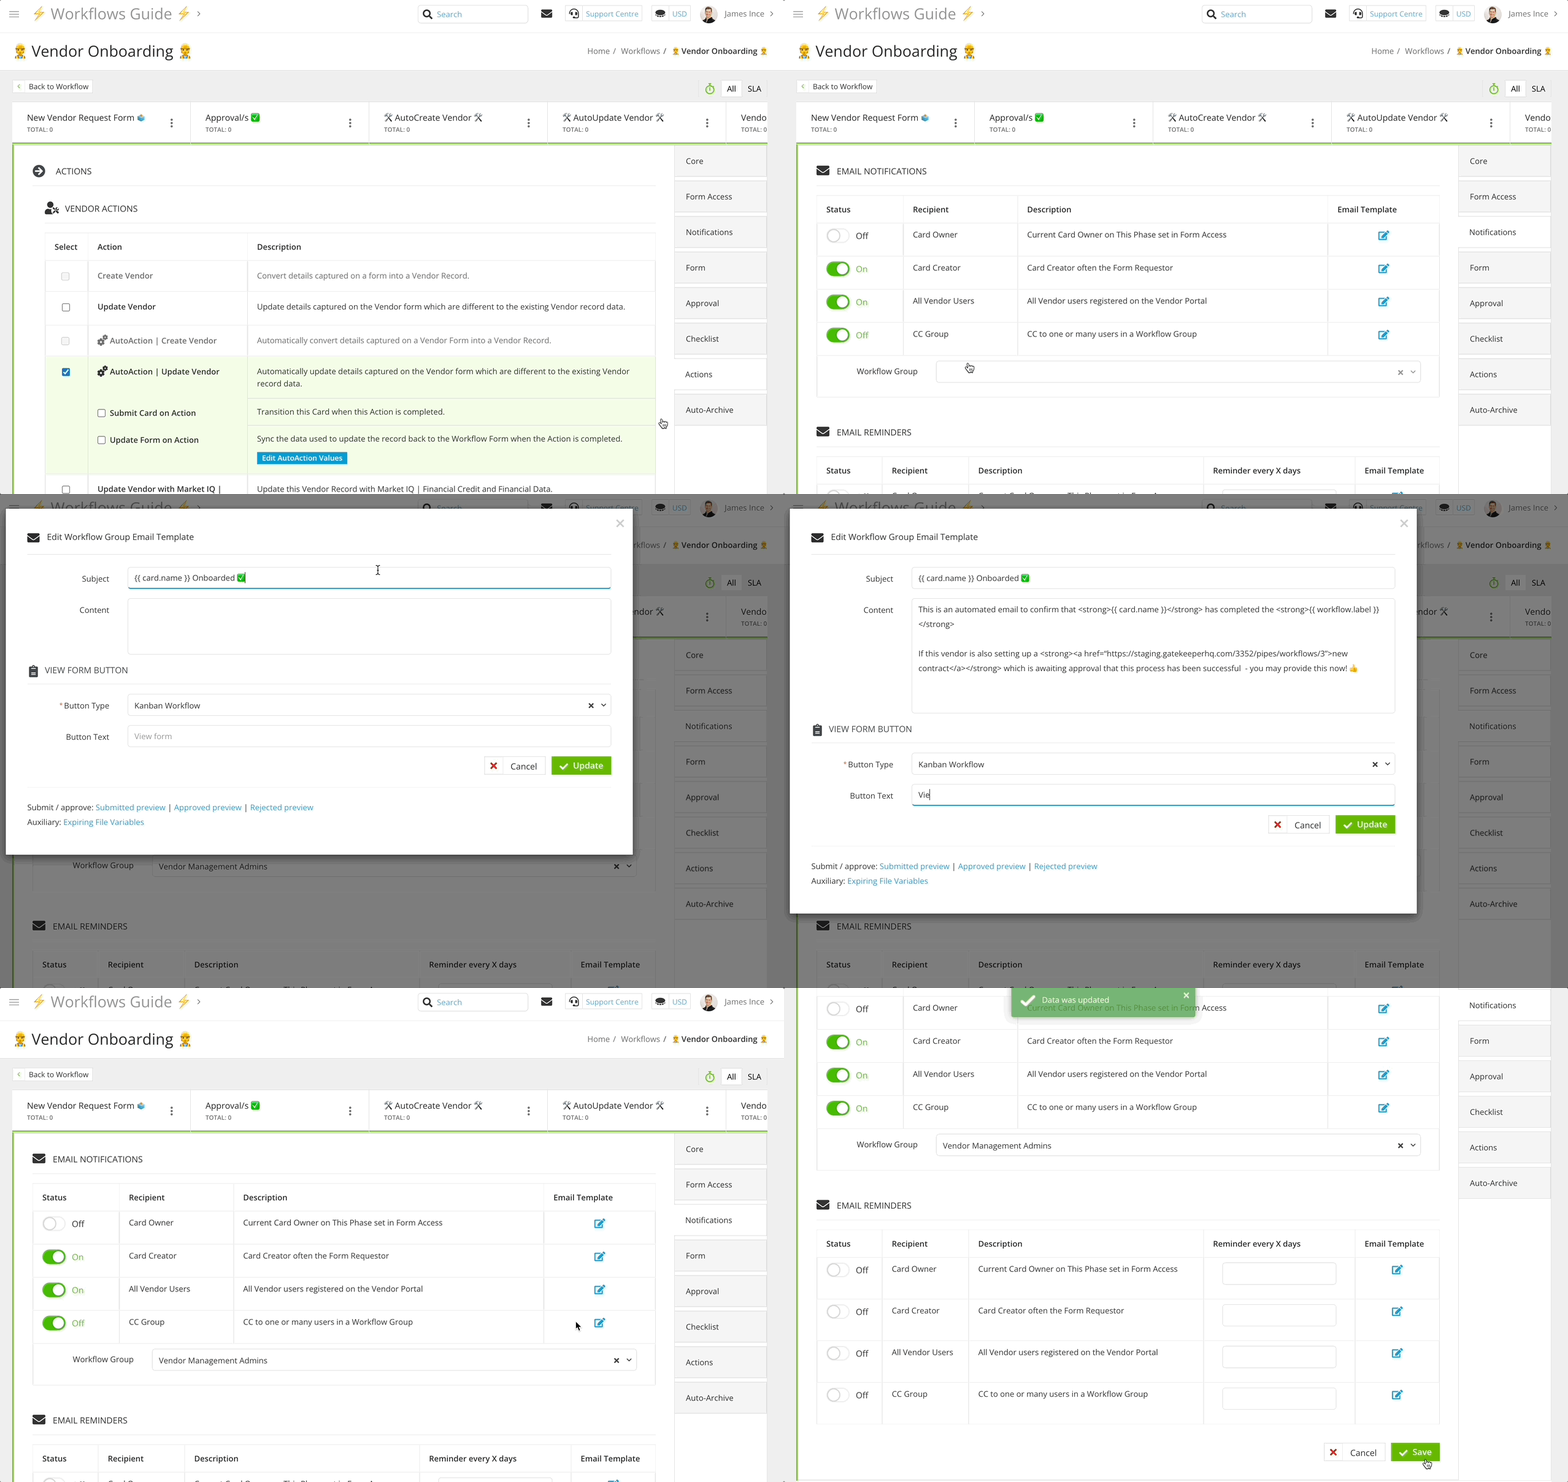
- Click to edit the Done phase on the vendor onboarding workflow.
- From Actions tab, select the AutoAction | Update Vendor checkbox.
- Click Edit AutoAction Values, then ensure that the Take Value from Form checkbox is selected for all fields except for Status and Approval, which should be set to Live and Approved respectively.
- From Notifications, enable the email notification toggle for the CC Group recipient.
- Select the group used in the final approval stage of the contract workflow.
- Populate the Email Template content then click Update.

To copy the example notification content, click to expand the section below:
Example Notification Email Content
This is an automated email to confirm that <strong>{{ card.name }}</strong> has completed the <strong>{{ workflow.label }}</strong>

If this vendor is also setting up a <strong><a href="CONTRACT WORKFLOW URL">new contract</a></strong> which is awaiting approval that this process has been successful  - you may provide this now! 👍
FAQ 💬
Q: Does the contract request workflow have to run in parallel with a vendor onboarding workflow?
A: You can use this method to link any initial compliance and setup steps taken before working with new vendors. This could be risk assessments and due diligence checks, or simply getting a new NDA, MSA, or Terms & Conditions agreement in place.
Q: Can more than two workflows run in parallel?
A: Yes, you can use a similar technique to link a vendor onboarding workflow with separate standalone ESG, Modern Slavery, Financial Risk, or NDA Execution workflows.
Additional Reading 📚
- Configure a Workflow Trigger - Learn how to configure automatic triggers for workflows.
- Test Gatekeeper - Learn how to create users for testing purposes, to experience all parts of a new workflow process from multiple perspectives.
- ⚡️ Test Triggered Workflows - Learn how to set up custom fields for the purpose of testing triggered workflows, without having to wait for real trigger scenarios to occur.
- 🛠 Create your own - Vendor Onboarding Workflow - See how to configure our Best Practice Vendor Onboarding workflow template.