
This article provides an overview of the Help Desk functionality, and how to configure it.
![]() Estimated Read Time: 4 minutes
Estimated Read Time: 4 minutes
Sections in this article:
What is the Help Desk?
The Help Desk functionality enables you to set up incoming email routing so that any emails sent to your company's internal help desk email address (for example procurement@yourcompany.com) are also sent into Gatekeeper. This means that any inbound queries on contracts or vendors are captured within a central area where they can be triaged, assigned, replied to, and associated with records in Gatekeeper. You can designate specific team members as Help Desk users within Gatekeeper.
Configure the Help Desk
Set Up Email Forwarding
To ensure that emails sent to your team’s support address (for example procurement@yourcompany.com) are automatically captured in Gatekeeper, you’ll need to set up email forwarding. This connects your existing inbox to Gatekeeper’s Help Desk feature so your team can manage and respond to requests directly within the platform. To do this:
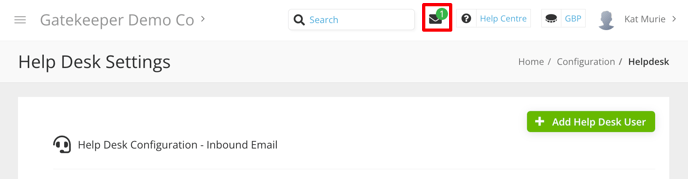
- From the navigation menu, expand Settings then click Configuration.
- Click Help Desk.
- Click the
 copy icon to copy the email address to your clipboard.
 - Set up email forwarding so that any email sent to your existing inbox also goes to this unique Gatekeeper address. The instructions to do this will depend on your email provider.
Now any email sent to your internal inbox will automatically appear in Gatekeeper's Help Desk.
Add a Help Desk User
To ensure that users can view, respond to, and be notified about incoming Help Desk messages, they need to be added as a Help Desk user in Gatekeeper. Only users assigned this role will receive notifications and be able to manage messages within the Help Desk feature. To do this:
- From the navigation menu, expand Settings then click Configuration.
- Click Help Desk.
- Click Add Help Desk User.

- Search for and select a user from the dropdown list, then click Save.
Manage Help Desk Messages
Once the Help Desk has been configured, Help Desk users can review and respond to messages.
Notifications
Help Desk users will receive email notifications whenever a new message is sent to the Help Desk. This contains a link to open the message in Gatekeeper:

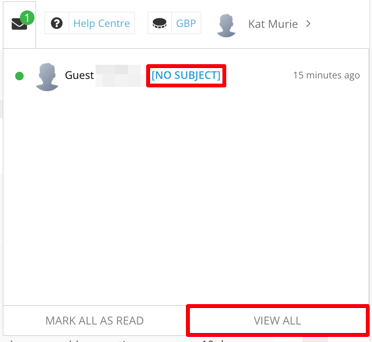
The Help Desk user will also see the number of unread messages displayed on the envelope icon:
After clicking the envelope icon, they can either open the specific message by clicking on the subject link, or click View All.
Help Desk users can also expand their profile icon and click My Messages to view their help desk messages.

View Messages
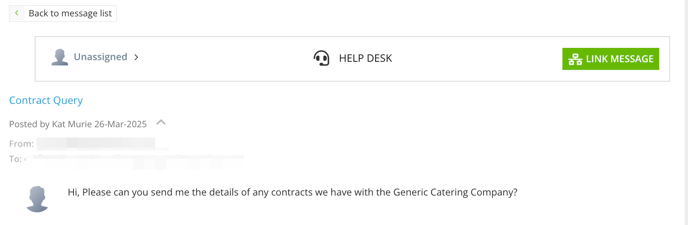
Once the message has been opened, the Help Desk user can see the details of the email and any attachments.
Respond to a Message
Help Desk users can respond directly in Gatekeeper by typing their message, adding any attachments, and clicking Post Comment.

Link to Vendor or Contract Record
The Help Desk user can associate the message with a vendor or contract. To do this:
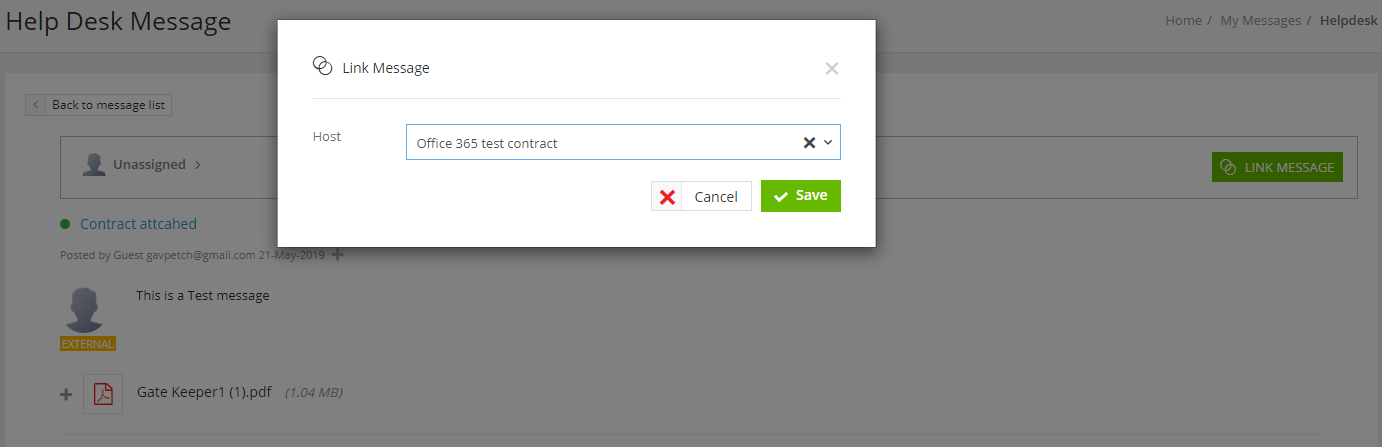
- Open the message and click Link Message.
- Search for and select the contract or vendor from the dropdown list.
- Click Save.
The message and any attachments are now linked to the contract or vendor record. Click on the link to open the contract or vendor record in a new tab.

Note: You can update the associated contract/vendor by clicking Change.
Once the message is linked to a contract or vendor:
- the message can be found within the Messages tab of that record.
- any attached files are displayed within the Files tab of that record.
Assign an Owner
You can assign a message to a specific Help Desk user if they are responsible for handling the query. To do this:
- Open the message and click Unassigned.

- Search for and select the user from the dropdown list.
- Click Save.
Archive Message
The Help Desk user can archive the message. This is useful if they have actioned the message and want to remove it from the active list. To do this, at the bottom of the message thread, click Archive Message.
