
![]() Estimated Read Time: 14 minutes
Estimated Read Time: 14 minutes
Sections in this article:
Want to learn more? For an interactive overview of workflow forms, head to the Gatekeeper Academy course on Building Workflow Forms.
What are Workflow Forms?
Workflow forms are digital questionnaires that gather structured data for a workflow card. Each form can be customised with the following types of sections to collect the exact data you need:
- Predefined Data: fields stored on records in the Vault, and can be populated as part of the workflow. This can be:
- Workflow Only Data: fields that exist only within the workflow and are not saved to the record in the Vault. These are used to collect information that is specific to the workflow process, which can be used to drive conditional logic.
Note: Every workflow form must include at least one Predefined Contract or Vendor core data section. This is how Gatekeeper associates the workflow card with a record in the Vault, enabling data collected during the workflow to be written back to the correct contract or vendor. Without this, any data captured in the form cannot be linked to a record.
You also have control over the visibility of each form section, deciding what is editable, read-only, or hidden. These can be based on conditions like vendor type or approval status.
Where Are Forms Configured?
Note: Users require the Workflow Administrator or Local Workflow Administrator permissions to configure workflow forms.
A workflow has a single form that runs throughout the entire process. All sections and fields should be added on the first phase of the workflow. When added here, they are automatically available across all other phases too.
Once the form is built, you can then configure the visibility of each section and field on a phase-by-phase basis, controlling what each user sees and can edit at each stage of the workflow. This ensures the right people see the right information at the right time, without needing to build separate forms for each phase.
To start building your form, click the name of the first phase to edit it.

Then, click the Form section:

Add Sections to a Form
To add a section:
- Click ADD SECTION.

- Enter a name for the section. This will appear as a heading on the form.
- Select the section type:
- Core data: select Contract, Vendor, or Attached File with Expiry Date from the Predefined dropdown, and leave any other dropdown lists blank.
- Custom data: select Contract, or Vendor, then select the relevant option from the Custom Data Group or Custom Tab dropdown.
- Workflow Only data: leave the Predefined dropdown blank.
- If needed, enter a description to provide guidance to users completing the form. Select the Display Description checkbox to make it visible on the form.
- Once finished, click Save.
Your new section will then be added to the form. If the section is Predefined, its fields will be added to the form automatically.
Note:
- To associate workflow cards with existing records in your repository, select the Associate Contract/Vendor with the card checkbox on the Contract/Vendor Name field. See Associate Existing Contracts and Vendors in a Workflow Form for further information.
- Custom groups marked as sensitive can be added to workflow forms, and users with access to the form will be able to populate and view data in these fields regardless of their sensitive data permissions. See Configure Sensitive Data for further details.
Add Fields to a Section
You can add fields directly to a form section in the following scenarios:
- While building a Workflow Only section
- When restoring fields in a Predefined section (e.g. if a field was deleted and needs to be re-added).
To do this:
- Click ADD FIELD on the appropriate section.

- Enter a Label, and configure the settings for the field. See Edit Fields for a full description of the available settings.

- Once finished, click Save.
The field will now appear in the appropriate section.
-png.png?width=670&height=155&name=Monosnap%2011%F0%9F%93%91%20Internal%20Contract%20Request%20%F0%9F%93%91%20_%20Gatek%20(1)-png.png)
Note: You cannot add additional fields to core data sections, as these reflect the prebuilt core data model. Any extra fields must be added as custom data, or in a workflow only section.
Form Visibility
Each section of a form can be set to one of the following visibility options per phase:
- Editable: users can view and edit the section
- Read Only: users can view the section but cannot edit it
- Hidden: the section is not displayed to users
- Custom: visibility is controlled by rules you define
Each individual field can also be set as Mandatory, Read Only, or Hidden.
Manage Section Visibility
To configure section visibility on an individual phase:
- Click the name of the phase to edit it, then click Form.
- For each section, select the relevant radio button: Editable, Read Only, Hidden, or Custom.

Custom Visibility
Custom visibility allows you to define conditions that control whether a section is shown, hidden, or editable when a card enters a phase. There are two ways to use custom visibility:
-
Based on form data: set conditions using fields and values to control visibility based on the form data, for example hiding a financial summary section when the contract type is set to NDA. To do this, add conditions and leave the workflow group blank to apply this to all users.
-
Based on who is viewing the form: the visibility setting will apply to anyone in that group, regardless of what data is on the card. For example, showing an internal notes section only to users in a Legal review group. To do this, assign a workflow group to the rule and leave the conditions blank.
Both approaches can be combined, for example showing a section only to users in a Finance group AND only when the contract value exceeds a certain threshold.
To add conditions to section visibility:
- Select the Custom radio button on the relevant section.

- Click the pencil icon next to Visibility and select how the section should be displayed when the conditions are met, for example Read Only or Hidden.
- If the rule should only apply to a specific group of users, select the relevant Workflow Group. Leave this blank to apply the rule to all users.
- If the rule should be based on form data, click Add to create a condition and select the required field, operator, and value from the dropdown lists, then click Create. Repeat this step to add further conditions if required.

- To configure visibility for additional workflow groups or form-based criteria, click Add New Set of Conditions and repeat steps 2 to 4.
- Click the pencil icon next to Based on and select how the conditions should be evaluated:
- And: all conditions must be true for the rule to apply
- Or: any one condition being true will apply the rule
- Click Save.
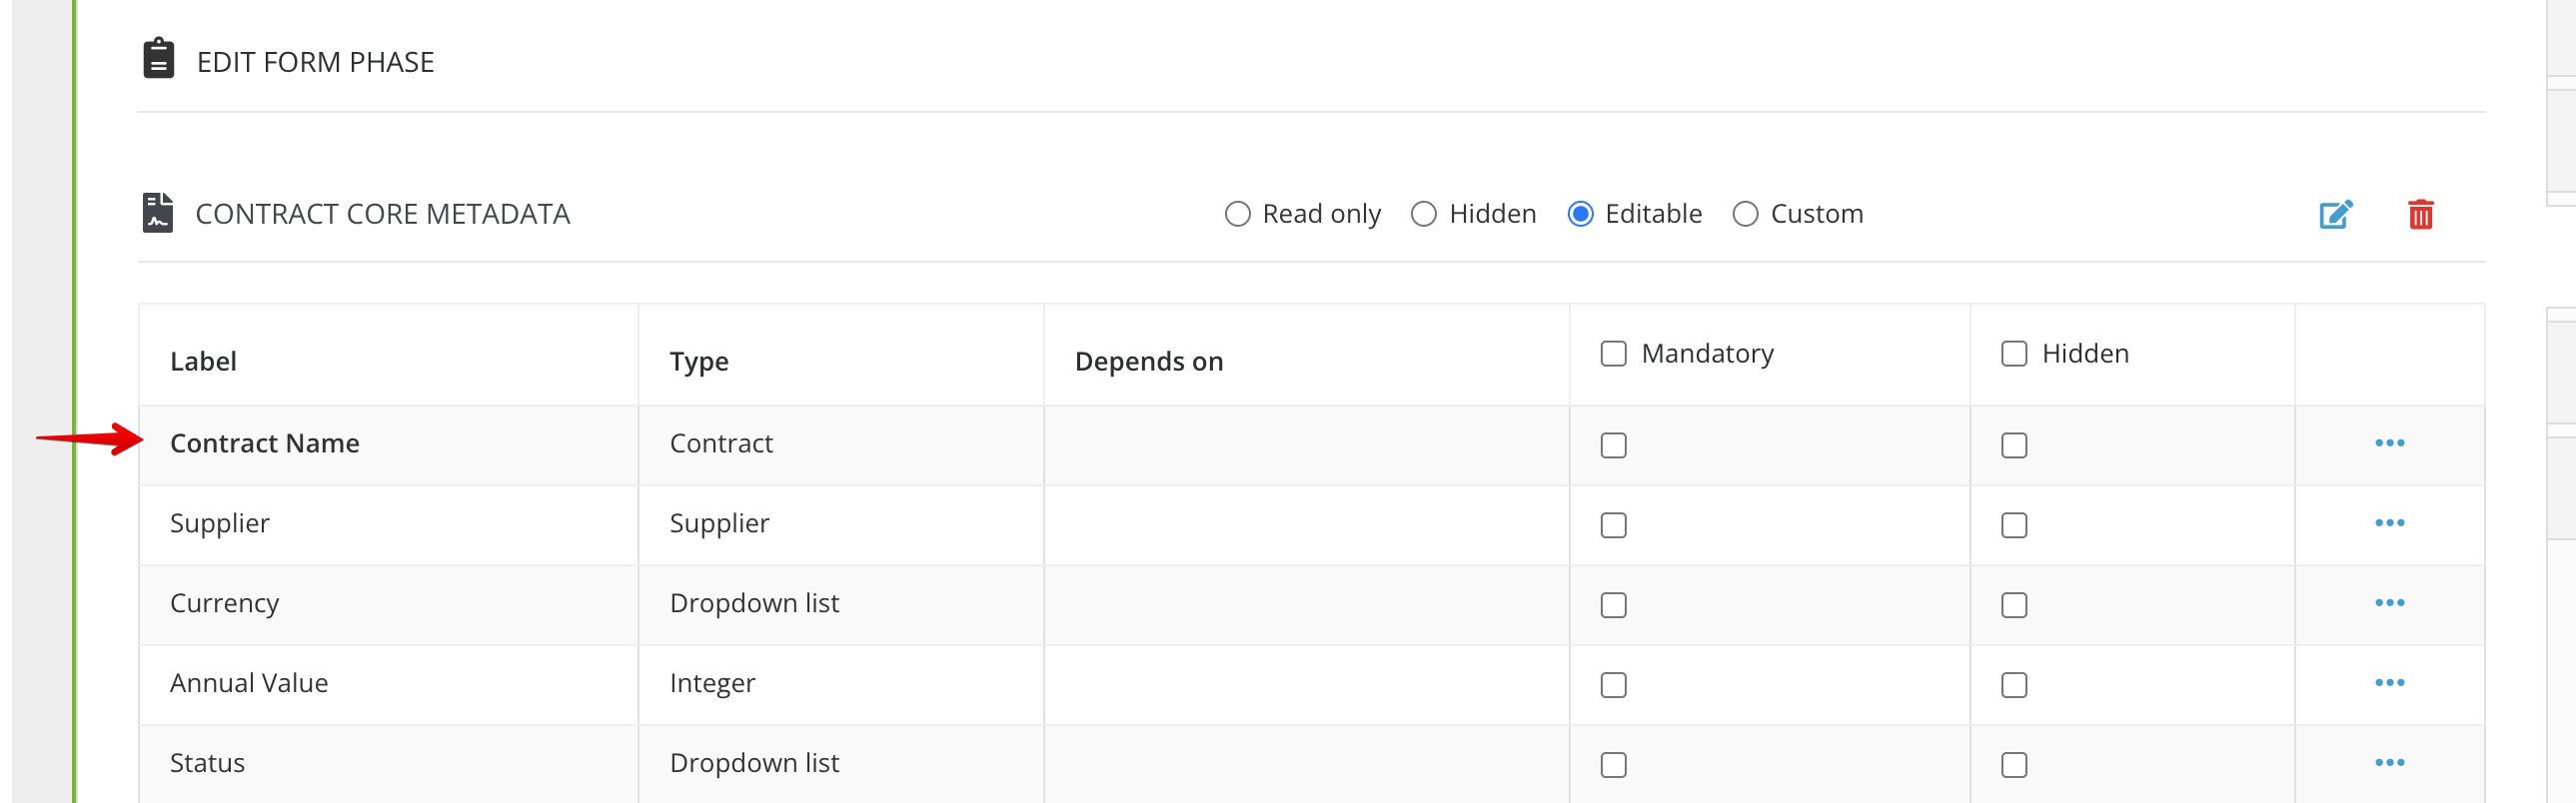
Manage Field Visibility
Field visibility can be set individually or for all fields within a section. For each field, select the relevant checkbox:
- Mandatory: the field must be completed before the form or phase can be submitted
- Read Only: the field is visible but cannot be edited
- Hidden: the field is not displayed on the form

To apply a setting to all fields in a section at once, select the checkbox in the top row of the section.
Note:
- You cannot have a field set to Hidden and Mandatory at the same time. In this case, selecting the second option will deselect the first automatically.
- If a field is set to Mandatory but it’s dependent on another field, the mandatory rule only applies when it becomes visible.
Manage Visibility Across All Phases
When building workflows, editing form and section visibility in each phase can be time-consuming. Therefore, if there are many sections and phases in the workflow, they can be managed from the Configuration View.
Follow the demonstration or the steps below to learn more:
- Click the settings icon to access the Configuration View.
-png-1.png?width=670&height=177&name=Monosnap%20%F0%9F%91%B7%20Vendor%20Onboarding%20%F0%9F%91%B7%20_%20Gatekeeper%20-%20Go%20(20)-png-1.png)
- To set the section visibility, hover over the relevant section box and select from the dropdown list.

- For custom rules, add your conditions and once finished, click Done & Close.

- For custom rules, add your conditions and once finished, click Done & Close.
- To set the field visibility:
- Hover over the section box and select the appropriate checkbox to apply the visibility to all fields within the section.
- Hover over an individual field box and select from the dropdown list to apply the visibility to fields one-by-one
- To copy section/field visibility settings to other phases, click the copy icon. Then, select the checkboxes to determine which phases you want to copy the settings to, and click Copy.

Changes are saved automatically.
Edit Fields
To edit fields within a section:
- Click the start phase to edit it, then click Form.
- Expand the 3 dots on the relevant field, then click the pencil icon
 .
. - Update the following as required:
- Label: the name of the field as it will appear on the form and throughout the workflow.
- Visibility: select Mandatory, Read Only, or Hidden.
- Set as card name: select this to use the field value as the card name. See Set Card Name for more details.
- Type: for fields in a Workflow Only section, select the field type. This cannot be amended after creation, and will be locked for fields in a Predefined section.
- Description: optional text displayed below the field label to provide guidance to users.
- Text: optional text displayed when a user hovers over the tooltip icon. If left blank, the tooltip will not appear.
-
Link: an optional URL attached to the field. It's recommended to use a shortened URL where possible.
-
Link Text: a display name for the link, shown instead of the full URL.
- Once finished, click Save.
For example:

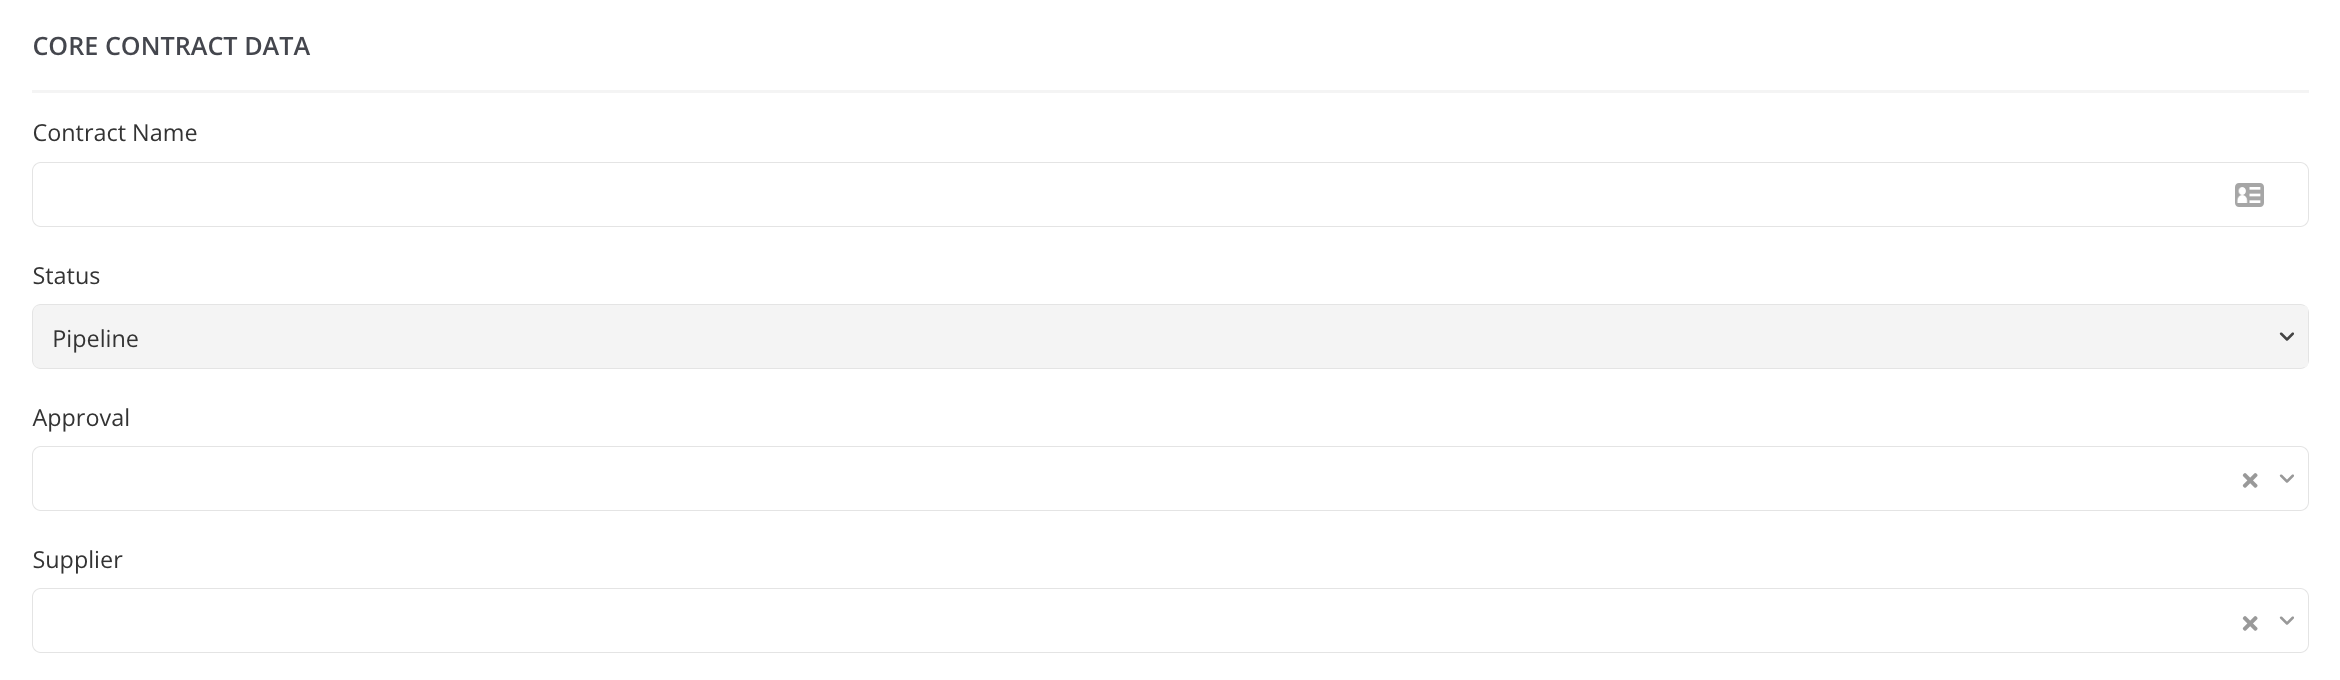
The screenshot below shows how the Contract Name field would display on the form based on the above configuration.

Lock Fields
You can lock specific dropdown fields within a form to restrict users to predefined options. This reduces manual input and prevents selection of unauthorised values when submitting new request forms. You can lock fields with:
-
Single Options: When a field is locked to a single value in the start phase, it becomes pre-populated and uneditable when a user submits a new card. For example, you might lock all new cards to have a status of Pipeline, preventing users from accidentally selecting Live or Archived.
-
Multiple Options: You can lock a dropdown field to multiple predefined values, allowing users to choose one from the permitted options. For example, if your system includes three currencies (AUD, USD, and CAD), you could lock the currency field to AUD and USD. This prevents users from selecting CAD, while still allowing them to choose between the approved values.
Note: You can lock any field with a type of Dropdown or Multi-select Dropdown.
To lock a field to pre-determined values:
- Click the start phase to edit it, then click Form.
- Expand the 3 dots on the relevant field, then click the pencil icon.
- Select the Locked checkbox.
- Select the value(s) from the dropdown list, then click Submit.
- Click Save.

Single-option locked fields will appear to the user pre-filled and greyed out:
Note:
- Fields can only be locked on the start phase. On subsequent phases, the field can be set to editable, allowing users to update the value as the card progresses through the workflow.
- To streamline request forms, it's recommended to hide any single-option locked fields so users only see what they need to complete.
Unlock Fields
After locking a field, it is possible to remove the locked value:
- Expand the 3 dots on the relevant field, then click the pencil icon.
- Deselect the Locked checkbox.
- Click Save. This field will now be unlocked for new forms.
Amend Locked Values
To update the values, you will first need to unlock the field by following steps 1-3 above. After unlocking the field, follow the steps below to set the new values:
- Click the pencil icon to edit the field again.
- Select the Locked checkbox, then click the x next to the saved field value.
- Select the new values from the dropdown list, then click Submit.
- Click Save.
Delete Fields and Sections
You can remove fields and sections from a form:
- To delete a form field, expand the 3 dots on the field then click the Delete icon.

- To delete an entire section, click the Delete icon at the top of the section.

You will then need to confirm this by clicking Delete. This will be removed across all phases.
This option may not be available for certain fields/sections, for example, if other fields depend on the field you are attempting to delete, or if the field is used for a transition.
Note: Once you delete a field/section, any workflow cards with values populated against that field/section will permanently lose the data. This is not reversible; re-adding it will not restore previous card data to the workflow form.
Set the Card Name
By default, Gatekeeper uses the Contract Name or Vendor Name from the first Predefined section added to the form as the card name. This can be changed to any other field in the form. To do this:
- Click the start phase to edit it, then click Form.
- Expand the 3 dots on the relevant field, then click the pencil icon.
- Select the Set as card name checkbox.
- Click Save.

The field used to determine the card name is displayed in bold on the Form configuration page, making it easy to identify at a glance:
Amend Form Layout
There are two options for your form layout:
- Simple: displays all sections on a single continuous page, maximising the width available for input fields. Recommended for shorter forms or forms with long field labels.
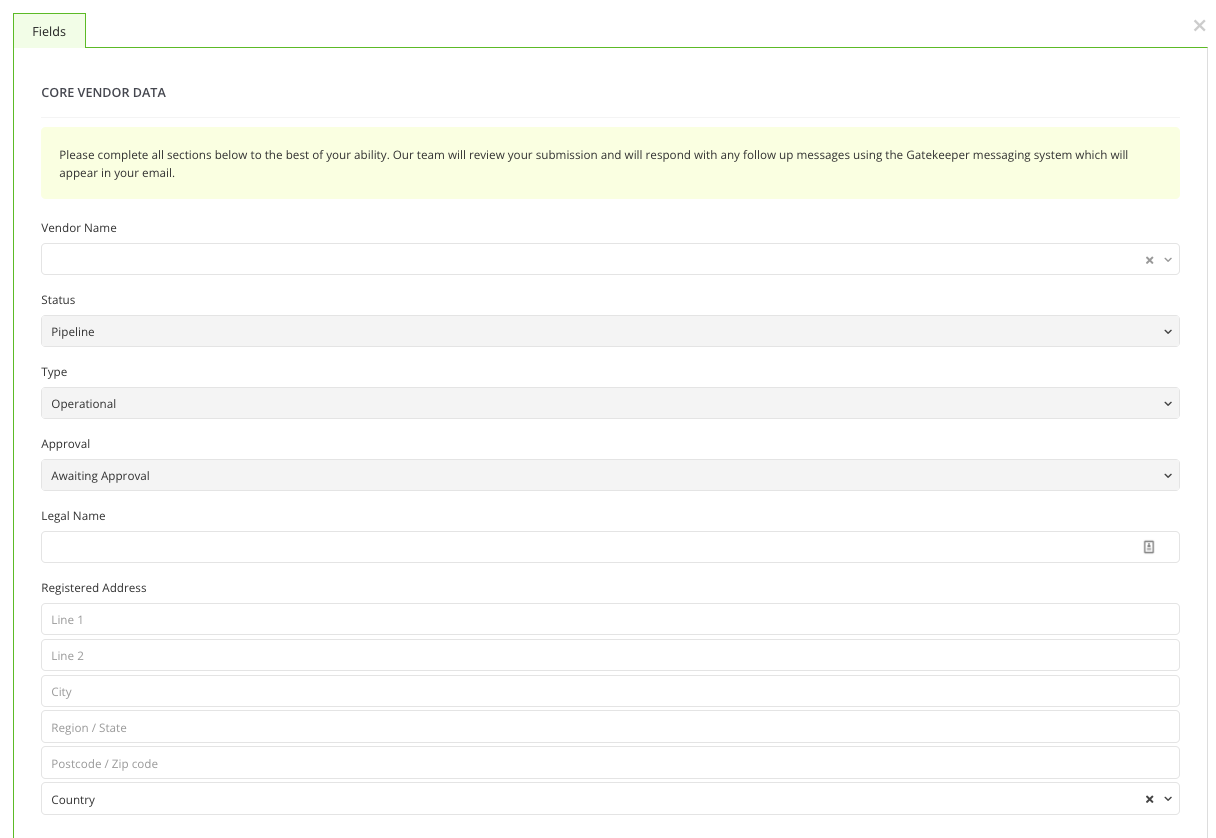
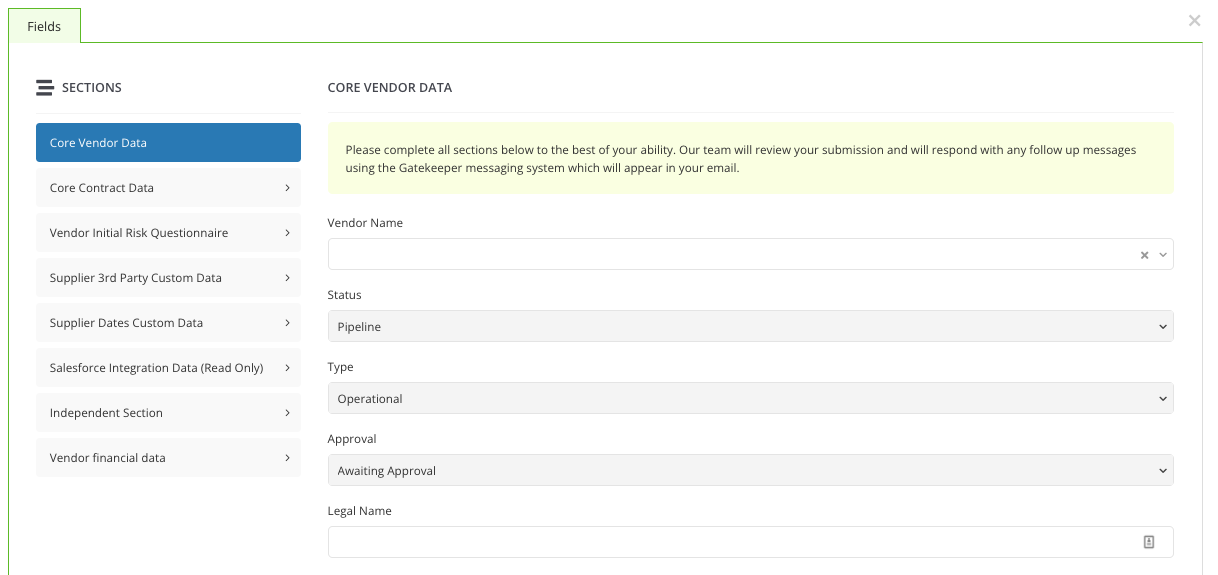
- Side Menu: sections are presented one at a time via a side navigation panel. Better suited for longer forms with multiple or complex sections.
To amend the layout:
- Click the name of a phase to edit it, then click Form.
- Scroll to the bottom of the form and click
 LAYOUT.
 - Select the appropriate radio button: Simple or Side Menu.
- Select the Apply to all Phases checkbox to apply this setting across all phases in the workflow.
- Click Update.

Reorder Sections and Fields
You can amend the order that form sections and fields appear to users. To do this:
- Click the name of a phase to edit it, then click Form.
- Scroll to the bottom of the form and click Reorder.
- Drag and drop each section into the desired order.
- To reorder fields within a section, click the arrow to expand it, then drag and drop the fields into the desired order.
- Click Update to save your changes.
Reordering sections and fields updates the display order across all phases but does not affect any visibility settings already configured.