
 Estimated Read Time: 10 minutes
Sections in this article:
This guide walks you through connecting Gatekeeper to NetSuite, including installing the SuiteApp, configuring the connection between the two systems, and mapping fields so vendor data transfers correctly.
Once the setup is complete, you won't need to repeat it unless you're upgrading the SuiteApp or changing your field mappings later on. See the Sync Vendor Data to NetSuite article to start syncing vendors between Gatekeeper and NetSuite once the connection is configured.
NetSuite Setup Steps
You'll first need to set up NetSuite: install the SuiteApp, enable the required permissions, and connect it to your Gatekeeper tenant.
Installation Prerequisites
Certain features must be enabled in NetSuite before installing Gatekeeper’s SuiteApp. To do this:
- As an Administrator, navigate to Setup > Company > Enable Features.

-
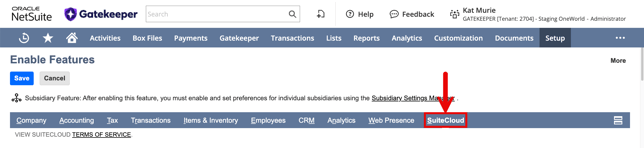
Navigate to the SuiteCloud sub-tab.
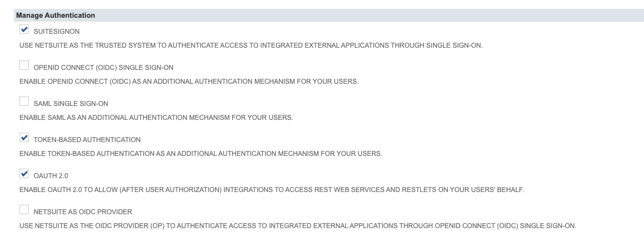
- Under the Manage Authentication section, ensure that the SuiteSignOn, Token-Based Authentication, and OAuth 2.0 checkboxes are selected.
- Review and agree to the Terms of Service.
- Under the SuiteTalk (Web Services) section, ensure that the SOAP Web Services and REST Web Services checkboxes are selected.

- Under the SuiteCloud Development Framework section, ensure that the SuiteCloud Development Framework checkbox is selected.

- Review and agree to the Terms of Service.
- Click Save.
Install the Gatekeeper SuiteApp
Gatekeeper's SuiteApp is available from the SuiteApp Marketplace. To install it, follow the steps below:
- Navigate to the SuiteApp Marketplace by either:
- Clicking SuiteApps from the navigation bar (if available).

- Typing SuiteApp into the global search and selecting SuiteApp Marketplace.

- Clicking SuiteApps from the navigation bar (if available).
- Locate the Gatekeeper SuiteApp using Search Apps, then click the corresponding tile.
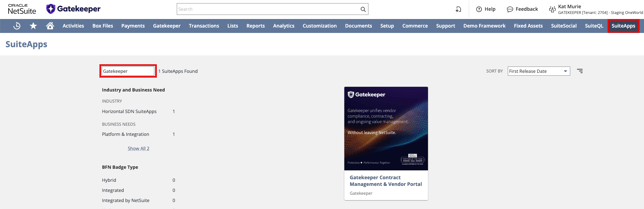
- Click Install. The page displays installation progress and shows the status as Installed once complete.
Integration Configuration
Next, you'll need to assign a NetSuite user and role to the integration, then generate an access token that Gatekeeper uses to authenticate with NetSuite.
Configure Users and Roles
- Navigate to Setup > Users/Roles > Manage Users.
- Click the NetSuite user you want the integration to run as.
-
Under the Access subtab, click Edit and assign the Gatekeeper Integration role.

-
Click Save.
Create an Access Token
- Navigate to Setup > Users/Roles > Access Tokens.
- Click New Access Token.
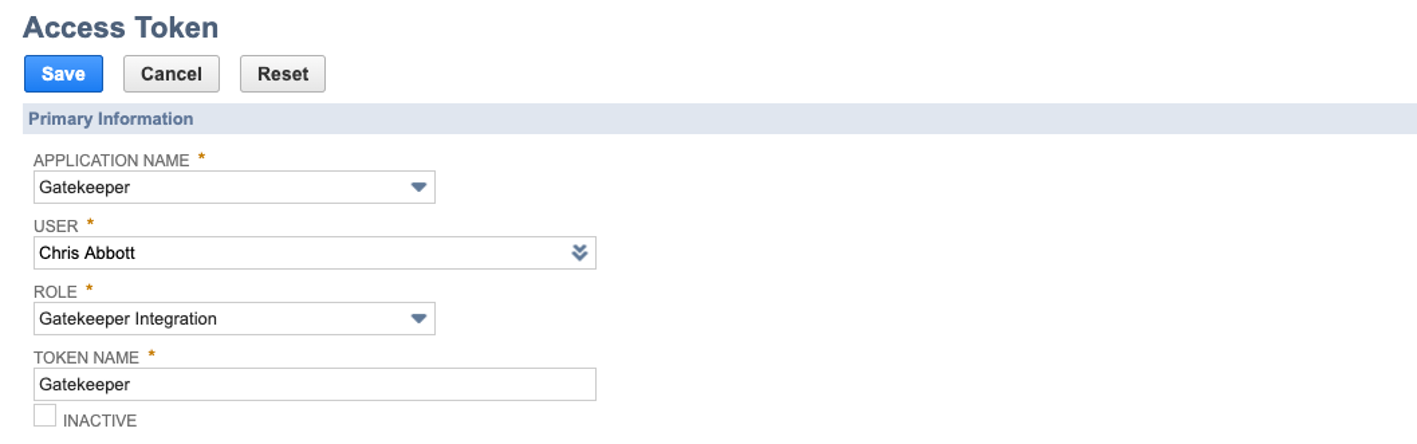
- Select the application, user, and role configured in the previous steps:
-
Click Save.
- Make a note of the Token ID and Token Secret for use during setup in Gatekeeper.
Note: For security reasons, these values are shown only once.
Connect to the Gatekeeper API
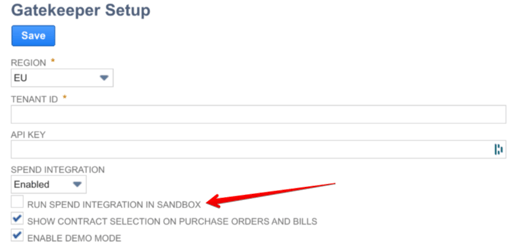
Navigate to Setup > Gatekeeper > Gatekeeper Setup and complete the form using the table below for guidance, ensuring you click Save once complete.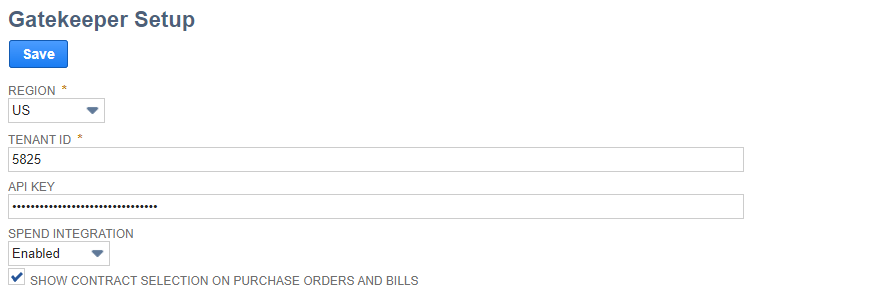
| Configuration | Description |
| Region |
The region your Gatekeeper tenant is located in. This can be found in the URL of your tenant. e.g. https://us.gatekeeperhq.com/5825 |
| Tenant ID |
The ID of your Gatekeeper tenant. This can be found in the URL of your tenant. e.g. https://us.gatekeeperhq.com/5825 |
| API Key | The authorisation key that allows NetSuite to interact with the API of your Gatekeeper tenant. This can be found by logging into your tenant and navigating to Settings > Configuration > API Keys. See Manage API Keys for further details. |
| Spend Integration Enabled/Disabled | If you use the Gatekeeper Spend module, enabling this will create spend entries in Gatekeeper from your Vendor Bills, for all vendors synced with Gatekeeper. |
| Show Contract selection | Enabling this allows you to select a contract when creating Purchase Orders and/or Bills in NetSuite for any vendors synced with Gatekeeper. Spend entries from Bills associated with a contract are then linked against both the vendor and the contract in Gatekeeper. |
Gatekeeper Portlet
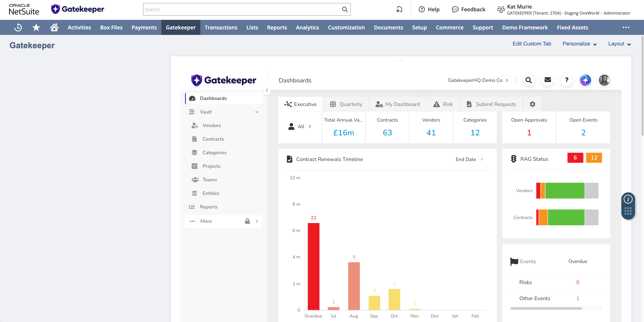
The Gatekeeper Portlet lets you access your Gatekeeper tenant directly from within NetSuite, so you don't need to switch between systems. To configure this:
- Navigate to the Gatekeeper tab in NetSuite, then expand the 3 dots and select Set Up in the portlet.

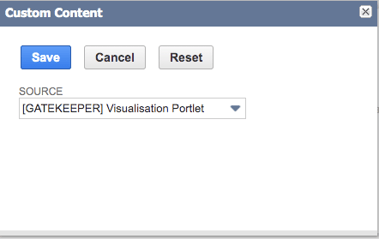
- Select [GATEKEEPER] Visualisation Portlet from the dropdown list, then click Save.
- You should now see your Gatekeeper Tenant within NetSuite.
Enable the Spend Integration for your Sandbox
Note: The Spend Integration is disabled by default for Sandbox accounts. This is to prevent both your Production and Sandbox accounts sending spend data to Gatekeeper at the same time.
- In NetSuite, navigate to Setup > Custom > Gatekeeper Setup
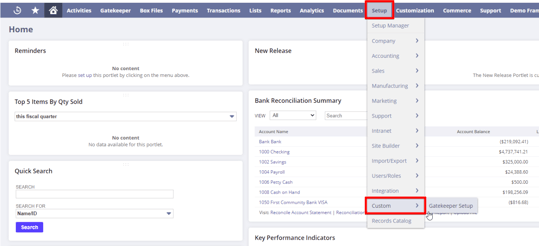
- If the advanced settings do not display for your sandbox, add "&advanced=true" to the URL of the page. This will display the Advanced features.
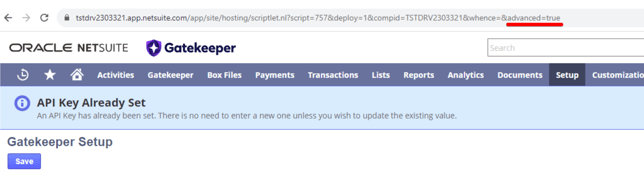
- Select the Run Spend Integration in Sandbox checkbox.
Gatekeeper Setup Steps
Next, you'll need to configure Gatekeeper by enabling the integration and mapping your fields.
Enable the Integration in Gatekeeper
Note: Users require the Administrator role and Configuration additional permission to complete these steps.
- From the navigation menu, expand Settings, then click Configuration.
- Click NetSuite.
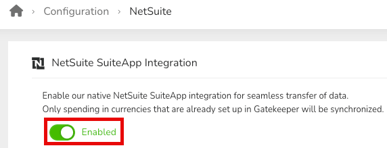
- Switch on the Enabled toggle.
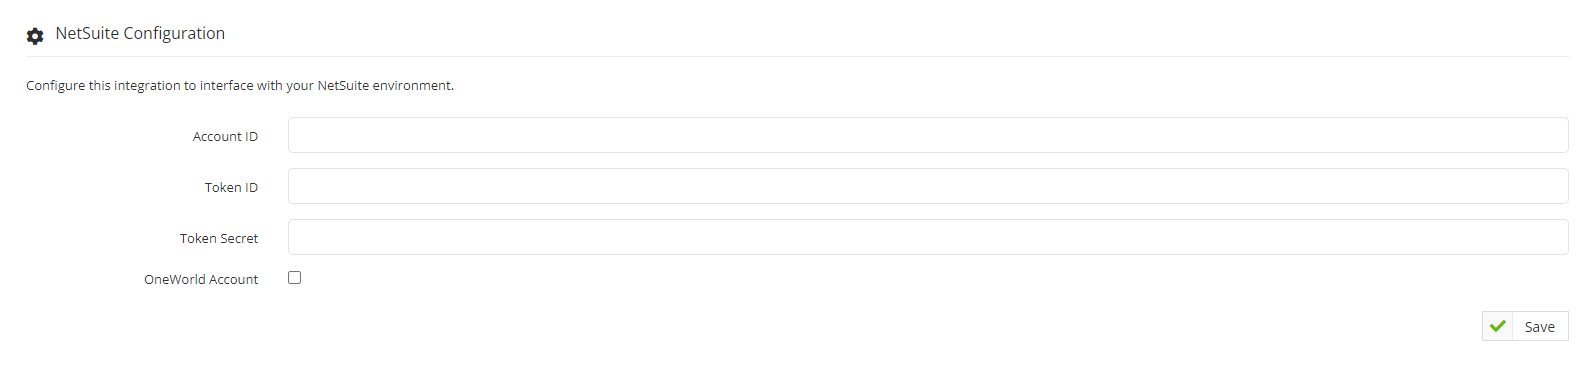
- Input the details you noted while configuring NetSuite.
- Click Save.
- If you have a NetSuite OneWorld account, select the OneWorld checkbox, then select a default subsidiary from the dropdown to assign created vendors.
- Click Save.
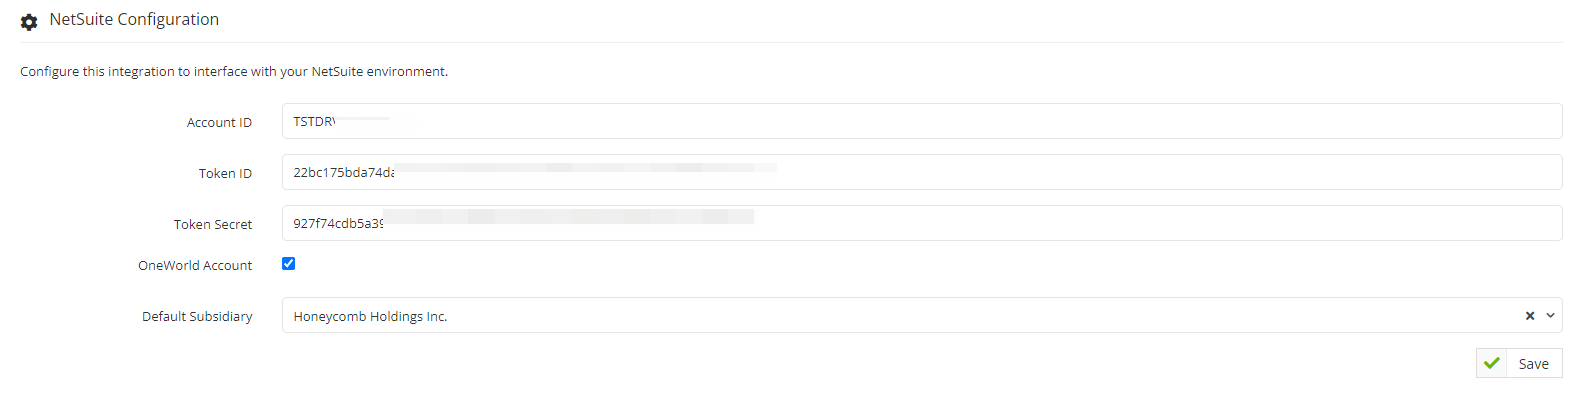
Configure Field Mapping
Field mapping tells Gatekeeper which of your NetSuite fields correspond to which Gatekeeper fields. Once mapped, data flows automatically between the two systems when a vendor syncs, rather than needing to be entered separately in each place.
Note:
- Gatekeeper does not have visibility into any fields you've flagged as mandatory in your NetSuite instance, including custom fields. To avoid errors, ensure all mandatory NetSuite fields are mapped appropriately in Gatekeeper.
- Users require the Administrator role and Configuration additional permission to complete these steps.
To do this:
- From the navigation menu, expand Settings, then click Configuration.
- Click NetSuite.
- Click the Field Mapping tab.
- To create a new mapping, click Add Field.
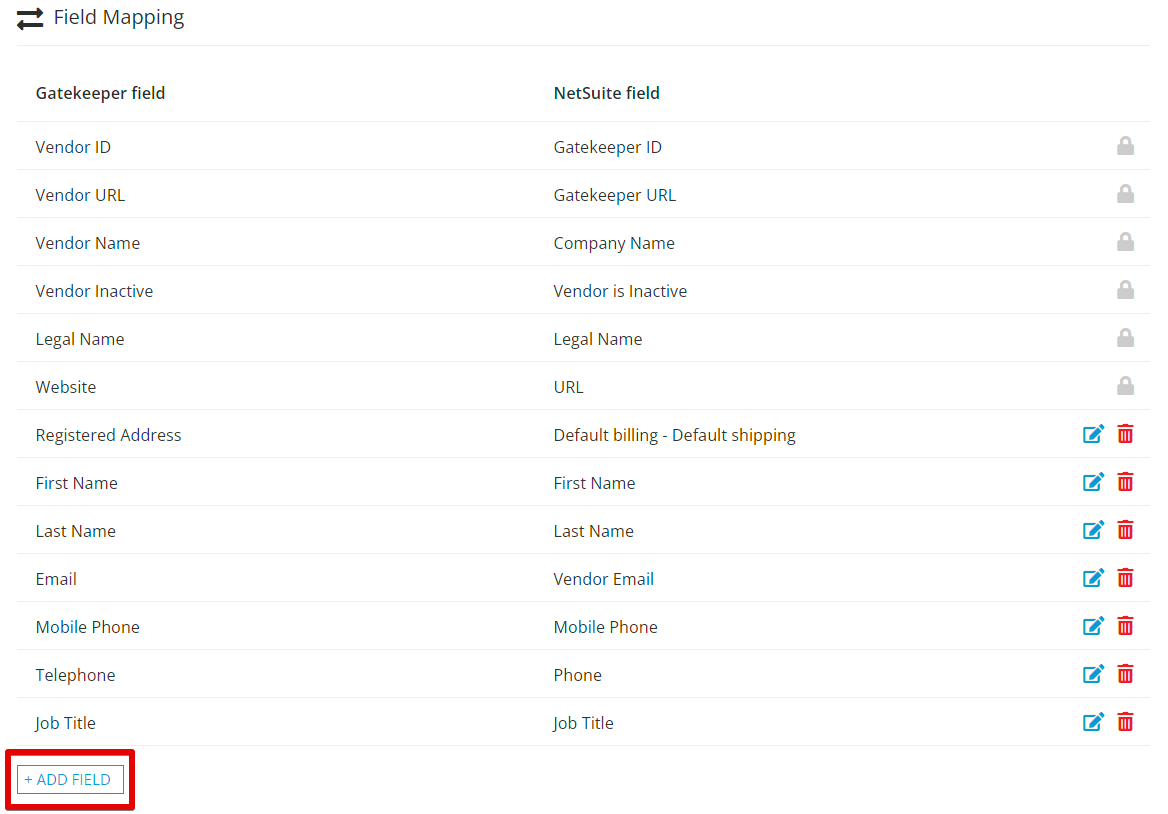
- Select the required Gatekeeper field to map to the required NetSuite field, then click Save.
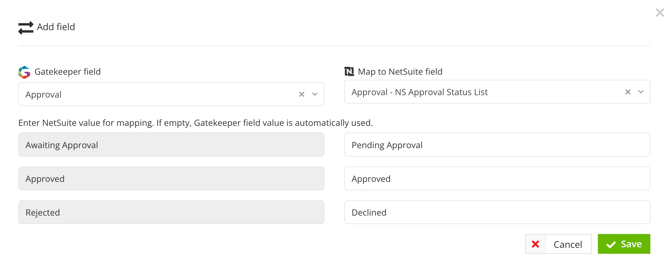
Continue mapping fields until all required NetSuite fields, especially those marked as mandatory, have been mapped in Gatekeeper.
Note: If you require additional custom data fields within Gatekeeper as part of this process, please see Configure Custom Data.
Map Currencies
To map currencies from Gatekeeper to NetSuite:
- Create a custom data field with the type of dropdown list. See Configure Custom Data for step-by-step instructions.
- Add the required currencies as an option using the relevant ISO 4217 code only, e.g. USD for USD Dollar. Do not include extra text such as USD: US Dollar as this can cause sync errors.
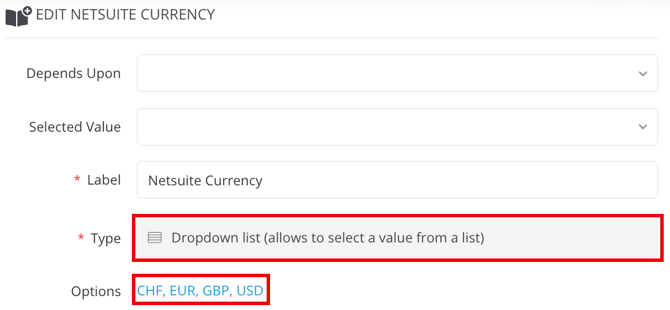
- Map the Gatekeeper field to the Currency NetSuite field.
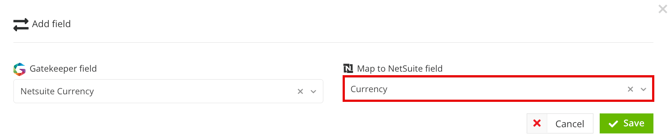
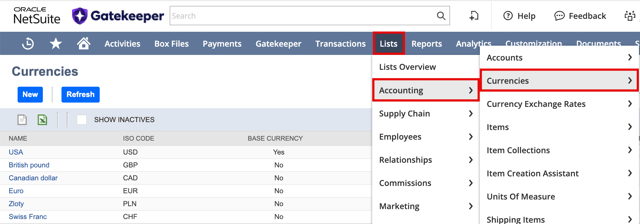
Note: The ISO codes added to the Gatekeeper dropdown custom field must exist in NetSuite, otherwise the field will not sync. To view the currencies set up in NetSuite, go to Lists > Accounting > Currencies. The list displays all currencies and their corresponding ISO codes.
Supported Field Mapping Table
Both core and custom data for vendors can be used for Gatekeeper field mapping. See the table below for further details on how Gatekeeper field types can be mapped to NetSuite Custom Entity Types.
Note: In the instance of a NetSuite Custom Entity Type that can be associated with dropdown values, the values for NetSuite must be entered manually. Each entry must exactly match the values in your NetSuite instance.
| Gatekeeper Field Type | Corresponding NetSuite Custom Entity Type(s) |
| Single/Multi-Line Text |
|
|
Multi-Line Text |
|
|
Single-Line Text |
|
| Address |
|
| Yes/No |
|
| Integer |
|
| Float |
|
| **Single Dropdown List |
|
| Multi-pick Dropdown List |
|
| Attachment |
|
| **Custom Entity |
|
**Default Subsidiary
The default Subsidiary field will only map to one singular Entity, and is a mandatory field.
If you would like to map more than one Subsidiary, you can create a custom data field against the vendor record of the type Entity, or map a Multi-select dropdown which can then be used to override the default Subsidiary field.
Troubleshooting
Use the following sections to help resolve issues with the NetSuite integration.
Upgrade the SuiteApp
It's recommended to regularly update the SuiteApp to access new features, enhancements, and issue fixes. To do this:
-
Follow steps 1-2 from Installation.
-
Click Upgrade.
This page will display the progress and, once complete, will return the status to Installed.
Note: As of v1.3.26, NetSuite requires OAuth 2.0 to be enabled before you can upgrade the SuiteApp. To enable this:
- As an Administrator, navigate to Setup > Company > Enable Features.
- Open the SuiteCloud sub-tab.
- Under Manage Authentication, select the OAuth 2.0 checkbox, then click Save.
Spend Sync Issues
For issues with spend not syncing from NetSuite to Gatekeeper, see the Sync Vendor Data to NetSuite article.
Access Request Logs
If you experience issues syncing data from Gatekeeper to NetSuite, you can access the integration logs directly from your Gatekeeper tenant:
Note:
- Logs are retained for seven days.
- Users require the Configuration additional permission to access the logs.
- From the navigation menu, expand Settings, then click Configuration.
- Click NetSuite.
- Click the Request Log tab.
This displays each request Gatekeeper sends to NetSuite. Click the links in the Details column for further information.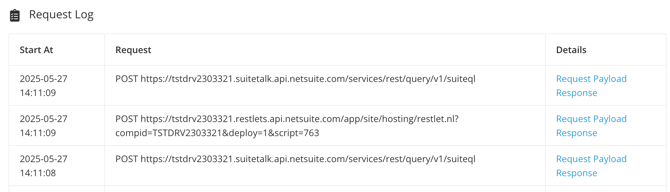
If you require help interpreting the logs, please contact support.
FAQs