
 Estimated Read Time: 7 minutes
Sections in this article:
- Sync Vendors From the Vault
- Sync Vendors via Workflows
- View Synced Vendors in Gatekeeper
- Unlink Vendors from NetSuite
- Link Vendors Manually to NetSuite
- Sync Historical Spend Entries
- Troubleshooting
You can manually sync vendors to NetSuite from the repository, or do this via workflows. Before syncing vendors, ensure the integration is installed and configured. If you haven't done this yet, see Configure the NetSuite Integration.
Sync Vendors from the Vault
If you have vendors in Gatekeeper to sync with NetSuite but do not have a workflow in place to manage this, certain admin users can manually push metadata records directly from the Gatekeeper repository to NetSuite.
Note: To facilitate a structured synchronisation with NetSuite, consider implementing one of the following workflows:
-
Vendor Onboarding: to sync newly added vendors after they complete onboarding.
- NetSuite Update Request: to allow internal users to request updates to vendor data in Gatekeeper and NetSuite.
Part 1: Grant the NetSuite Sync Permission
Before a user can manually sync vendors to NetSuite, they need the NetSuite Administrator permission. To grant this to a user:
- From the navigation menu, expand Settings then click Users.
- Expand the three dots on the relevant user, then select Edit.
- Select the NetSuite Administrator checkbox in the Additional Permissions section.
- Click Save.
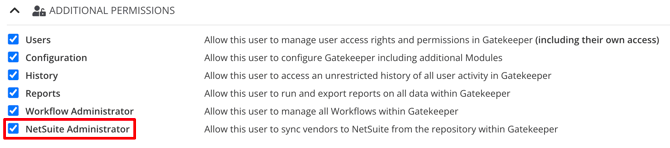
Note: This permission can be enabled en-masse via a bulk user update.
Part 2: Perform the Sync
Once you have the required permission, you can sync a vendor to NetSuite from the Vault. To do this:
- From the navigation menu, expand the Vault and click Vendors.
- Click a vendor to open their record, then click NetSuite.

- Select Sync to NetSuite.
Note: Once a vendor has been synced to NetSuite, you can push a manual re-sync of data by clicking NetSuite then selecting Sync to NetSuite.
Sync Vendors via Workflows
You can sync vendors to NetSuite on workflow phases where the Create/Update Vendor action is enabled. To do this:
- Navigate to the workflow and click on the relevant phase to edit it.
- Click Actions, then select the Sync to NetSuite on Action checkbox.

All vendors that have this action executed will now be synced to NetSuite.
Note: Ensure the workflow itself is fully configured, including its form, phases, owners, and transitions. Enabling the action on an incomplete workflow can cause vendors to sync at the wrong point, or not at all.
View Synced Vendors in Gatekeeper
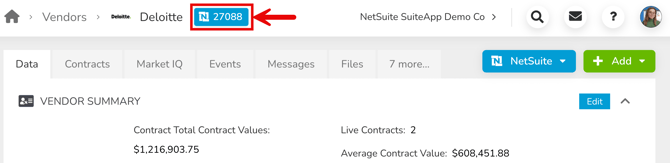
Once a vendor is synced to NetSuite, its record in Gatekeeper displays a link to the associated NetSuite record.
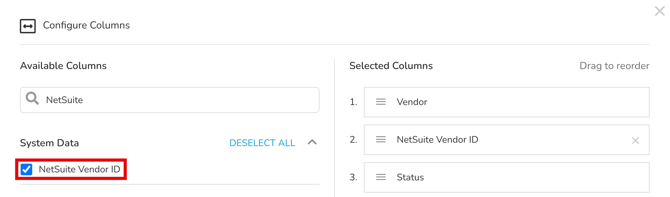
You can also add a column in the vendor list view to see which vendors have been synced to NetSuite.
Unlink Vendors from NetSuite
Administrators can unlink a vendor from NetSuite, directly in Gatekeeper. This halts data synchronisation for that vendor while retaining historic data in Gatekeeper.
To do this:
- From the navigation menu, expand the Vault and click Vendors.
- Click a vendor to open their record.
- Click NetSuite then select Unlink Vendor.
- To proceed, you must type Unlink in the confirmation field.
- Click Unlink.
Note: If you later choose to re-sync the vendor, click Sync to NetSuite to do this. The system will automatically re-link the vendor to the original NetSuite record using the same ID. Data will resume syncing from that point onward.
Link Vendors Manually to NetSuite
You can manually link a vendor record in Gatekeeper to a vendor in NetSuite. To do this:
- From the navigation menu, expand the Vault and click Vendors.
- Click a vendor to open their record.
- Click NetSuite then select Set NetSuite ID.
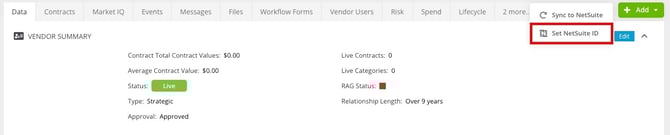
- Enter the NetSuite Vendor ID.
- To proceed, you must type Link in the confirmation field, then click Link Vendor.
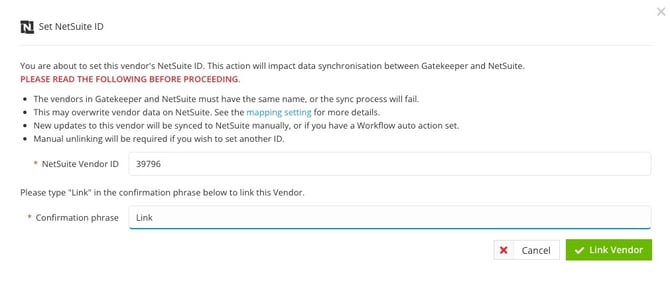
- Once linked, click Sync to NetSuite to initiate data syncing.
Note: The vendor name in Gatekeeper must match the vendor name in NetSuite for the records to link correctly.
Sync Historical Spend Entries
Gatekeeper syncs spend from NetSuite automatically: when a bill or credit is saved against a synced vendor, it joins a queue and sends across on the next 15-minute run. Bulk Spend Replay lets you add historical bills and credits to that same queue manually, for spend that existed before you set up the integration or enabled the Spend module, or to recover spend that didn't sync if you experience an outage.
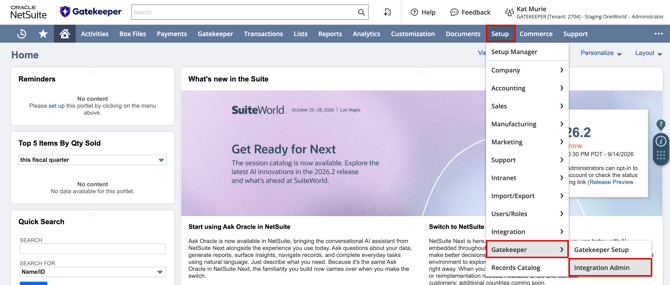
- In NetSuite, navigate to Setup > Gatekeeper > Integration Admin.
- Click the Bulk Spend Replay tab.
- Set the start and end dates, then click Search. This returns a count of transactions that meet the normal sync criteria: a bill or credit attached to a synced vendor in an open accounting period.

- If some of the target spend sits in a closed accounting period, select the option to include closed periods, then click Search again.
- Click Replay to queue every matching transaction for sync.
Note:
-
When syncing a large amount of data, it may take multiple 15-minute runs to complete rather than appearing in Gatekeeper straight away.
-
Replaying a transaction that already exists in Gatekeeper updates the existing record rather than creating a duplicate.
To confirm the backfill has completed, click the Triage tab under Setup > Gatekeeper > Integration Admin and refresh it. Adjust the filters if needed to include entries at any status.
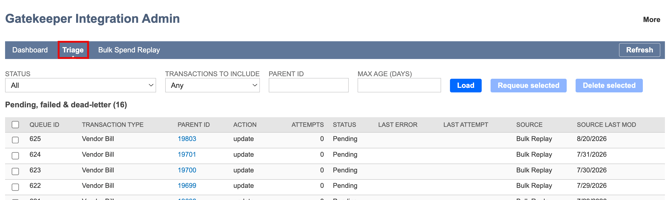
Entries clear from the queue as they send. If any display as Failed or Dead Letter, see Resolve Spend Sync Issues.
Troubleshooting
Use the following sections to help resolve issues with the NetSuite integration.
Upgrade the SuiteApp
It's recommended to regularly update the SuiteApp to access new features, enhancements, and issue fixes. To do this:
- Navigate to the SuiteApp Marketplace.
- Locate the Gatekeeper SuiteApp using Search Apps, then click the corresponding tile.
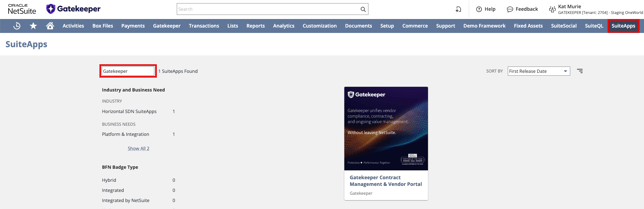
- Click Upgrade.
This page will display the progress and, once complete, will return the status to Installed.
Note: As of v1.3.26, NetSuite requires OAuth 2.0 to be enabled before you can upgrade the SuiteApp. To enable this:
- As an Administrator, navigate to Setup > Company > Enable Features.
- Open the SuiteCloud sub-tab.
- Under Manage Authentication, select the OAuth 2.0 checkbox, then click Save.
Access Request Logs
If you experience issues syncing data from Gatekeeper to NetSuite, you can access the integration logs directly from your Gatekeeper tenant:
Note:
- Logs are retained for seven days.
- Users require the Configuration additional permission to access the logs.
- From the navigation menu, expand Settings,then click Configuration.
- Click NetSuite.
- Click the Request Log tab.
This displays each request Gatekeeper sends to NetSuite. Click the links in the Details column for further information.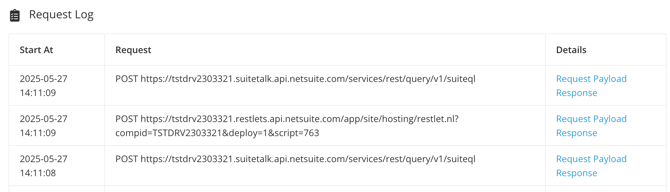
If you require help interpreting the logs, please contact support.
Resolve Spend Sync Issues
Spend syncs from NetSuite to Gatekeeper automatically every 15 minutes through a managed queue in the SuiteApp. If a sync attempt fails, it retries automatically up to five times at 15-minute intervals before the entry is marked Dead Letter.
If spend appears to be missing in Gatekeeper:
- In NetSuite, navigate to Setup > Gatekeeper > Integration Admin.
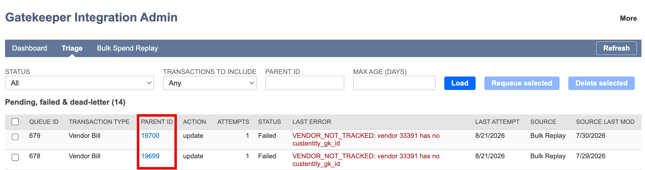
- Click the Triage tab.
- Review any entries marked Failed or Dead Letter. The most common cause is a vendor that's no longer linked to Gatekeeper.
- Click the Parent ID to open the NetSuite record and confirm the vendor link, then fix the underlying issue.
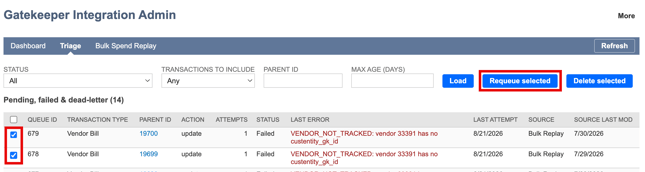
- Select the entry and click Requeue selected.
To backfill historical spend, for example when onboarding a customer or recovering from a sync outage, use the Bulk Spend Replay tab in the same Integration Admin area. See Sync Historical Spend Entries for further details.
FAQs