
![]() Estimated Read Time: 8 Minutes
Estimated Read Time: 8 Minutes
Sections in this article:
- Export User Data
- Bulk Import Users
- Field-by-Field Import Rules
- Bulk Update Video Demonstration 🎬
- Troubleshooting
Note: Users require the Administrator Role, the All Permission, and the User Additional Permission to create and edit other users. See User Management Definitions for further information.
Export User Data
To edit existing users in bulk, you need first to download an export of the current user list. To do this:
- From the navigation menu, expand the Settings option, then click Users.

- Click Export, then select the relevant export option.
Export Options
There are several options available for exporting the data:
| Export Option | Description |
| CSV | All Pages | The entire user list, regardless of the page you are viewing. |
| CSV | Current Page | Only users within the current page that you are viewing |
| CSV | This View | All Pages | The entire user list, with any Persistent Filters and Additional Columns applied. |
| CSV | This View | Current Page | Only users within the current page with any Persistent Filters and Additional Columns applied. |
Bulk Import Users
The Bulk Import method is useful when you have multiple new users to be created, or existing records to update, and do not wish to use the UI to do this one-by-one.
When performing a bulk import, you can either use a blank template (best for creating new users) or modify a previously exported file to update existing users.
Update users with an existing file
After exporting the user data, you can update the values in the CSV file according to the accepted values outlined in the Field-by-Field section of this document, as well as the User Management Definitions.
When updating users in bulk, the Gatekeeper ID field should not be changed.
Once you have saved your changes, you can re-import the file into Gatekeeper:
- From the navigation menu, expand the Settings option then click Users.
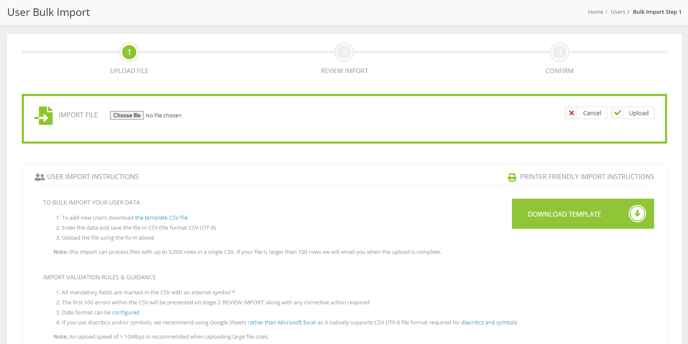
- Click Add then select Bulk Import Users.

- Click Choose File to locate your import file, then click Upload.

- Review the Summary then click Import Data to finalise the import.
Note: It is not possible to revoke user access en masse. This will need to be performed on a user-by-user basis. Read Dealing with Leavers and Movers for further information.
Import new users with a blank template
- From the navigation menu, expand the Settings option then click Users.
- Click Add then select Bulk Import Users.
- Select Download Template to download a blank version of the template.
- Populate the file with the relevant data. Detailed instructions are available on the page within Gatekeeper, including field by field import rules. For further information on user permissions, read User Management Definitions.
- Return to Gatekeeper and click Choose File to locate your import file.
- Once your file has been chosen, click Upload.
- Review the Summary then click Import Data to finalise the import.
Field-by-Field Import Rules
The table below will provide you with the current list of required values to fill out your CSV file. Mandatory fields are marked with an asterisk(*).
- Field relates to the name of the field within your sheet. These field headings do not need to be changed.
- Inputs Needed outlines the validation that the specific field requires.
| Field | Inputs Needed |
| Gatekeeper ID | Integer. |
| *First Name | Text limited to 200 characters. |
| *Last Name | Text limited to 200 characters. |
| Text limited to 200 characters. Must be a valid email address. | |
| Job Title | Text limited to 200 characters. |
| Landline | Text limited to 200 characters. |
| Mobile | Text limited to 200 characters. |
| *Team | Text limited to 200 characters. If the Team entered in the CSV is not recognised as an existing option, a new Team will be created. |
| *Predefined Access Groups | Multiple access groups are allowed (separated by ;). |
| *Custom Access Groups | Multiple access groups are allowed (separated by ;). |
| Workflow Groups | If the Workflow Group entered in the CSV is not recognised as an existing option, a new Workflow Group will be created. Multiple workflow groups are allowed (separated by ;). |
| eSign Sender | Yes, No. |
| eSign Signatory | Yes, No. |
| Users | Yes, No. |
| Configuration | Yes, No. |
| History | Yes, No. |
| Reports | Yes, No. |
| Workflow Administrator | Yes, No. |
| NetSuite | Yes, No. |
| Weekly summaries you own | Yes, No. |
| Weekly summaries all | Yes, No. |
| Vendor Portal Administrator | Yes, No. |
| Employee Portal Administrator | Yes, No. |
| Global Vendor Administrator | Yes, No. |
| Global Vendor Collaborator | Yes, No. |
| Dashboards | Text limited to 200 characters. Multiple dashboards are allowed (separated by ;). |
| Default dashboard | Executive Dashboard, Quarterly Dashboard, My Dashboard, eSign, Vendor Portal Dashboard, Employee Portal Dashboard or Submit Requests |
| Invite into Gatekeeper? | Yes, No |
Note: When populating the Invite into Gatekeeper? column, be aware of the status of your users, as a user with a status of Revoked will be reinvited to Gatekeeper.
Manage Import Errors
If the import file contains errors, you will be presented with a summary table that will assist you in fixing the errors. Please fix all of the errors in your spreadsheet before attempting to reimport.
Bulk Update Demonstration
See the below demonstration of using the bulk update feature to activate all your users:
As mentioned in the video, these same steps could be followed to amend user permissions or user metadata.
Troubleshooting
Encoding Error
This error generally occurs when the uploaded file isn’t in a UTF-8 format.
- Create a new Google Sheets document.
- Import your CSV file.
- Click File, then select Download As, and Comma-Separated Values to save the file to your device.
- Open and alter the import template in Excel.
- Save it as a CSV file.
- Open the CSV file in Notepad.
- Click Save As, then remove the .csv at the end of the filename, and select UTF-8 as the encoding type.
- Find the saved file and alter the .txt at the end of the filename to .csv
- Click OK on the warning about changing the file type
- Import the new file into Gatekeeper.