
 Estimated Read Time: 13 Minutes
 Requires Market IQ Advanced
Sections in this article:
- Introduction
- Mandatory Configuration
- Additional Configuration
- Additional Setup Outside the Workflow
- ⚡️Getting Started⚡️ - Activate the Trigger
- Additional Reading
Introduction
This workflow automates monitoring your vendors for any financial or cybersecurity risks. Once you have connected a vendor to one of our Market IQ modules, the workflow uses the live data to trigger reviews when risk scores change.
Workflow Diagram

Mandatory Configuration
The steps in this section outline the essential setup required to make your workflow fully functional:
- Add the Market IQ Escalation workflow template to your tenant as the starting point for the build
- Configure the triggers that pull vendors onto the workflow when their risk scores change
- Create workflow groups and assign them as phase owners, then amend the email notifications so they suit your process
- Add the Market IQ data to the workflow form, and review the questionnaires used to capture feedback and decisions
See the Additional Configuration section for optional additions to expand the scope of your process or tailor the workflow to better align with your organisation’s policies and procedures.
Add the Template
To get started, you'll need to add the template workflow:
- From the navigation menu, click Workflows.
- Click Add, then select Workflow Template.
- Click Create on the 📉 Market IQ Escalation 📈 template.
- Amend the title if needed, then click Create.
Configure the Trigger/s
Next, configure the triggers to set the conditions for when vendors are pulled onto the workflow:
- From the navigation menu, click Workflows.
- Expand the 3 dots on the relevant workflow, then select Workflow Triggers.
- Click Add Trigger.
- Enter a name, then click Create.
- To set your workflow trigger conditions, click + Add.
- Select the field that will trigger the workflow, then select the operator and value.
- Click Create. Repeat these steps if the trigger requires multiple conditions.
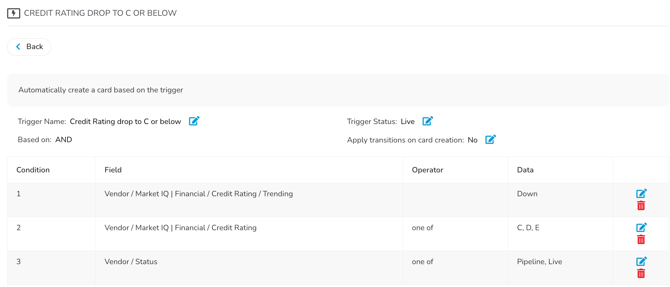
For Market IQ Financial, it's recommended to build a trigger with the following conditions:
|
Field |
Operator |
Data Value |
| Vendor / Market IQ | Financial / Credit Rating / Trending | n/a | Down |
| Vendor / Market IQ | Financial / Credit Rating | one of | C, D, E |
| Vendor / Status | one of | Pipeline, Live |
For Market IQ Cyber, it's recommended to build a trigger with the following conditions:
|
Field |
Operator |
Data Value |
| Vendor / Market IQ | Cyber / Security Grade / Trending | n/a | Down |
| Vendor / Market IQ | Cyber / Security Score | less than | 75 |
| Vendor / Status | one of | Pipeline, Live |
Note: Each individual trigger operates with AND logic, so the Financial and Cyber examples above must be configured as separate triggers.
You can also add triggers that are specific to certain vendor types. For example, vendors marked as critical can be held to a higher standard, so their threshold for entering the review workflow is lower than for other vendors:
|
Field |
Operator |
Data Value |
| Vendor Type | one of | Critical |
| Vendor / Market IQ | Cyber / Security Grade | n/a | Trending Down |
| Vendor / Market IQ | Cyber / Security Score | less than | 85 |
| Vendor / Status | one of | Pipeline, Live |
Create Workflow Groups
Workflow groups can be used in this workflow to:
- Grant access to groups of users to review risks and make decisions
- Send notifications to groups of users
For example, you may require groups such as a Vendor Management Team, an InfoSec Team for Market IQ Cyber, or a Finance Team for Market IQ Financial. If you haven’t already created workflow groups in your tenant, see Manage Workflow Groups for step-by-step instructions on creating groups and adding users.
Assign Phase Owners
Several phases in this workflow cover the review and monitoring of vendor risk. The following don’t have an owner configured, so you’ll need to assign one for each, based on how responsibility is normally assigned in your organisation. This could be a workflow group, a team or an individual user.
| Phase | Description |
| Vendor & Risk Management Review | The owner reviews the risk flagged by the Market IQ data, and decides whether to accept it, keep monitoring or offboard the vendor. |
| Holding Phase | Monitoring | The owner is notified after a month has passed, and reviews the risk flagged by the Market IQ data again, and decides whether to accept it or offboard the vendor. |
| Offboard Vendor |
The owner updates the vendor record if the risk is too high to continue the relationship. |
To assign owners:
- Click on a phase where the owner needs configuring to edit it.
- From Form Access, select the relevant radio button to determine how ownership is assigned.
- Repeat these steps until owners have been assigned for all the phases outlined above.
Note: The Internal Vendor Manager Review phase is already configured to be owned by the Internal Vendor Owner, with a backup owner being the Card Creator.
Amend Email Notifications
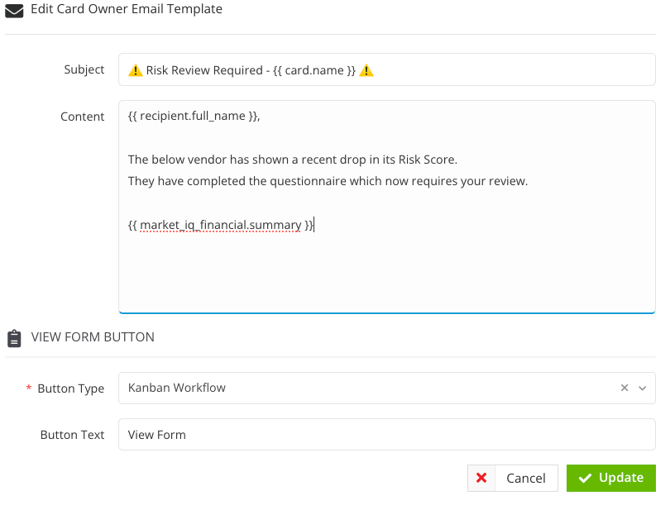
The template is designed for monitoring vendor risks from the Market IQ Financial or Market IQ Cyber data. Therefore, you should adapt the notification emails so the phase owners receive the relevant details.
- Click the phase where you want to edit the notification content.
- From Notifications, click the
 pencil icon for the Email Template for any of the enabled notifications.
 - Delete the tag that doesn’t apply to your workflow, along with the word OR, from the line below:
- {{ market_iq_financial.summary }} OR {{ market_iq_cyber.summary }}
- Add any other context your review process needs, then click Update.
Add the Market IQ Metadata to the Form
Next, add the Market IQ data to the workflow form:
- Click the start phase to edit it.
- From Form, click Add Section.
- Enter a Name e.g. Market IQ Financial Data.
- Select the following from the dropdown lists:
- Predefined: Vendor
- Custom Data Group: Market IQ | Financial or Market IQ | Cyber as required.
- Click Save.
If required, click Reorder to drag and drop the new section to a different position in the form:
Note: Once you added, this form section will be Read Only by default on all phases. If required, you can change it to Hidden for phases where the Market IQ values shouldn't be shown to users (e.g. on the Vendor Portal phase). See Form Visibility for further details.
Configure the Form Questionnaires
By default, the workflow has three form sections, designed to capture context, feedback and decisions from users during the review process.
Expand each section to learn more:
To edit the questionnaires:
- Click on the start phase of the workflow to edit it.
- From Form, navigate to the section you wish to amend:
- Click Add Field to include additional questions in the form.
- Expand the 3 dots on a field, then click the
 pencil icon or
  delete icon to amend existing fields.
Additional Configuration
This section covers optional steps to adjust the workflow’s scope or default settings, helping you tailor it to your organisation’s needs.
Remove the Vendor Portal Review
The workflow template includes an option to involve vendors in the review process when a risk arises, so you can get their input before taking action. If your organisation does not use the Vendor Portal, you can remove this step to make the workflow internal only.
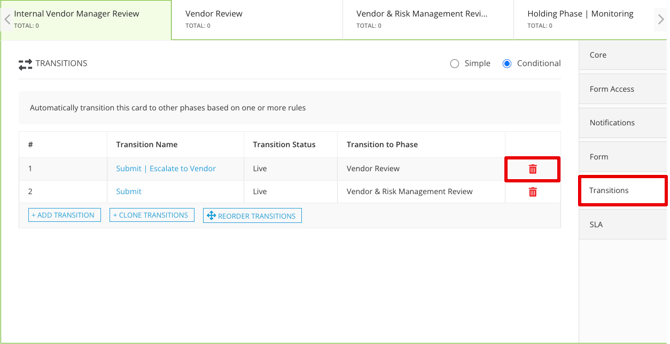
Part 1: Remove Transitions Pointing to the Vendor Review Phase
- Click the Internal Vendor Manager Review phase to edit it.
- From Transitions, click the
 delete icon on the Submit | Escalate to Vendor transition.
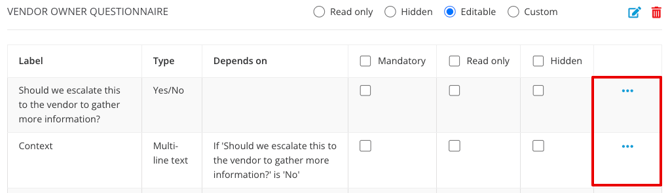
Part 2: Remove the Associated Form Questionnaire
- While still on the Internal Vendor Manager Review phase, navigate to Form.
- Click the delete icon on the Vendor Portal Questionnaire form section, then click Delete to confirm.
- In the Vendor Owner Questionnaire section, delete the fields for Context and Should we escalate...?.
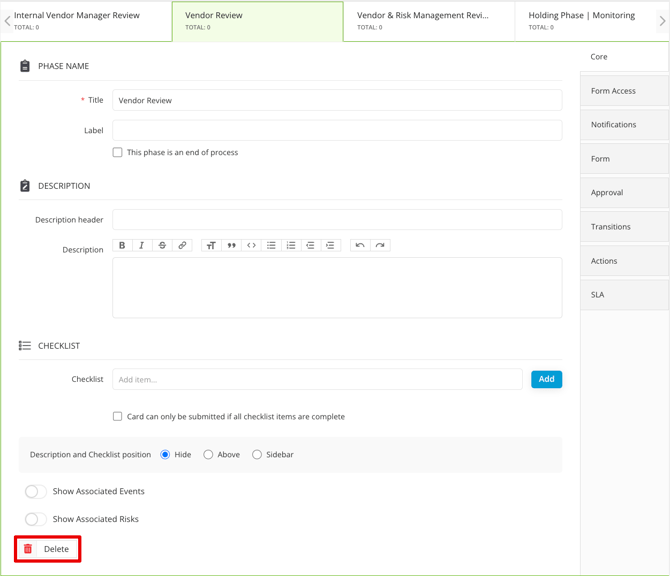
Part 3: Archive the Phase
Click the Vendor Review phase, then click Delete.
Additional Setup Outside the Workflow
If you’ve followed all of the steps above, your workflow is nearly ready to launch. To help the process run smoothly and reliably, there are a few additional areas of your tenant worth reviewing.
Connect Vendors to Market IQ
Vendors cannot be monitored for risk reviews via this workflow if they are not connected to Market IQ.
Connect a Vendor to Market IQ Financial
- Navigate to the relevant vendor record, then click the Market IQ tab.
- From the Market IQ Financial section, click Connect.
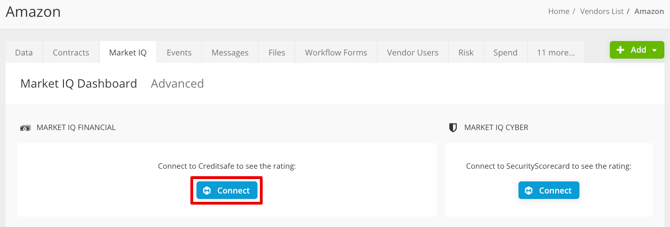
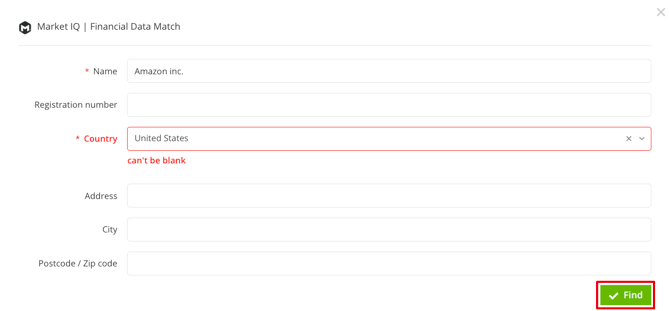
- Enter the details for the vendor, then click Find. If no results are found, ensure the vendor details are correct and search again.
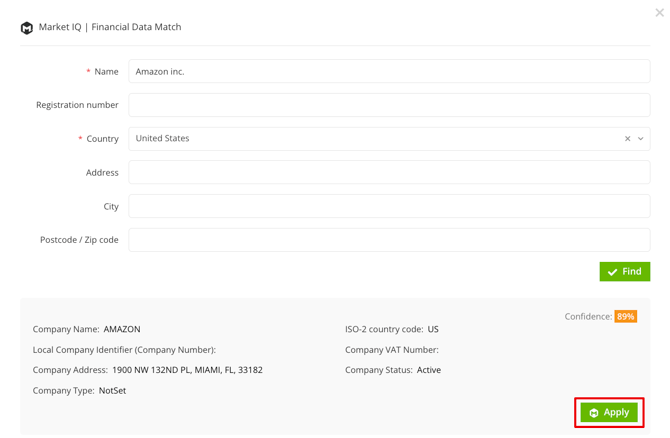
- Review the company name and information from the list of results, then click Apply. A confidence score is returned in the case of multiple results.
Connect a Vendor to Market IQ Cyber
To connect a vendor to Market IQ Cyber, ensure the Website field is populated on the vendor record. The vendor is then connected automatically.
Note: To ensure new vendors are connected, it's recommended to build this into your vendor onboarding process. If you don’t have one, see Create Your Own - Vendor Onboarding Workflow.
Populate Internal Vendor Owners
This workflow process works best if the appropriate internal owner is assigned to a vendor record, so they can be notified that one of their relationships is showing a new risk. Therefore, it's recommended to ensure that vendor records have an internal owner assigned:
- Open the vendor record.
- Click Edit and navigate to the Owners section.
- Select the relevant user from the dropdown list then click Save & Exit.
Note: If multiple vendors need to be assigned owners, it's recommended to use bulk import to do this efficiently.
Add Vendor Users
If you’re using the Vendor Portal to request input from vendors, check that each vendor has at least one activated Vendor Portal user.
- Open the vendor record.
- Click Add then select Vendor User to add a new contact.
Note: To invite them to the Vendor Portal straight away, select the Invite into Gatekeeper checkbox before clicking Save. Otherwise, the workflow invites them automatically if a card lands on the Vendor Review phase.
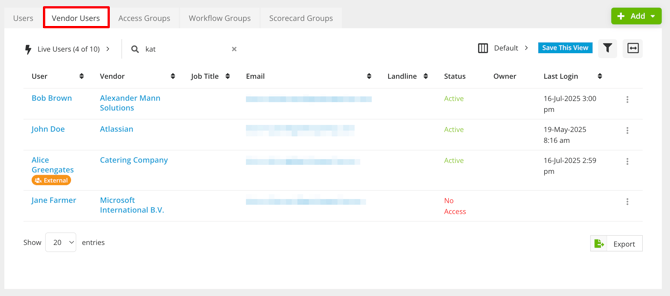
You can also see a full list of vendor users in your tenant and bulk import users:
- From the navigation menu, expand Settings then click Users.
- Click the Vendor Users tab.
⚡️Getting Started⚡️- Activate the Trigger
Once your workflow is fully configured, simply activate the triggers to make it live:
- From the navigation menu, click Workflows.
- Expand the 3 dots on the relevant workflow, then select Workflow Triggers.
-
Click to open the trigger.
- Click the
 pencil icon on Trigger Status.
 - Select Live from the dropdown list, then click Update.
- Repeat steps 3-5 for all triggers.
Any vendors connected to Market IQ now automatically begin the risk review process when their scores drop in line with your trigger conditions.
Additional Reading 📚
- Market IQ Financial - Learn about the data available within our
 CreditSafe integration module
 - Market IQ Cyber - Learn about the data available within our
 Security Scorecard integration module
 - ⚡️Vendor Portal Expert - Invitation Emails - Review how to set clear expectations with vendor users from the outset and operate with transparency in all your new relationships
- ⚡️Testing Triggered Workflows - Learn how to manually trigger test cards for this workflow to test out the process before switching on the real triggers