
![]() Estimated Read Time: 18 minutes
Estimated Read Time: 18 minutes
![]() Estimated Configuration Time: 1-2 hours
Estimated Configuration Time: 1-2 hours
☑️ Requires: Vendor Portal
Sections in this article:
- 🛠 Additional Configuration 🛠
- Add Custom Metadata
- Set AutoAction Values
- Set Visibility Rules
- Configure Rejections
- Add Market IQ Financial or Cyber
- Add a NetSuite Sync
- Add Extra Phases
- Start the Workflow with a Trigger
- Disable the Public URL Request Form
- Hide Phases from the Vendor and Employee Portal
- Amend the Workflow Description
- ⚡️Getting Started ⚡️
- Additional Reading
Introduction
This workflow helps you digitise your vendor onboarding and risk assessment process. It offers a flexible structure that can be adapted to your organisation’s policies and requirements. By using this workflow, you can ensure that all new vendors are thoroughly documented and risk-assessed, giving you the data required to make informed business decisions.
See the video below for a demonstration:
🛠 Mandatory Configuration 🛠
The steps in this section outline the essential setup required to make your workflow fully functional. By completing the configuration steps below, you’ll have a fully operational end-to-end vendor onboarding workflow.
The ⬇️ Additional Configuration ⬇️ section covers optional additions to expand the scope of your process or tailor the workflow to better align with your organisation’s unique policies, procedures, and Gatekeeper subscription features.
Add the Template
To get started, you'll need to add the template workflow:
- From the navigation menu, click Workflows.
- Click Add, then select Workflow Template.
- Click Create on the Vendor Onboarding template.
- Amend the title if needed, then click Create.
Create Workflow Groups
Workflow groups serve two key purposes in your vendor onboarding workflow:
- Grant access to groups of users to perform actions, update form data, or approve the vendor relationship
- Send notifications to these user groups
For example, to support a complete and effective vendor onboarding process, you may require groups such as a Data Privacy Team, Vendor Management Team, or Dedicated Compliance Teams.
To create a workflow group:
- From the navigation menu, expand Settings then click Users.
- Click Add then select Workflow Group.

- Enter a title and, if useful, an optional description, then click Save.
- Expand the 3 dots on the newly created group, then select Edit.

- Click Add Member.

- Select the user from the dropdown list then click Save.
- Repeat steps 5-6 until all group members have been added.
Note: If you need to populate multiple workflow groups, you can save time by using a bulk update via spreadsheet rather than updating each group one by one.
Assign Approver/s
There are two phases where vendor onboarding forms require approval:
- Approval/s ✅ - This phase reviews the initial scope of the vendor onboarding request. It helps prevent unnecessary work later in the process, for example if the vendor or service is not within budget or if an existing vendor already provides the same service. Using a dynamic approver (such as a team owner) or a single workflow group (for example, the Procurement team) is recommended here.
- Onboarding Review ☑️ - This phase performs final checks and risk approvals. By this stage, all required data and documentation should be available, enabling your teams to assess, catalogue, and approve any potential risks. Include all groups or users who need to assess risks or manage interactions with third parties at this stage.
There are multiple options for approvals. Expand the relevant section to learn more, depending on your requirements.
Option 1 - Simple Approval ✅
- Click on the approval phase to edit it.
- From Approval, ensure that the Enabled and Single radio buttons are selected.
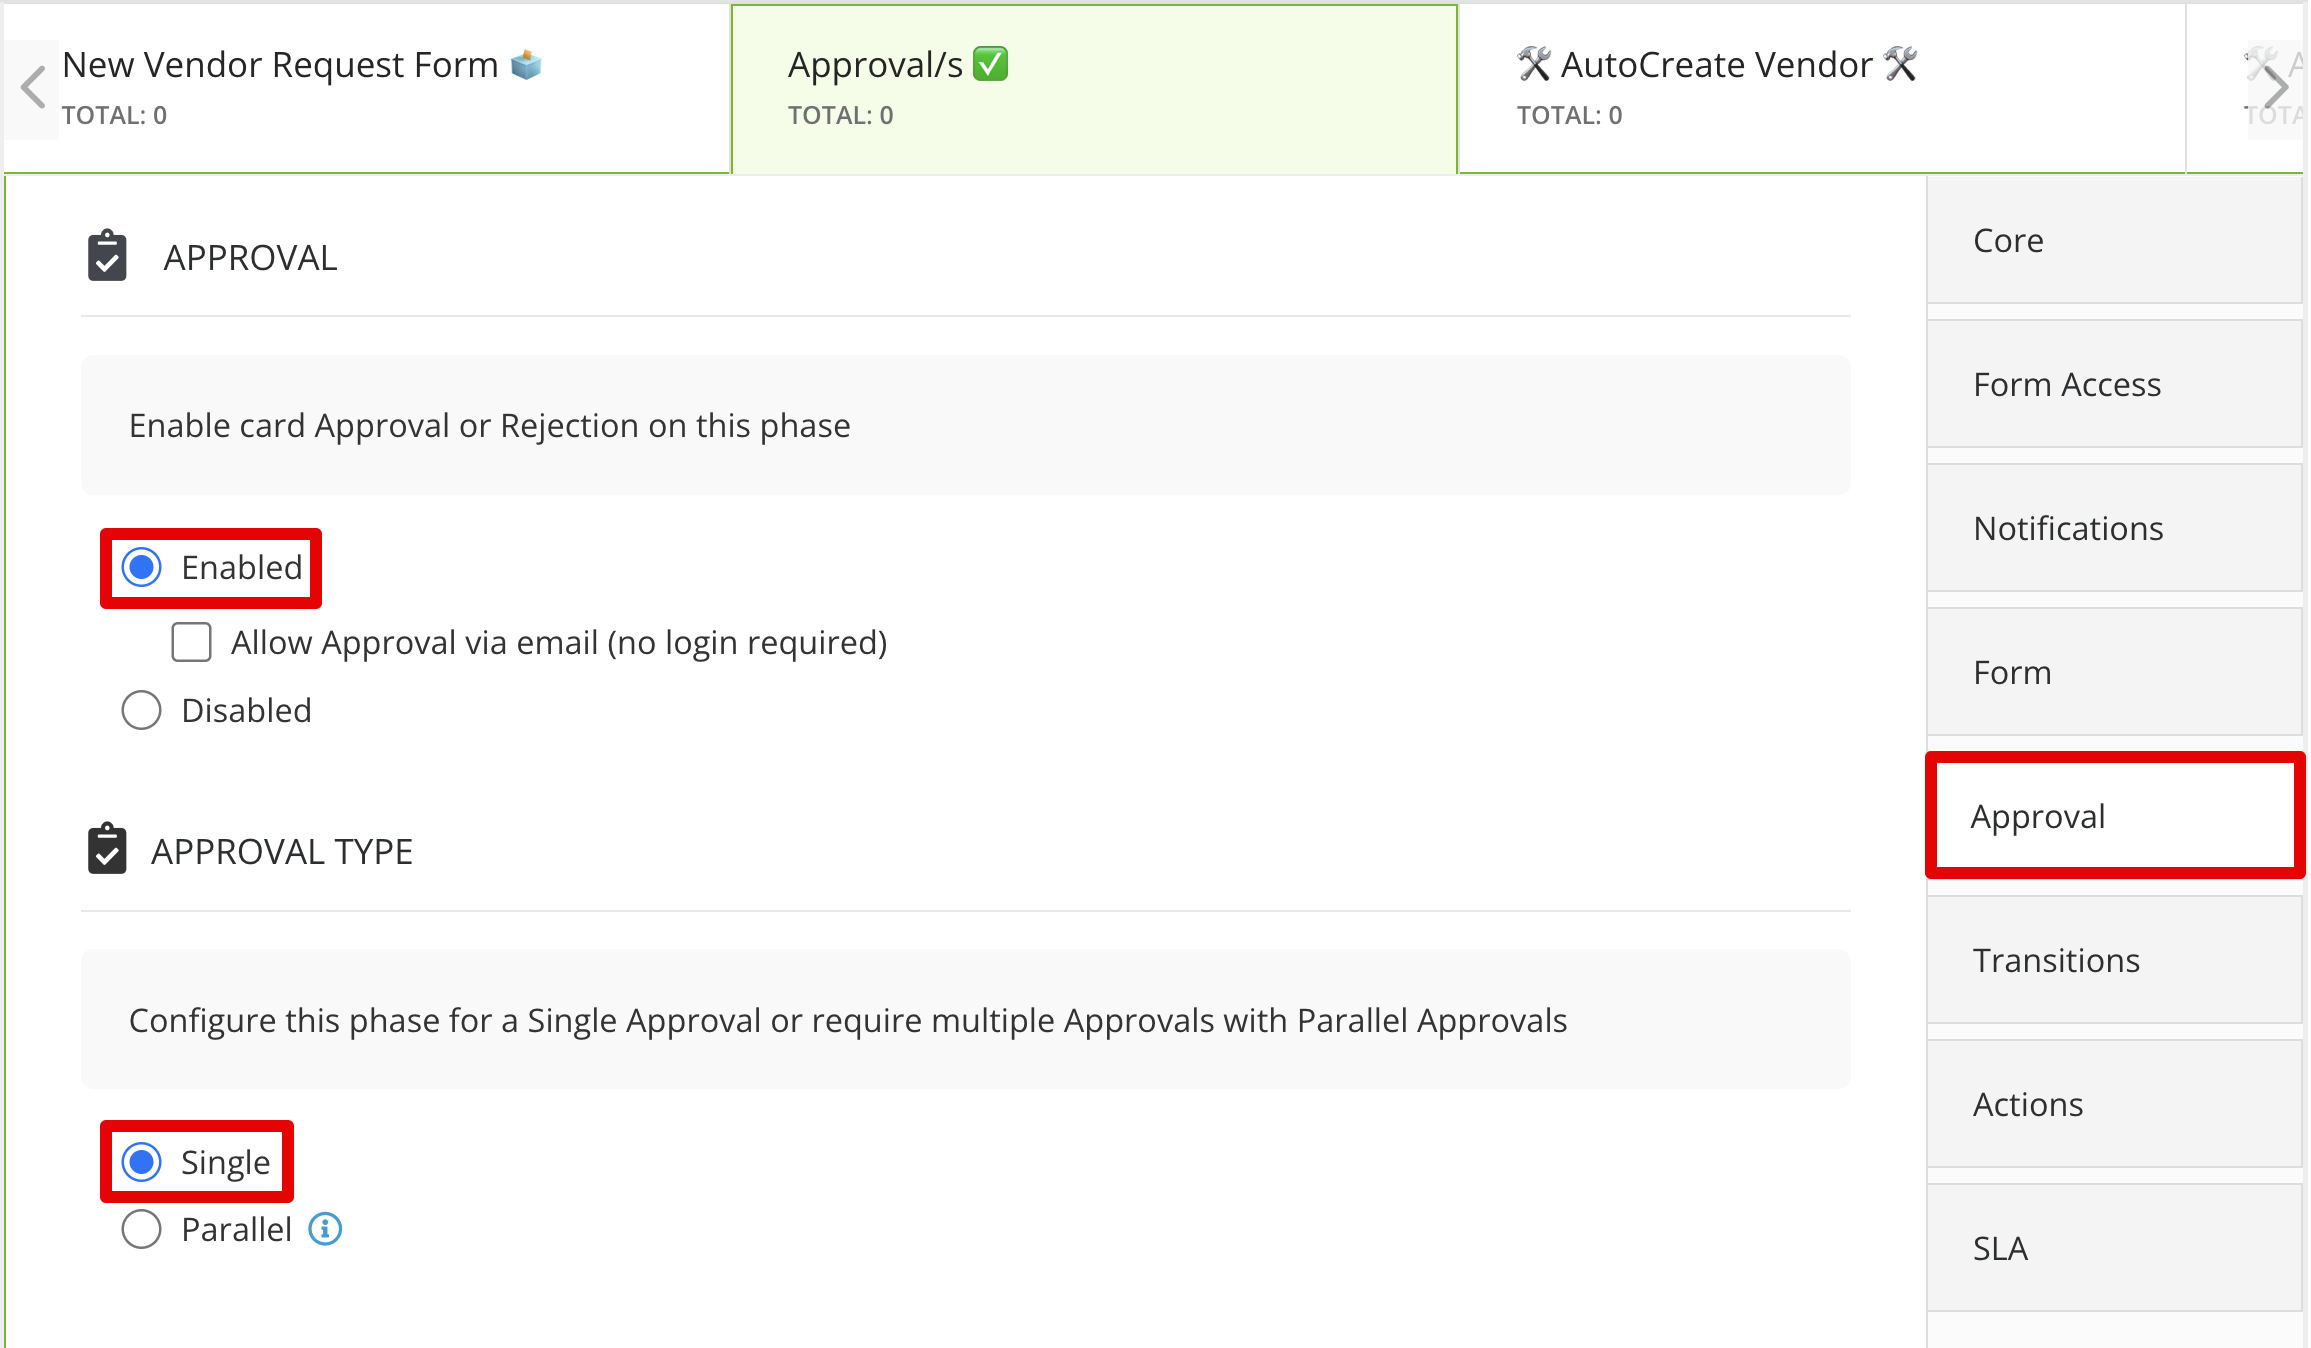
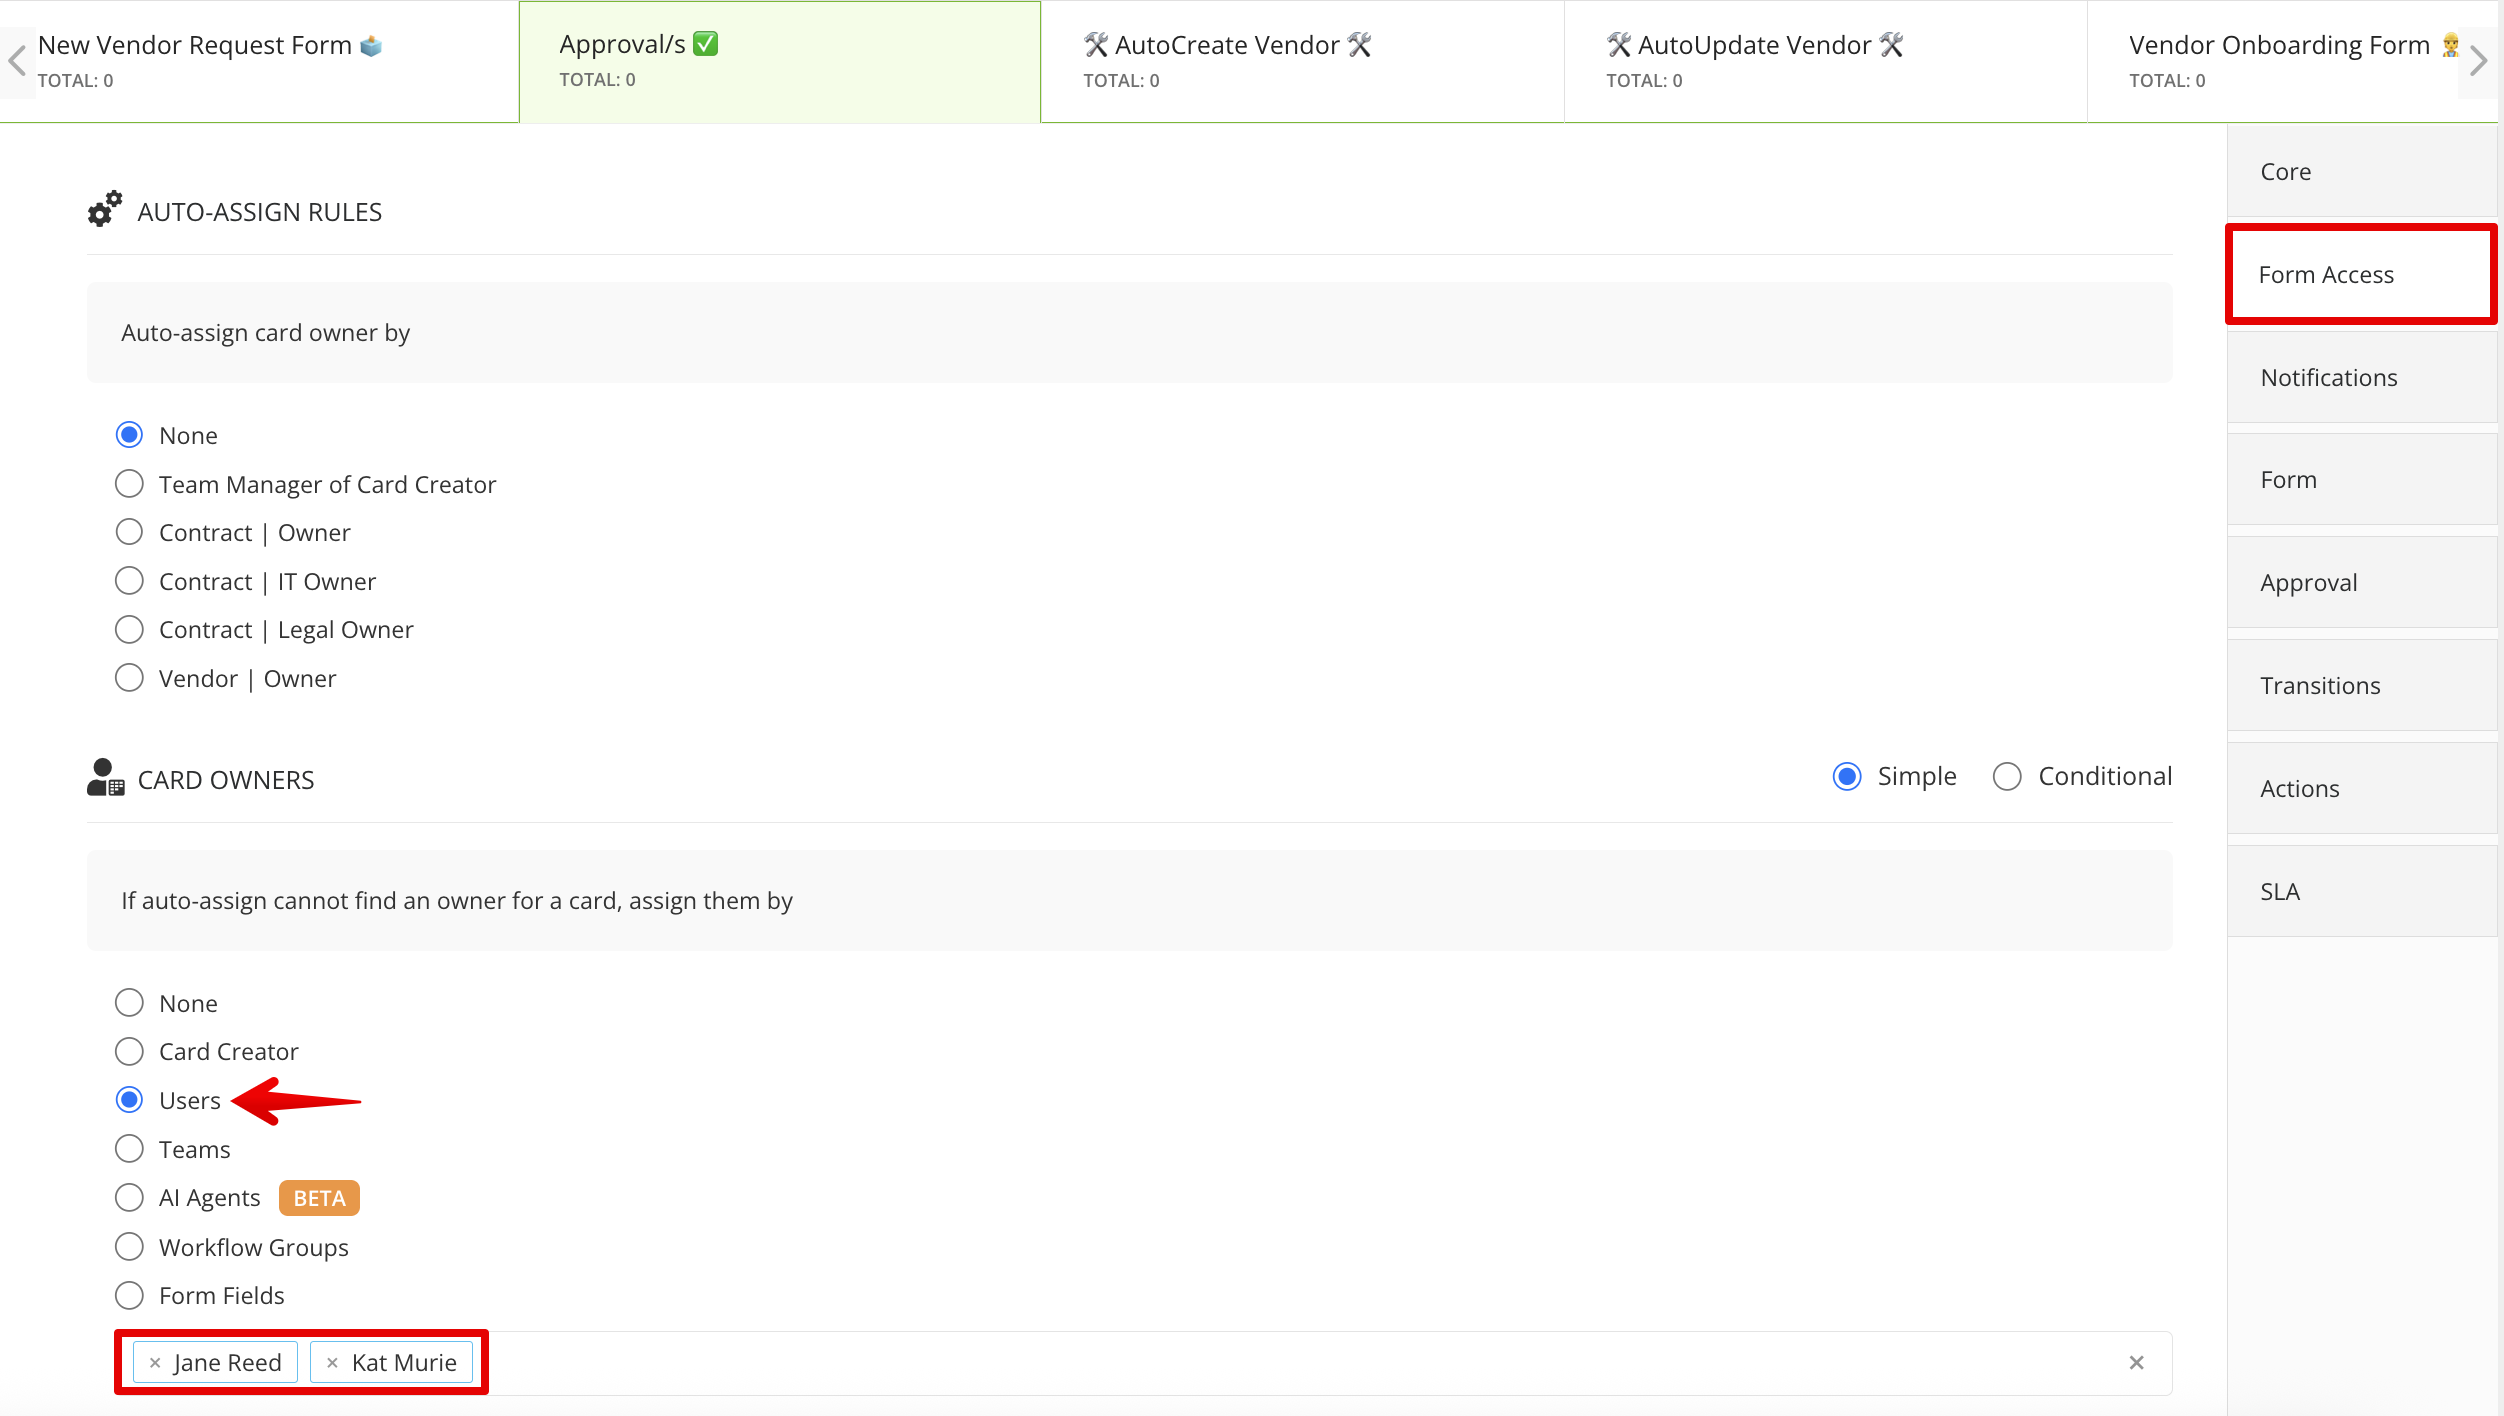
- From Form Access, select the user/group who should provide the approval. If you select multiple users or groups, only one needs to approve the onboarding form for it to progress past this phase on the Kanban board.
Option 2 - Parallel Approvals ✅✅✅
- Click on the approval phase to edit it.
- From Approval, select the Parallel radio button.
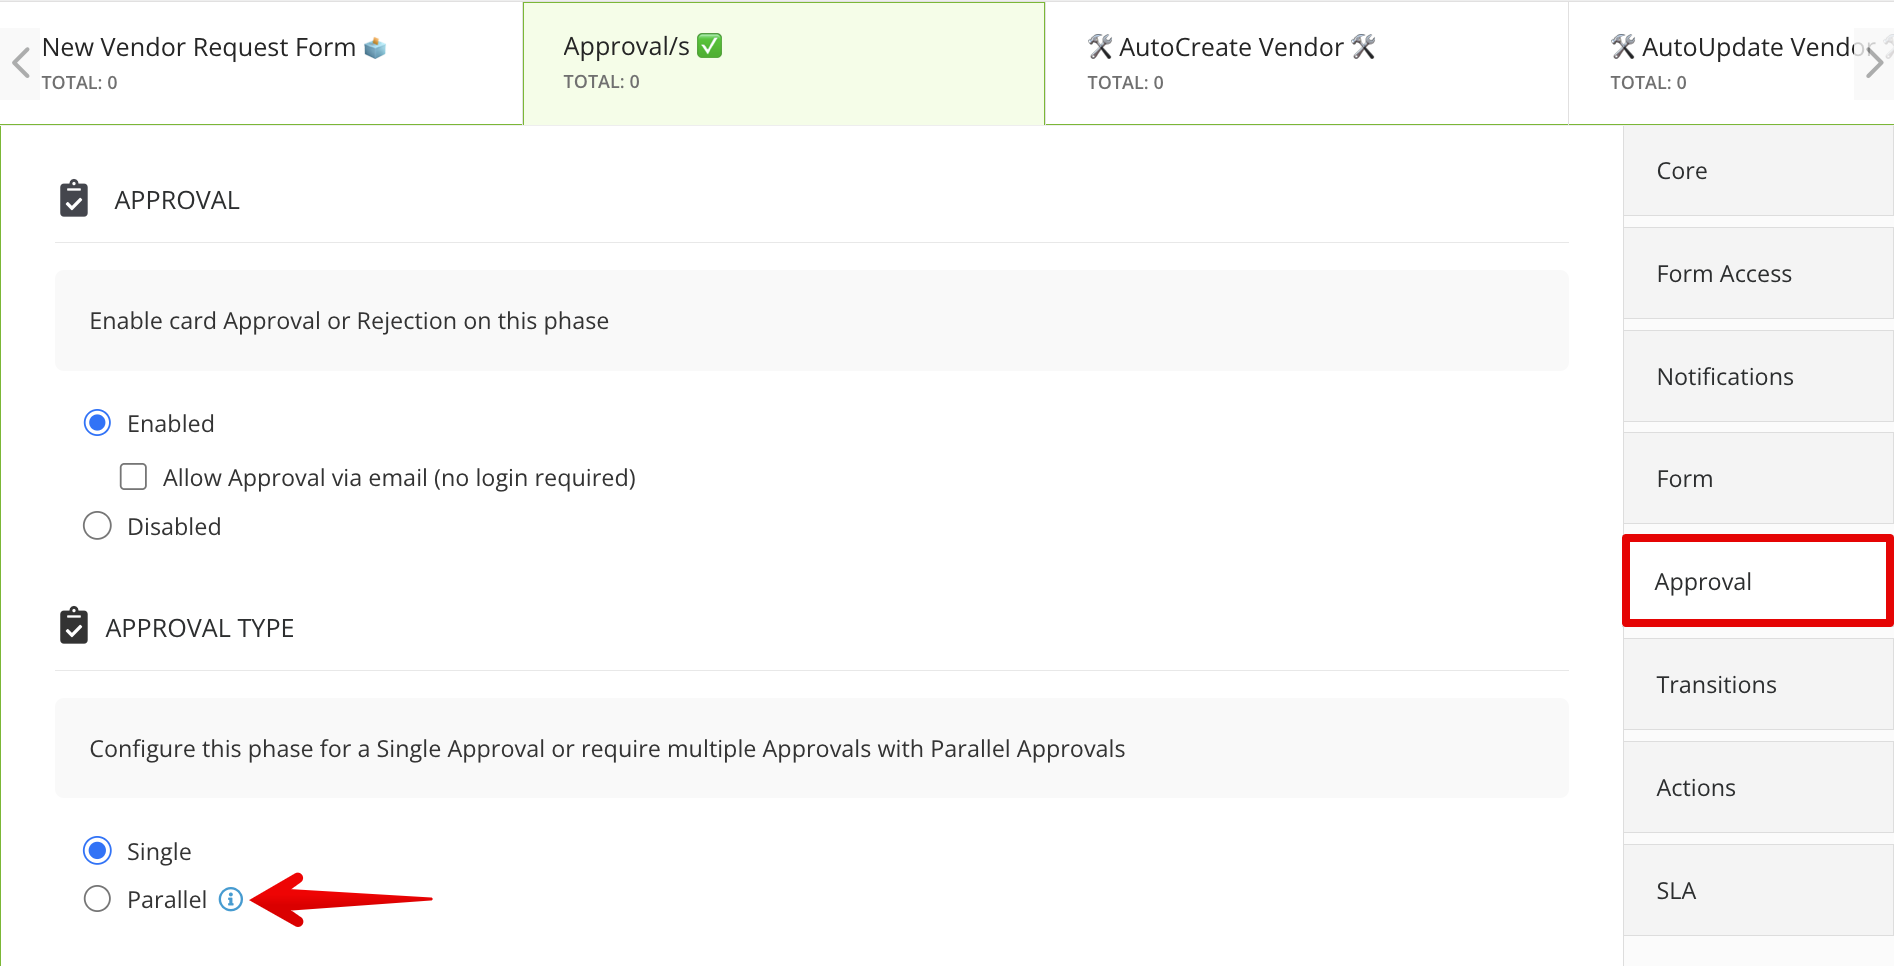
- Select the required users/groups then click Save. All selected users/groups must approve for the vendor to progress past this phase.
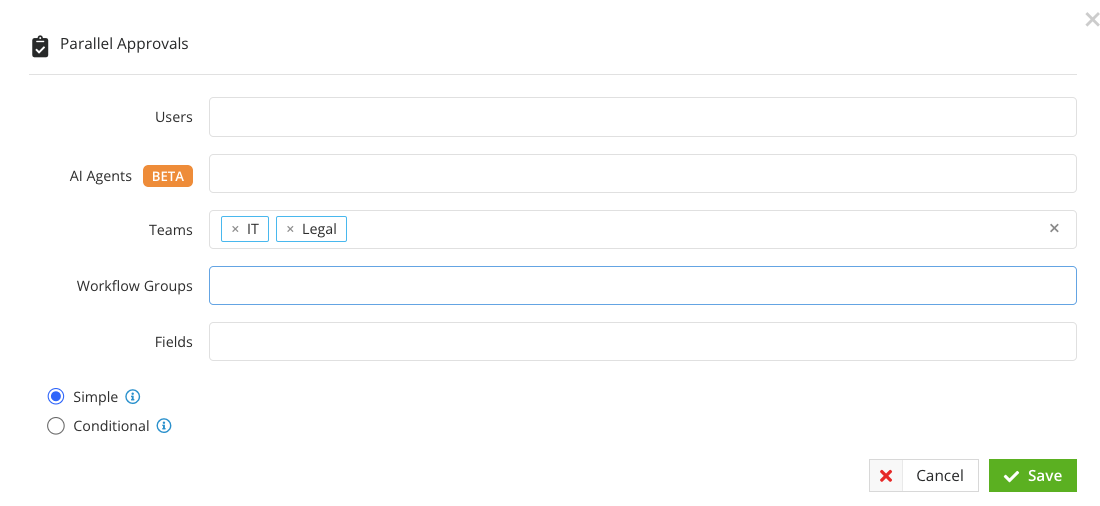
Option 3 - Conditional Parallel Approvals 🔀
- Click on the approval phase to edit it.
- From Approval, select the Parallel radio button.
- Select the required users/groups, then select the Conditional radio button and click Save.
- Click ➕ ADD to assign conditions for the selected user/group to require approval.
- Click Add New Parallel Approval and repeat steps 3 - 6 until all conditional approvers are set.
Gatekeeper will evaluate each rule and apply the relevant approvers when the workflow card meets the defined conditions.
- Carefully setting your conditions, or
- Including an Always Active approval alongside your conditional ones.
Configure the Pre-built Forms
Two form sections have been added as placeholders to help you build out fields for your onboarding questionnaires:
- Form 1: REQUEST FORM - This form is designed for internal users to provide details about the new vendor beyond the core metadata. Where possible, this should follow the format of any existing intake form used by your organisation. It should capture context about the purpose and nature of the new vendor relationship, for example:
- Reason for new vendor request [Multiline text]
- Relationship type [Dropdown: One-off purchase, ongoing/recurring services]
- Estimated budget [Monetary value]
- Service category [Dropdown: Software, transportation, maintenance, etc.]
- Form 2: VENDOR ONBOARDING FORM - This form, pre-populated with example questions, is designed for vendor users to provide information about their organisation and compliance standards. Use this form to collect any details or attachments from vendors that do not need to be stored in the final vendor record as metadata.
To configure these forms:
- Click the New Vendor Request Form phase to edit it.
- From Form, click ➕ ADD FIELD in the REQUEST FORM section to begin creating the questionnaire.

- Continue adding fields to this section until the questionnaire is complete.
- Scroll to the VENDOR ONBOARDING FORM section and configure the fields as required:
- Click + ADD FIELD to add new form fields.
- Expand the 3 dots then click the
 pencil icon to edit existing fields.
 - Expand the 3 dots then click the
 delete icon to remove existing fields.
Set the Vendor Type
Vendor Type is an important field for classifying vendors, and is mandatory for vendor records in your Gatekeeper repository. To ensure this is captured for all new vendors, configure your workflow to populate this field using one of the methods below:
Option 1 - Make the field Mandatory before the Create Vendor AutoAction
- Click the phase of the workflow where the Type field should be populated. This can be either New Vendor Request Form 🗳 or Approval/s ✅ depending on your organisation's processes.
- From Form, select the Mandatory checkbox for Type.

- If you have made the field mandatory at a phase where the Vendor Details section is not editable, ensure you update this by selecting the Editable (or Custom: Editable) radio button.

Option 2 - Set up a backup value within the Create Vendor AutoAction
- Click the AutoCreate Vendor phase to edit it.
- From Actions, click Edit AutoAction Values on ⚙️ AutoAction | Create Vendor.
- For Type, select a backup value from the dropdown list, then click Save.

🛠 Additional Configuration 🛠
This section covers optional steps to adjust the workflow’s scope or default settings, helping you tailor it to your organisation’s needs.
Add Custom Metadata
If you have created custom vendor metadata, you can add it to the workflow form to capture additional data that will be stored on the final vendor record. This is ideal for due diligence forms and other key data points you typically collect about vendors, for example risk assessment data related to InfoSec/GDPR or Anti-Money Laundering.
⚡️ Expert Use Case: Automated NDA ⚡️
To use custom data for generating an automated NDA while completing the onboarding process, see Parallel Workflows 📖.
To add custom data to the workflow form:
- Click on the start phase of the workflow to edit it.
- Navigate to Form, then click ADD SECTION and enter a section name.
- Select the following from the dropdown lists:
- Predefined: Vendor
- Custom Data Group: The custom group you want to add.
- Click Save.
- Click REORDER to move the new section to your preferred position in the form.

Note: You can expand the 3 dots then click the ![]() pencil icon alongside the form fields to relabel them. For example, a field in your data model such as Data Processor [Yes/No] could be reworded for vendors as Do you or will you process data as part of your services to us? [Yes/No].
pencil icon alongside the form fields to relabel them. For example, a field in your data model such as Data Processor [Yes/No] could be reworded for vendors as Do you or will you process data as part of your services to us? [Yes/No].
Set AutoAction Values
For any additional custom metadata sections, you need to ensure the vendor record is updated with the values from these fields in any AutoAction phases. In the template, you may configure these values on the following phases:
- 🛠 AutoCreate Vendor 🛠 and 🛠 AutoUpdate Vendor 🛠
These phases exist near the start of the workflow to create/update the appropriate metadata values before the Vendor Portal onboarding form is sent. The Update action phase allows the workflow to support re-onboarding of existing vendors. - ✅ Vendor Onboarded ✅
This is the Done phase of the workflow. It captures any updates made after the previous two actions (for example, by the vendor or approvers) and publishes them to your finalised vendor records.
To configure this:
- Click a phase of the workflow where vendors are created/updated.
- From Actions, click Edit AutoAction Values for the enabled AutoAction.
- For any new fields, select the corresponding Take Value from Form checkbox.
- If required, select an optional backup value in case the field is left blank.
- Click Save.

Set Visibility Rules
Once you add a form section, it will be Editable by default in the current phase, and Read Only in all other phases. You can adjust this for specific phases of the workflow if needed:
- Click the settings icon to access the Configuration View.

- To set the section visibility, hover over the relevant section box and select from the dropdown list.

- To set the field visibility:
- Hover over the section box and select the appropriate checkbox to apply the visibility to all fields within the section.
- Hover over an individual field box and select from the dropdown list to apply the visibility to fields one-by-one.
- To copy a section/field visibility settings to other phases, click the copy icon. Then, select the checkboxes to determine which phases you want to copy the settings to, and click Copy.

Configure Rejections
This workflow template includes two phases where a vendor onboarding card can be rejected:
-
The Approval/s ✅ phase
Near the start of the workflow, a manager or admin user reviews the onboarding request.
A rejection here transitions the card to ❌ Vendor Rejected ❌ DONE, marking the request as closed with no further action. To change this, see the recommendations in⚡️ Workflow Resubmissions and Appeals ⚡️. -
The Onboarding Review ☑️ phase
At the end of the workflow, the vendor onboarding form is assessed. A rejection here sends the card back to Vendor Onboarding Form 👷 for updates and resubmission. In some cases though, a rejection here should instead close the request entirely, with no further action. To support this, you can configure a Review Rejection phase where an admin user or team decides the next step:- Return the form to the vendor for updates, or
- Send the form to the ❌ Vendor Rejected ❌ DONE phase.
 Add Market IQ Financial or Cyber
Part 1: Add the Market IQ Metadata Fields to the Form
- Click on the start phase of the workflow to edit it.
- Navigate to Form, then click ADD SECTION.
- Enter a section name (e.g MIQ Financial Data or Creditsafe Data), then select the following from the dropdown lists:
- Predefined: Vendor
- Custom Data Group: Market IQ | Financial or Market IQ | Cyber

- Click Save.
- Click REORDER to move the new section to your preferred position in the form.
- For each phase, set the visibility of this new data section. As these fields will only be populated by the action configured in Part 2 below, it is best to set them as Hidden in all phases until the action has run.
Part 2: Enable the Sync Action for Market IQ Financial
For Market IQ Financial, you'll need to add an action to the workflow to connect the vendor. However, for Market IQ Cyber, all you need to ensure is that the vendor website is populated and published to the record in the repository, so you can skip this section.
- Click the phase where you wish for the vendor to be linked to Market IQ. If this is not suitable for an existing phase (such as Onboarding Review), you can add a new phase.
- From Actions, select the Update Vendor with Market IQ | Financial checkbox.

You can also use Market IQ data to trigger a conditional approval, so that only high-risk vendors require review by a designated user or group. Expand the section below to learn more.
⚡️Expert: Use Market IQ Data for a Conditional Approval ⚡️
- Click on the phase where the conditional approval would take place.
- From Approval, select the Enabled and Parallel radio buttons.
- Click ➕ ADD NEW PARALLEL APPROVAL.
- Select the required users/groups, then select the Conditional radio button and click Save.
- Click ➕ ADD to assign conditions for the selected user/group to require approval, selecting the relevant Market IQ field (e.g. Credit Rating) and choose the values you consider high enough risk to require approval.
Note: For guidance on Market IQ, see:
Add a NetSuite Sync
To connect the vendor to NetSuite as part of the onboarding workflow:
- Click on the phase where a vendor should be synced to NetSuite to edit it. Set this to occur after the Onboarding Review phase to prevent syncing vendors who may not meet compliance requirements.
- Navigate to Actions, then select the Update Vendor checkbox. Alternatively, it is possible to enable a NetSuite sync using Create Vendor.
- Underneath this action, select the Sync to NetSuite on Action checkbox.

Add Extra Phases
This template is designed to be succinct, with flexibility to expand within the pre-configured phases. For example, the single Onboarding Review phase can accommodate multiple reviews and approvals, depending on your team structure. However, you can also add steps to your workflow to support additional processes, such as:
- Adding a new phase before Onboarding Review to link the vendor to Market IQ Financial
- Adding a new phase after Onboarding Review to sync the vendor to NetSuite
To do this:
- Navigate to the right hand side of the workflow board.
- Next to New Phase, click ADD.

- Enter a phase title and description if needed, then click Save & Next.

- Click
 Reorder to move the phase to the appropriate point in your workflow.
 - Complete the configuration for the phase depending on its purpose, and reconfigure transitions from other phases to ensure your new phase is included in the end-to-end form workflow.
Start the Workflow with a Trigger
By default, the Vendor Onboarding template uses internal request forms to start the workflow process, as they capture who requested the vendor, why they are needed, and key information about the relationship from the outset. They also ensure onboarding does not begin until the right approvals are in place, helping you manage vendor relationships and avoid wasted time.
However, depending on how onboarding fits within your Procurement, Vendor, and Contract Management lifecycle, you can choose to initiate the workflow with a trigger instead.
Part 1: Change the Form Access
To prevent this process from being manually initiated:
- Click to edit the start phase of the workflow.
- From Form Access, select the Internal radio button under Authorisation Type.
- Select the radio button for the relevant stakeholder who should be responsible for completing the start form. If an internal vendor owner is assigned, they are the recommended choice, with Card Creator as a backup. Alternatively, select a team such as Procurement or Vendor Management.

Part 2: Change how the workflow starts
- From the navigation menu, click Workflows.
- Expand the 3 dots on the relevant workflow, then select Workflow Triggers.
- Click ➕ ADD TRIGGER.
- Enter a name then click Create.
- Click ➕ ADD to set the trigger conditions.
Note:
- To use trigger conditions based on vendor user actions, select:
-
Vendor Portal Self Registration, or
-
Vendor Portal Invitation
-
For details on how these invitation and registration options work, see 📖 Invite Vendors to the Vendor Portal.
- To trigger the workflow based on vendor record metadata, select a field such as:
-
Vendor / Approval is Awaiting Approval
-
-
To automatically initiate vendor onboarding during a contract approval workflow, see 📖 Parallel Workflows - Contract Request x New Vendor Onboarding.
-
To automatically initiate vendor onboarding upon completion of an NDA workflow, see 📖 Parallel Workflows - Touchless NDA x Vendor Onboarding.
Disable the Public URL Request Form
If you are using the authenticated Employee Portal form to start the workflow, you may want to disable the Public Form to prevent users from accessing the less secure option. To do this:
- Click the start phase of the workflow to edit it.
- From Form Access, deselect the Public Form checkbox.

Hide Phases from the Vendor and Employee Portal
If your workflow is long, or includes AutoAction phases, you can hide certain phases to simplify the Progress tracker view for Employee Portal or Vendor Portal users.
- From the navigation menu, expand Modules, then click Vendor Portal or Employee Portal as required.
- In the Vendor/Employee Portal Workflows section, expand the 3 dots on the relevant workflow, then click Edit.
- Select the Hide checkbox for the phases you wish to hide.
- Click Submit to save your changes.
Amend the Workflow Description
When using this workflow in Employee Portal, users will see a description on the request form tile on the Submit Requests dashboard. To amend this:
- From the navigation menu, click Workflows.
- Expand the 3 dots on the relevant workflow, then select Edit this Workflow.
- Enter a short summary in the Description box to explain to users what the workflow is for, and use HTML tags to format the text.
- Once finished, click Save.
Example Text:
This request form can be used to initiate a new vendor onboarding. This is a key step before we can enter into a contract agreement with vendors
⚡️Getting Started ⚡️
Once your workflow is fully configured, follow the guidance below to start using it:
If Using the Employee Portal
Once your workflow is configured, users can initiate a new vendor onboarding request via the Submit Requests dashboard. To share the form URL, right-click the Request button to copy the link.

If Using a Public Form
You will need to copy and distribute the form URL. To do this:
- Click the start phase of the workflow to edit it.
- From Form Access, copy the URL to share with users.

If Using Triggers
Once your workflow is fully configured, activate the triggers to make it live:
- From the navigation menu, click Workflows.
- Expand the 3 dots on the relevant workflow, then select Workflow Triggers.
- For any trigger with a Pipeline status, click on the trigger's name.
- Click the pencil icon on Trigger Status.
- Select Live from the dropdown list, then click Update.
- Click < Back to return to the list of triggers.
- Repeat steps 3-5 until all triggers are live.
If triggered by Self Registration, you'll need to make sure vendors have access to the registration link. To copy this:
- From the navigation menu, expand Modules, then click Vendor Portal.
- Switch on the
 Enabled toggle under SELF REGISTRATION.
 - Click Copy to store the URL in your clipboard. You can then share the link to the Vendor Portal Registration, for example on your website, Confluence page, or email signature.
Additional Reading 📚
- ⚡️Vendor Portal Expert - Invitation Emails - Learn to configure how vendor users are invited to the Gatekeeper platform. This is a simple but important step to help set clear expectations and ensure transparency in new relationships.
- ⚡️Vendor Portal Expert - Workflow Phase Notifications - Learn useful tips to ensure every automated email your vendors receive is clear, informative, and well-received.
- ⚡️Vendor Portal Expert - Workflow Phase Reminder Emails - Learn how to configure automated reminder emails for your vendor phases, reducing the need to chase responses.