High-Level Workflow Build Process
This article will walk you through the high-level end-to-end process of creating a workflow in Gatekeeper.
![]() Estimated Read Time: 10 minutes
Estimated Read Time: 10 minutes
Sections in this article:
Note: This article is for users who want to build simple workflows on their own. If you require advanced functionality, please reach out to us for support.
Requirements Gathering
The first step in building a workflow is to confirm that the process is well-suited to the Gatekeeper Workflow Engine. Before you begin, consider the following questions to ensure a smooth fit:
- Does the process involve multiple people or teams?
- Does it include several tasks or steps owned by different stakeholders?
- Is it based on form submission or completion?
- Will it result in updates to a contract or vendor record?
If the answer to these questions is ‘Yes’, you're ready to proceed with your workflow build.
Supported Use Cases
Below is a list of supported use cases for Gatekeeper’s Workflow Engine. Click the relevant example to view a completed diagram of the process.
- Contract Renewal process
- Contract Approval Form (CAF) process
- Vendor Onboarding process
- File Expiration process
Additionally, please see an example of a Contract Approval Form here.
Create a Process Flow Diagram
After confirming that your process aligns with one of the four supported use cases, the next step is to map out a Process Flow Diagram to guide your workflow build. This acts as both a visual map and a safeguard against scope creep.
- Gatekeeper’s Workflow Engine uses a Kanban approach. Ensure your diagram follows the Kanban style, as this will ensure a smoother experience when building your workflow.
- You can use any diagramming tool to help you map out the process flow, but at Gatekeeper, we use Lucidchart.
- When creating your diagram, consider all phases involved in the process to ensure nothing is missed.
- It's recommended to keep your diagram up to date as your workflow evolves. This ensures consistency and allows Gatekeeper to provide accurate support when needed.
For an in-depth guide to creating a Process Flow Diagram, refer to Creating a Workflow Diagram 📐.
Phases and Phase Ownership
Phases are stages in a workflow, representing specific steps, such as Procurement Approval or Compliance Reviews. This acts as a container, with one or many owners. In the below example, the phases are highlighted in red:
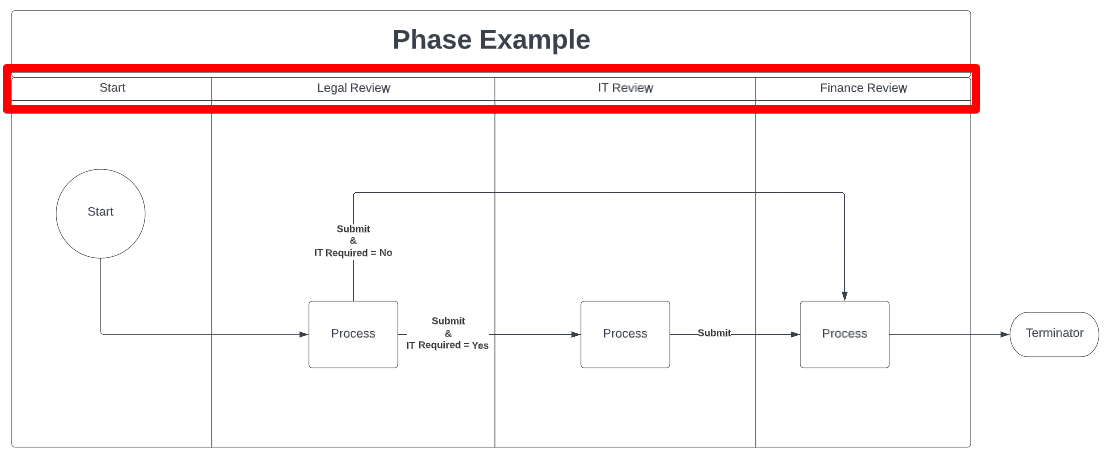
Each phase can have one or many owners, i.e. the users responsible for completing any actions. For example, this could be assigned to a particular team or user.
- For a detailed guide on phases, see Add Phases to a Workflow.
- For more details on phase ownership, see our Workflow Owners Overview.
Transitions
Transitions are the logic required to move cards from one phase to the next. In the below example, these are highlighted in red:
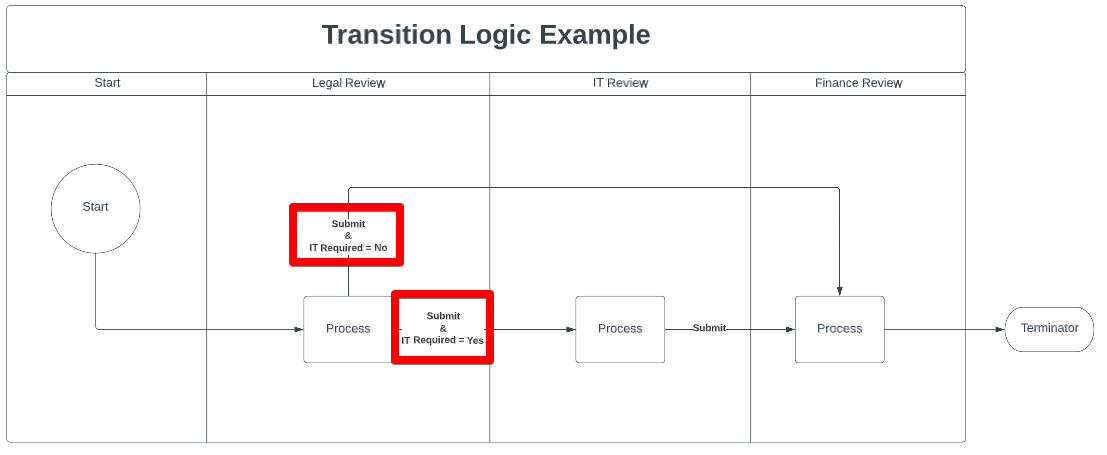
In the example above, simple yes/no transitions are used to move a card. However, these can be tailored to suit your business requirements. For instance, IT involvement may only be needed if the contract poses a Cyber Security risk. In this case, instead of using ‘IT Required = Yes’, you could use a more specific field such as ‘Does this contract involve access to Personally Identifiable Information (PII)? = Yes’.
Additionally, transitions can include multiple conditions. Continuing the example above, IT involvement might be triggered when both conditions are met: the contract involves access to Personally Identifiable Information (PII) and the work provides access to your organisation’s database:
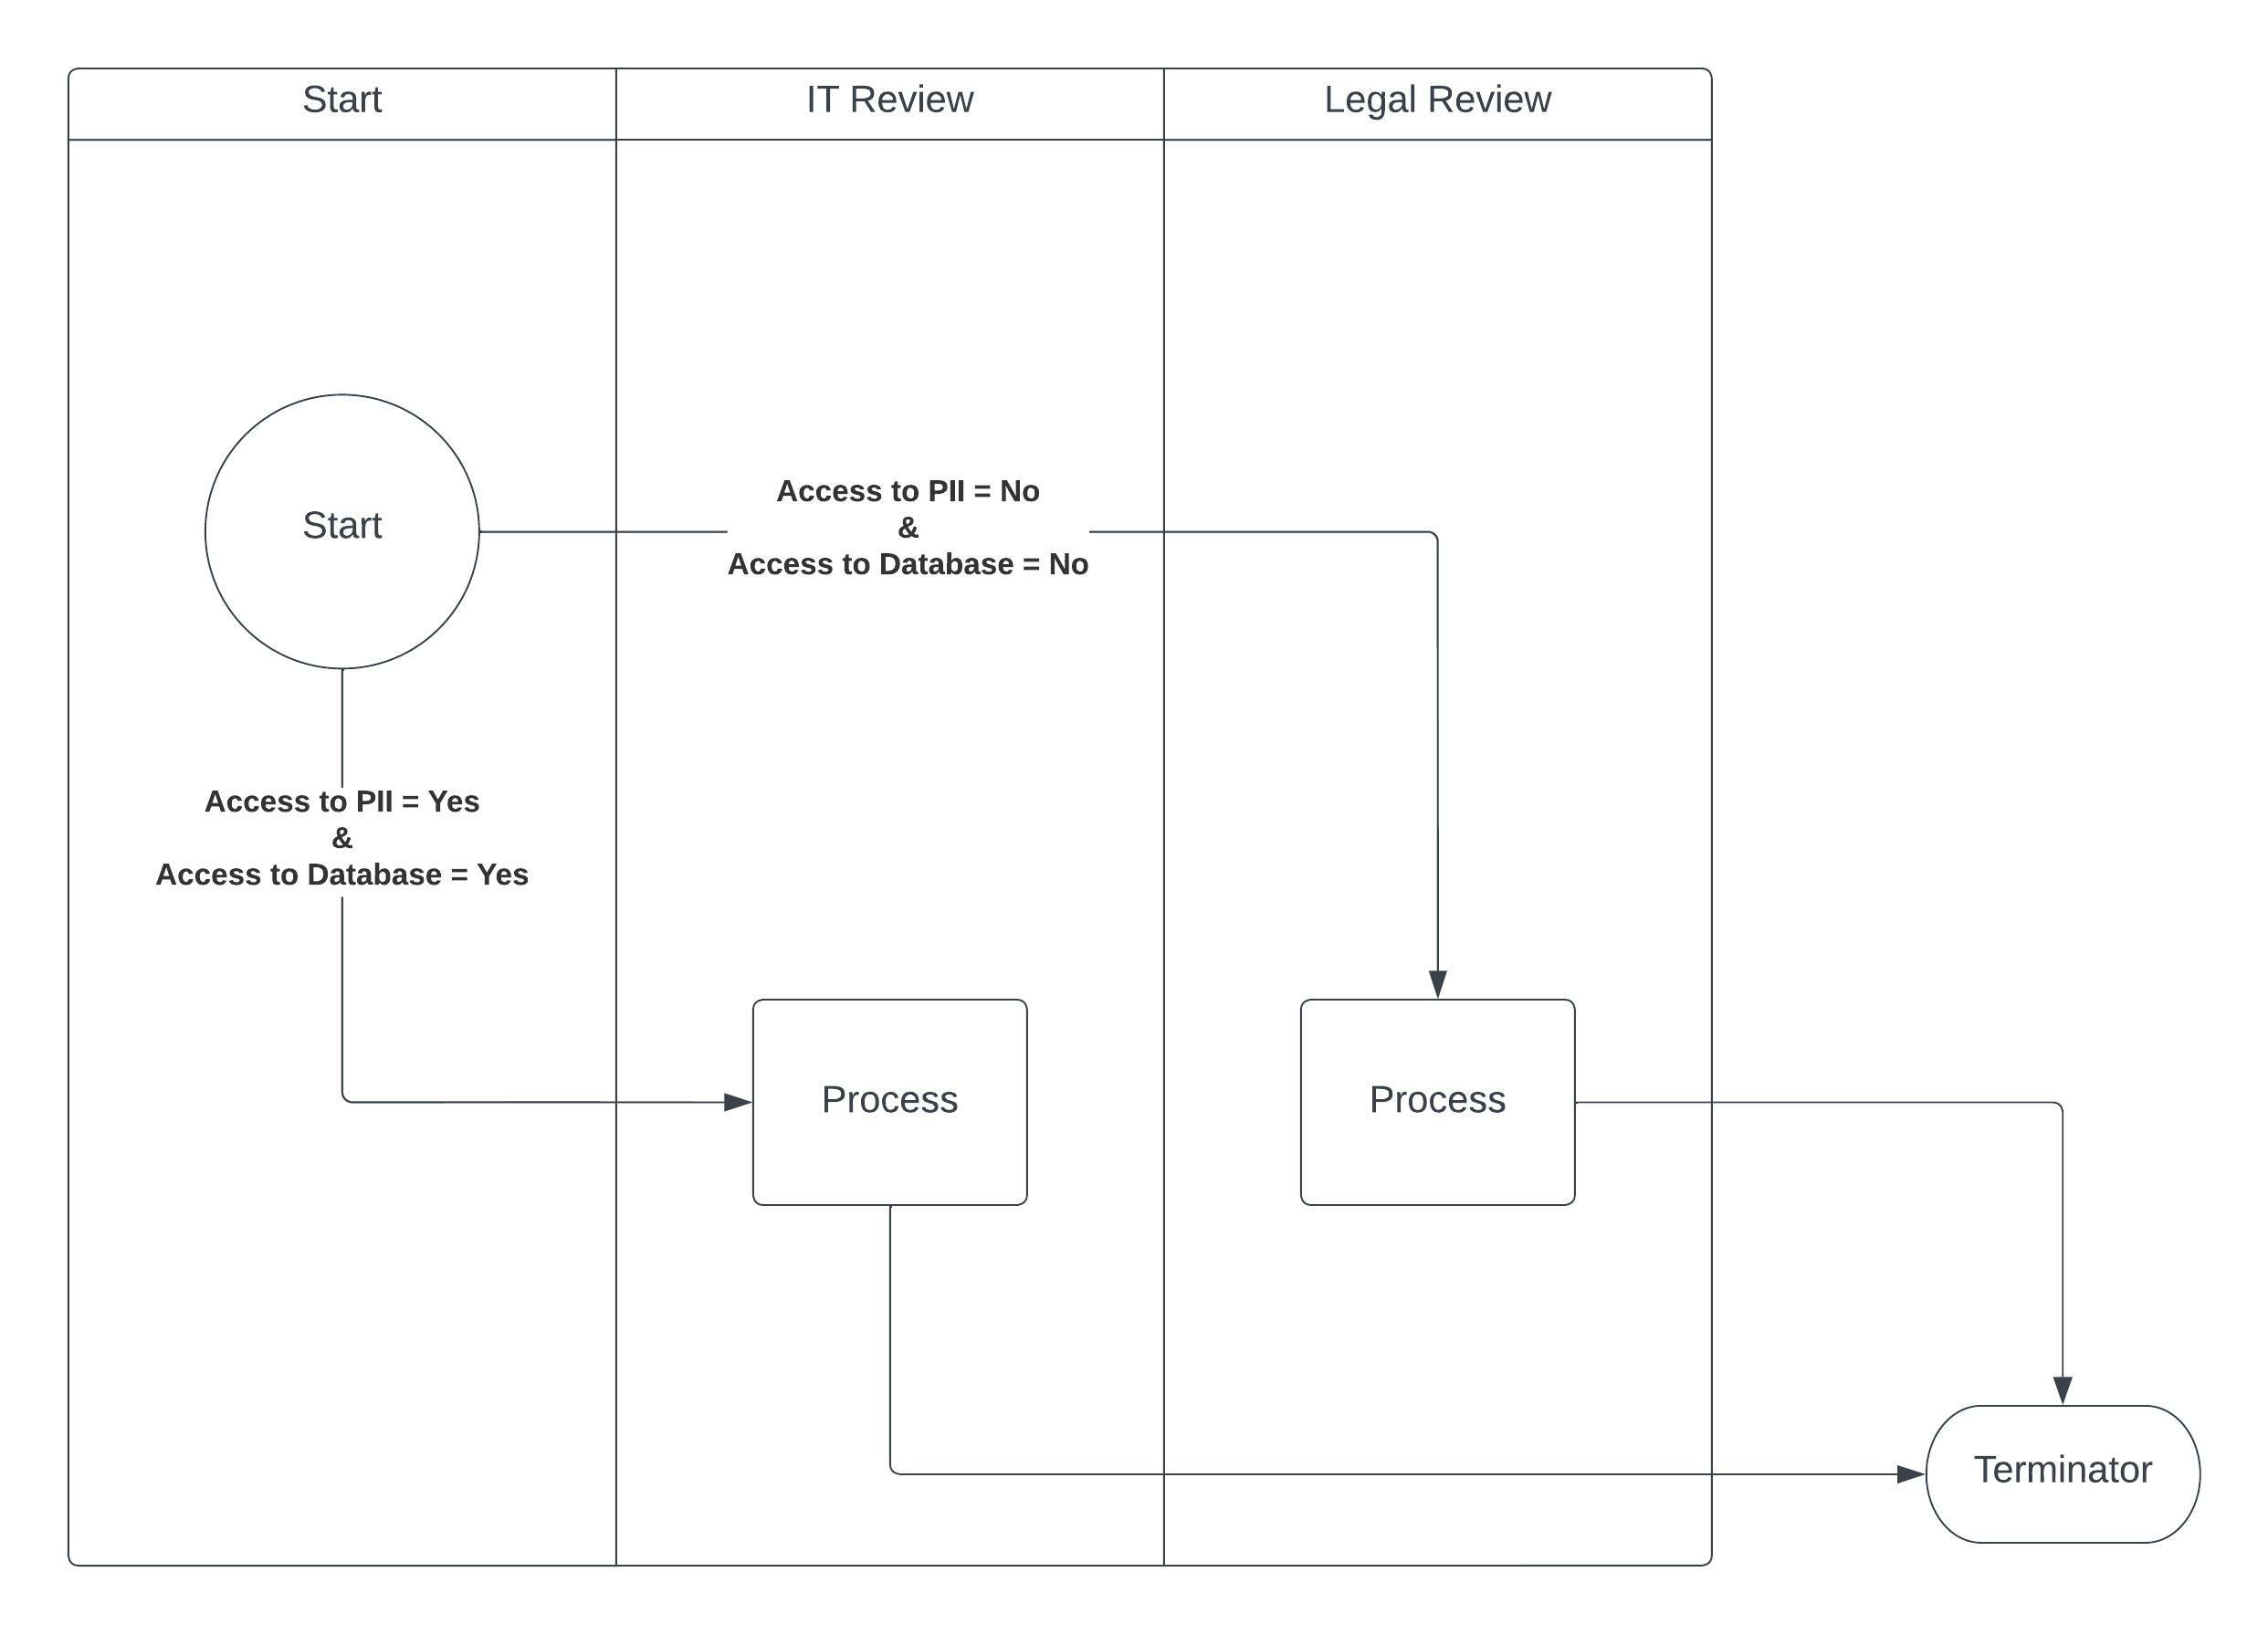
As part of scoping, it's important to engage with each relevant team to fully understand their transitional requirements within the workflow.
For a detailed guide on creating transitions, see Configure Workflow Transitions.
Workflow Actions
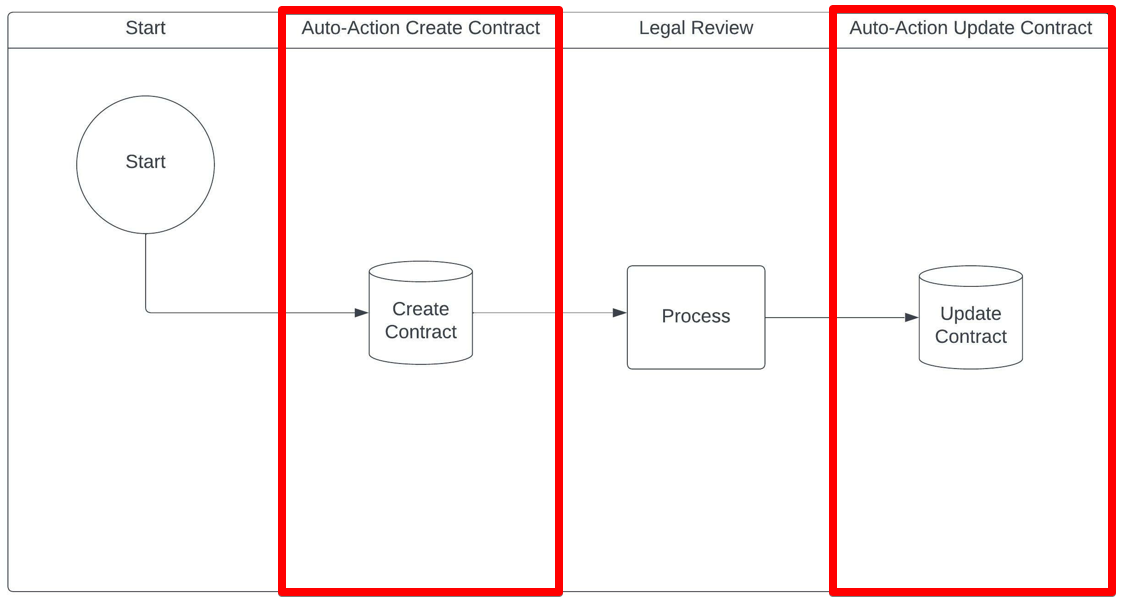
Workflow actions play a key role in any workflow, enabling the creation or updating of records as part of the process. Actions must be enabled for all workflows; without them, any information collected during the process will not be used to create or update records.
As shown in the diagram below, an auto-action is used in phase two of the workflow to create the contract record using information collected during the start phase. The card then moves to the Legal Review phase, where additional input is gathered from the legal team. Finally, it progresses to the Update Contract phase, where the information from Legal Review is added to the existing record.
For additional information, see Workflow Actions.
Approvals
Approvals represent key decision points in the process, determining whether a request should continue through the process. In an approval phase, the relevant stakeholders have two options:
- Approve
- Reject
For example, the Finance team may reject a request if the cost exceeds the available budget.
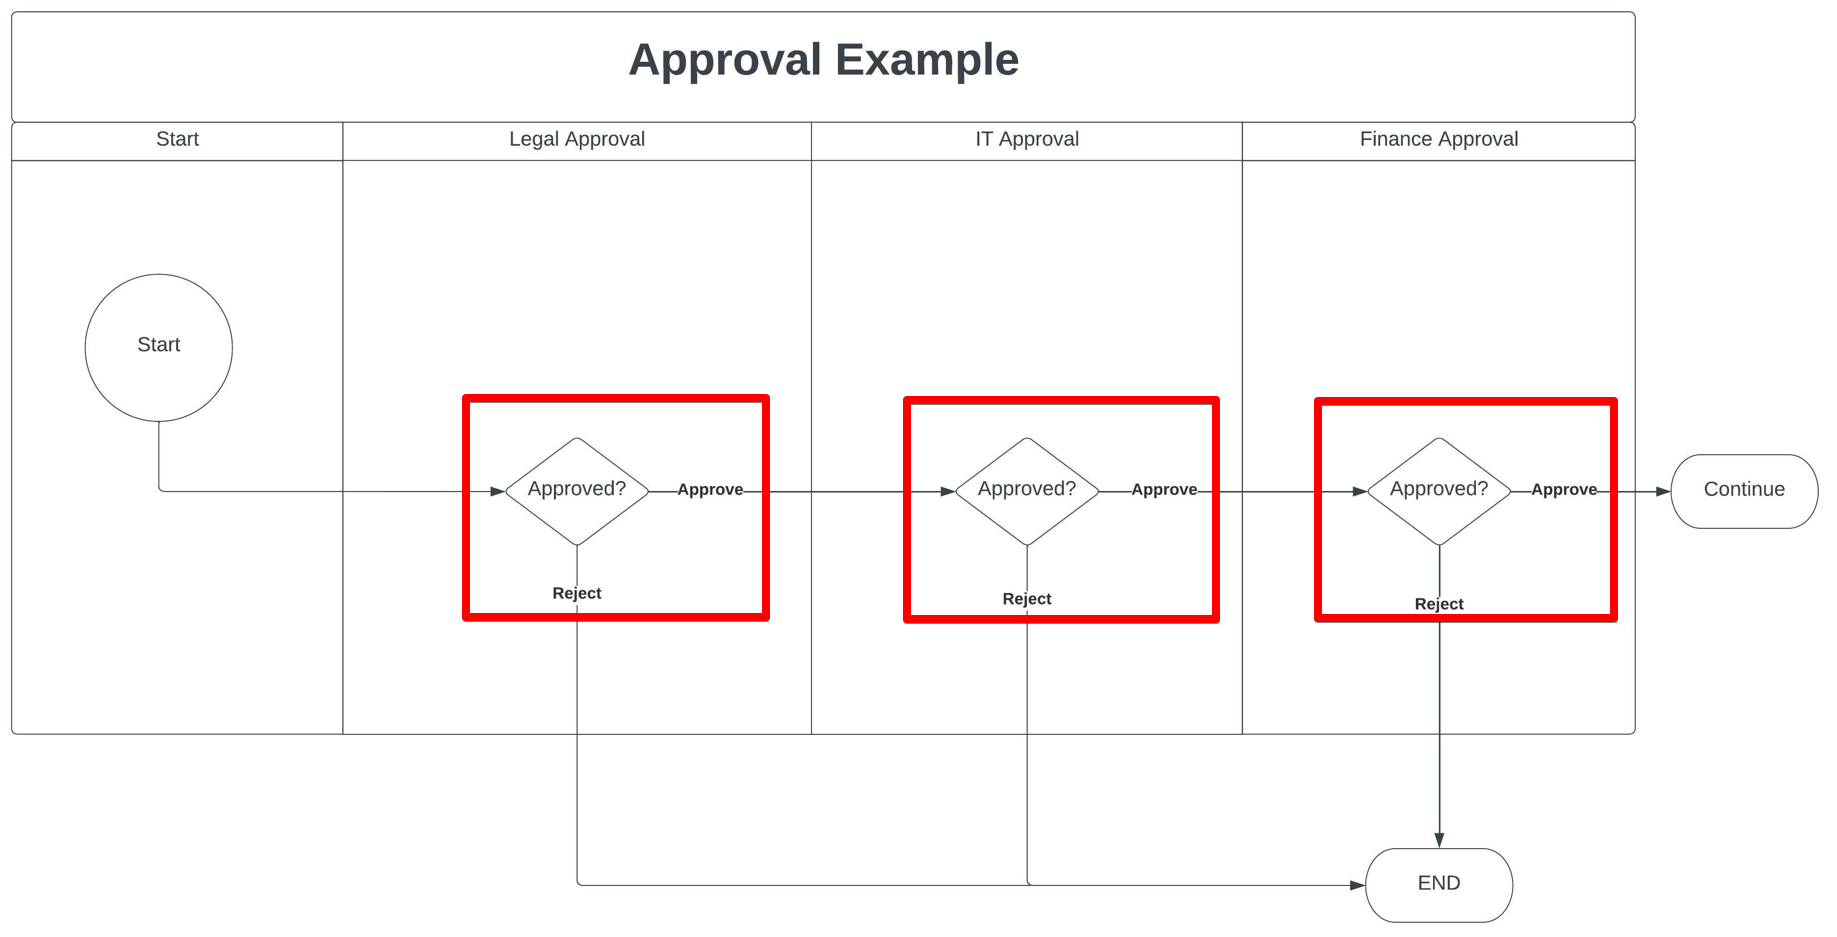
It's important to consider each phase of the process to understand the requirements:
- When are approvals required, and when are they not?
- If required, what information do they need to see?
- Are they responsible for approving or simply reviewing the request?
- Can they reject a request, and if so, what happens next?
For an in-depth guide to Approvals, see Workflow Phase Approvals.
Process Flow Diagram Sign-Off
Once your Process Flow Diagram is complete, share it with all relevant stakeholders for review and approval before starting the workflow build. This ensures any potential changes in scope can be discussed early, and a clear decision made on whether the diagram needs to be updated before moving forward.
Workflow Build
The build phase is where your Process Flow Diagram is translated into a functioning Gatekeeper workflow. This process includes building your form and configuring each workflow phase. We recommend reviewing the linked articles in full before starting your workflow build.
Form Creation
As part of the workflow build, you’ll need to create the forms that your teams require to support the process you've designed. Forms are a vital element of every workflow, as they are used to collect key data throughout the process. This data is gathered using a combination of ‘Form Fields’ and ‘Custom Data Fields’, depending on what each phase requires.
Forms make up an important part of every workflow, as this is where we collate data points as 'Form Fields' and 'Custom Data Fields'.
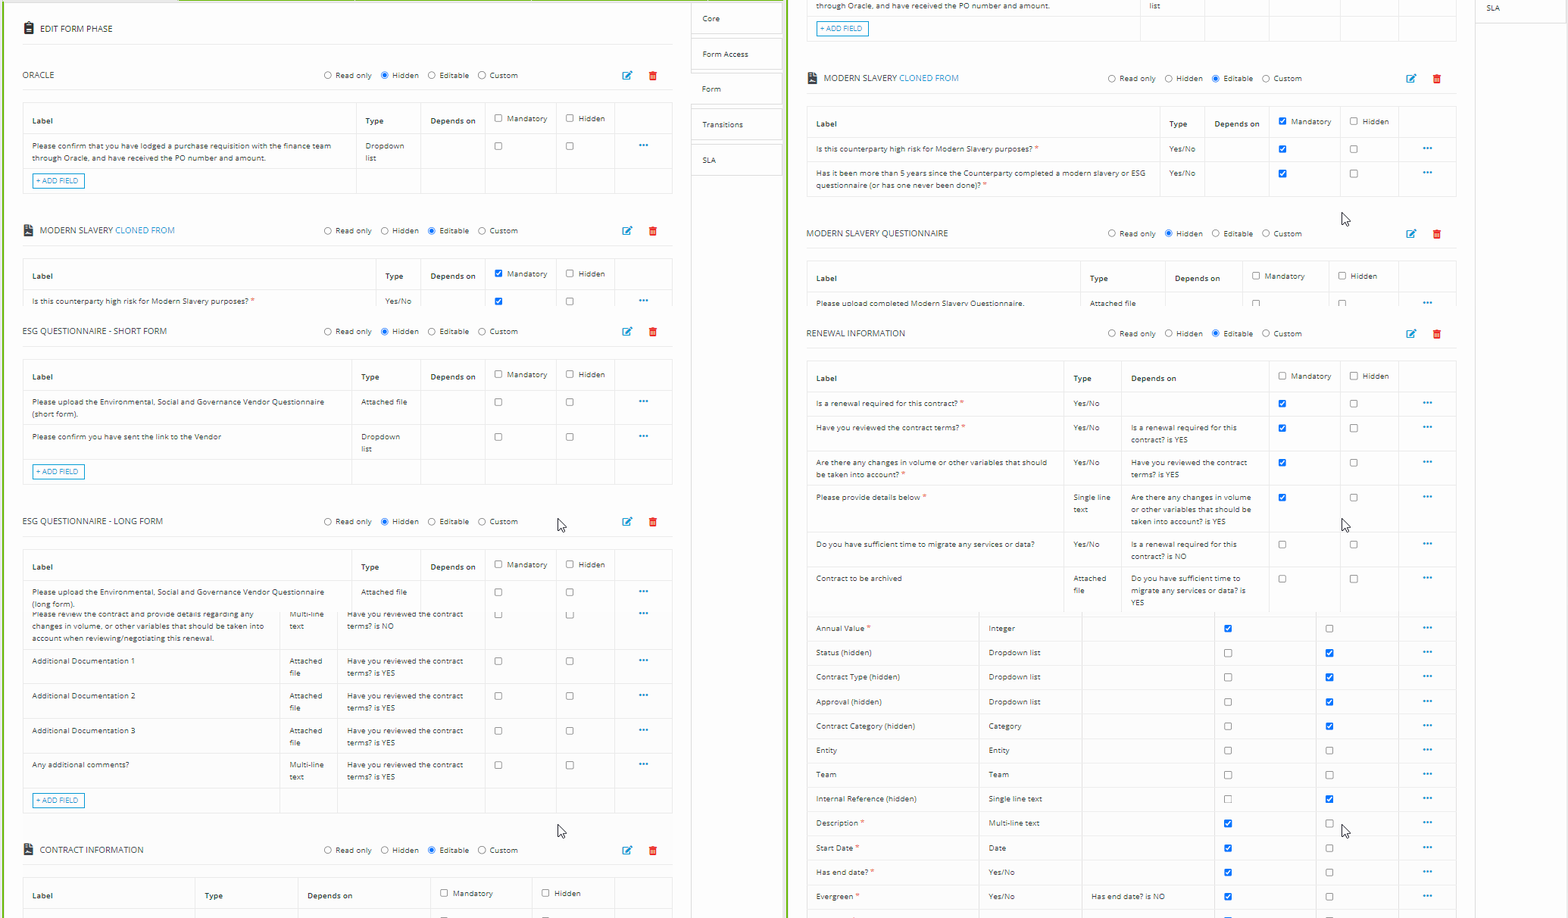
There are two different types of fields available within workflows:
- Predefined Fields - these sections contain fields which exist in your Gatekeeper repository, and can be pulled into the workflow as needed. This can be:
- Form Fields - these fields exist only in the workflow, and do not appear against the created record within the repository. These are primarily used to drive the form experience and build automated workflow transitions based on a specific input.
- For example, a form field might be: “Is Legal required?” - this field helps determine the path of the workflow card, but doesn’t need to be stored in the contract or vendor record.
For an in-depth guide to forms, please see Set up a Form within a Workflow.
Workflow Configuration Guide
The table below outlines the steps required to configure a workflow:
|
Step |
Instructions |
Knowledge Base Links |
|
Starting your workflow build |
First, create the empty version of the workflow. |
|
|
**Create a trigger for your Workflow |
Click Workflows from the navigation menu, then expand the three dots on the workflow and select Workflow Triggers. **Note - if your workflow doesn't require a trigger, you may skip this step |
|
|
Add Phases to your Workflow |
Within your workflow, click Add to create phases. |
|
|
Setting up a Form within your Workflow |
Click the first phase of the workflow to edit it, then click the Form section. Form sections and fields need to be added, then form visibility (for example mandatory, hidden, etc) can be configured separately in each phase. |
|
|
Configuring Approvals |
Click on the phases that require approval to edit them, then click the Approval section and select the Enabled radio button. |
|
|
Configuring Owners |
Ownership is configured from the Form Access section of each phase configuration. |
|
|
Configure transition rules |
Configure the transition rules in each phase from the Transitions section. You can select the Simple or Conditional radio button, then define the logic for the transition. |
|
|
Configure Workflow Actions |
On the required phases, navigate to the Actions section and select the appropriate checkboxes to enable the relevant actions. |
|
|
Configure Notifications |
To manage notifications and reminders for each phase, click the Notifications section and enable the relevant toggles. |
Configure Workflow Notifications |
Testing your Workflow
Once your workflow build is complete, it's recommended to test it. Try out all possible paths a card could take to make sure the logic works correctly and nothing has been missed. Ensure each step behaves as expected, based on the rules you've set.
It can be useful to involve multiple stakeholders in testing, especially those who will be using the workflow. They can confirm they can view and submit the correct information, helping identify any gaps.
Use the checklist to help with your test cases:
- Can a card move from one end of your workflow to the other, following all transitional logic?
- Could each team see the specific information they required?
- Were emails sent accordingly?
- Were any contract/vendor records created correctly?
- Are the correct approvers/owners assigned to each phase?
- Do auto-actions include all appropriate fields?
Testing Feedback
From testing, teams will likely have feedback to provide on the process, requiring amendments to the workflow build:
- Minor changes: These are changes that do not require a change in or addition to logic, for example adding missing data fields to the form, changing the ownership of a phase, adding fields to auto-actions, or changing email notifications. Minor changes can be rectified within the workflow immediately.
- Major changes: These are changes to logic or the flow of the workflow. If major changes are required, Gatekeeper recommends going back to the Process Flow Diagram step and refining your process on paper before editing the workflow. This ensures that documentation stays up to date and that no piece of logic is missed.
Sign-Off
Once the workflow has been completed, and all testing has passed, the workflow can be signed off in preparation for Go-Live.
Go-Live
Once testing is complete and the workflow has been approved, you’re ready to Go-Live. Gatekeeper recommends choosing one of the following approaches:
- Soft Rollout: Use the workflow in a live environment with a small group of key users or a limited number of cards. This allows you to monitor performance and make adjustments before wider adoption.
- Full Launch: Deploy the workflow across the full user base and all applicable cards, using it in its complete, intended capacity.