
![]() Estimated Read Time: 5 Minutes
Estimated Read Time: 5 Minutes
Sections in this article:
- Navigate to User Management
- Add Users to Gatekeeper
- Edit Existing Users
- Revoke User Access
- Delegate Workflow Card Ownership
It's recommended to understand the User Management Definitions before managing users.
Navigate to User Management
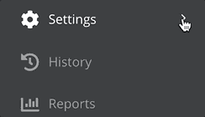
To access user management, expand the Settings option in the navigation menu, then click Users.
Note: Users require the Administrator role and the Users additional permission to access this area.
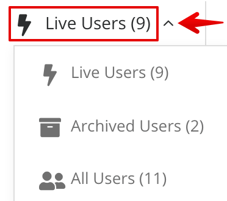
Filter by Status
Only Live Users will be listed by default. To amend this, expand the status filter and select the relevant option, for example Archived Users.
Search Users
Use the search to locate specific users. Enter a full or partial term for the user's name or email address. Click the x icon next to your search term to clear the filter once finished.

Configure Columns
Click the Configure Columns icon to adjust your User Management view.

Select the relevant checkboxes to display columns, then reorder the columns by dragging and dropping them into the desired position. Gatekeeper will remember your selections the next time you navigate to the User Management area.

Click Reset to restore the default view.
Add Users to Gatekeeper
There are two ways to add users in Gatekeeper:
- Add User (recommended for adding a single or small number of users)
- Bulk Import (recommended for adding many new Users)
Click Add then select the appropriate option.

Edit Existing Users
You can continue to make changes to users after creating their account. To edit existing users, expand the 3 dots on the relevant row, then select Edit.

Note:
- If the user's email exists in multiple Gatekeeper tenants, then the email address will be locked for editing. An administrator with the appropriate permissions will need to archive one of the user's accounts first in order to update it (see Dealing with Leavers and Movers for further details).
- If an employee has been granted access to Gatekeeper with an administrator, collaborator, or custom RBAC role, they cannot then be downgraded to an Employee Portal Only user.
Revoke User Access
To revoke a user's access to Gatekeeper:
- Expand the 3 dots on the relevant row, then select Edit.
- Select the Revoke Access to Gatekeeper checkbox.
- Click Save.

For details on archiving and restoring users, see Dealing with Leavers and Movers.
Delegate Workflow Card Ownership
Workflow Delegation allows workflow cards to be assigned to an alternative user for a set period of time, after which time the ownership is returned as before.
This temporary transfer of ownership also grants the necessary permissions to the new owner so that they can perform the tasks just as the original owner would.
If you want the delegation to work 'indefinitely', it's recommended to set the end date to many years in the future:

Set up a Delegation for Yourself
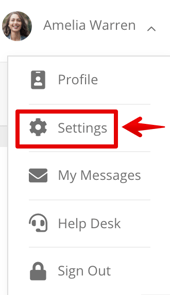
- Click your name in the top right of Gatekeeper to expand the profile menu, then click Settings.
- Scroll to Workflow Management and click Create Delegation on the relevant workflow.

- Select the user to delegate responsibility to, then enter the dates you want this delegation to be active.
- If required, enter some Instructions then click Create.
- Repeat Steps 2 - 4 until all the Workflows you need to delegate are reassigned.
These instructions entered will appear in the Gatekeeper notification the delegated user receives:

Create Delegations for Other Users
Users require the Administrator role and the Users additional permission to delegate workflow activities for others. To create delegations for other users:
- From the navigation menu, expand the Settings option then click Users.
- Click on a user's name. (Do not click Edit from the 3 dots).
- Scroll to Workflow Management and click Create Delegation on the relevant workflow.
- Select the user to delegate responsibility to, then enter the dates you want this delegation to be active.
- If required, enter some Instructions then click Create.
- Repeat steps 3 - 5 until all the workflows you need to delegate are reassigned.